Another way to extend our Zabbix server to do some checks is by making use of Secure Shell (SSH). SSH checks will be launched from the server with the need of a Zabbix Agent.
For this example, we just need a Zabbix server properly configured and a host that we can use to connect to by making use of SSH.
When you log in with SSH, you have to provide a username and a password in Zabbix to log in to the host that we want to monitor. This must be done in the GUI in plain text. An alternative to this is the use of SSH keys.
- The first thing we have to do in the
Zabbix_server.conffile is to look for the optionSSHKeyLocationand enable it and add a path for the location of our SSH key files. Add the following line to theconfigfile.SSHKeyLocation=/home/zabbix/.ssh
- First edit the
/etc/passwdfile and give a home folder to the userzabbix:zabbix:x:500:500::/home/zabbix:/sbin/nologin
- Next, create the directory on the server. This can be done by running the following command:
# mkdir -p /home/zabbix/.ssh - Next, give the correct rights to the folders and sub-folders:
# chown -R zabbix:zabbix /home/zabbix/ - Now restart the Zabbix server so that the new configuration is loaded:
# service zabbix-server restartFor RHEL 7:
# systemctl restart zabbix-server - Now we can create a new pair of SSH keys for Zabbix:
# sudo -u zabbix ssh-keygen -t rsa -b 2048 - When the
keygenoption asks you for a pass-phrase, you can just press enter for none. - Now copy our key to the host that we want to monitor (this has to be done for every host we want to monitor if making use of SSH).
# sudo -u zabbix ssh-copy-id root@<host ip>
The authenticity of host '192.168.10.102 (192.168.10.102)' can't be established.
RSA key fingerprint is 2f:83:7f:0e:4b:bd:1b:6c:b7:b7:c4:69:f6:99:10:71.
Are you sure you want to continue connecting (yes/no)? yes
Warning: Permanently added '192.168.10.102' (RSA) to the list of known hosts.
[email protected]'s password:
Now try logging into the machine, with "ssh '[email protected]'", and check in:

  .ssh/authorized_keys

to make sure we haven't added extra keys that you weren't expecting.
- Now it should be possible to log in with our SSH key to the host without making use of a password:
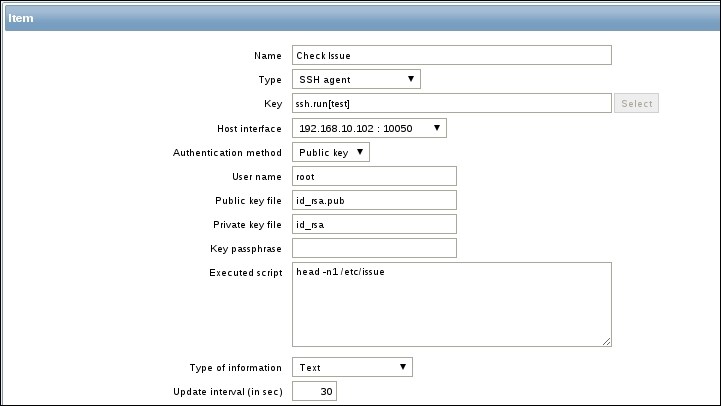
# sudo -u zabbix ssh root@<ip host> - If this works, we are ready to create our item. On our host, add an item and give it a Name.
- Next for Type select
SSH agent. - Replace the Key with
ssh.run[test]where test is just a unique name for our key. - As Authentication method we select
Public keyas we want to make use of our SSH key that we have created. - Since we copied our key to the host as user
root, we will addrootin the User name field. - In the box where we have to put Public key file, we add the name of our public key:
id_rsa.pub. - In the field for the Private key file, we put our private key :
id_rsa. - Next, we have a box Executed script; this box is the place where we can put the command that we want to launch on our host. For this example, we will put the next command to read the OS name from our host:
# head -n1 /etc/issue - The Type of information field can be
Textas we will get a string back from the host:
- Now save the item and go to Monitoring | Latest data to check your result:

Zabbix will be configured as a normal user, we will give Zabbix a home directory under /home/zabbix. Here we will install our SSH keys for the Zabbix user. In the zabbix_server.conf file we have to specify this location, so our server knows where to look.
Next, we have to create an item for SSH and this item has to know the name of our private and public SSH keys.
It's important that we log in the first time manually ourselves on all the hosts so that the key is accepted on all the machines. This way we are also sure that SSH passwordless login works.
Now when Zabbix wants to launch the command that we added in the script box, it will be launched as the user that we told Zabbix to use to log in on the remote host.
Make sure that port 22 is not blocked in your firewall. Normally RHEL and derivatives have port 22 standard open in the firewall. If you use SSH on another port than the standard port 22, you need to specify this in your key parameters. Example. ssh.run[<unique short description>,<ip>,<port>,<encoding>].
If you see messages in the log file like this:
<hostname> became not supported: Cannot obtain authentication methods: Would block requesting userauth list
Then you have to check your DNS. This is probably a problem of SSH doing a hostname look-up without success. It can be fixed easily by adding the correct entry in the DNS or host file of the Zabbix server.
It takes more time and resources to check SSH items than to check them by making use of the agent. So don't be too aggressive with the check interval of the item.
