
Zabbix offers a way to query any database using SQL queries. The result retrieved from the database is saved as the item value and can have, as usual, triggers associated with it. This functionality is useful in many applications. This gives you a way to monitor the user currently connected to a database, the number of users connected to your web portal, or simply retrieve metrics from the DBMS engine.
ODBC is a layer—a translation layer between Database Management Systems (DBMS) and the application. The application uses the ODBC function through the linked ODBC driver manager. The ODBC driver has been implemented and developed in concert with most of the DBMS vendors to enable their database to interoperate with this layer. The configuration file specifies the driver to load all the connection parameters for each Data Source Name (DSN), and all the DSNs are enumerated and defined inside this file. DSN also gives the functionality to present the entire database in a human-readable format. The DSN file needs to be protected. In the proposed setup, it is advisable to use a different Unix account for your Zabbix server, which will make things easy. As there is only one Zabbix server, the only user that needs to access this file is the Zabbix server user. This file should be owned by this user and made unreadable to others. DSNs are contained in the odbc.ini file in the ect folder. This file will contain all the DSNs for all the different databases to which we want to connect. Take care to protect this file, and prevent other people from accessing this file because it can contain passwords.
There are two open source versions of ODBC available—unixODBC and iODBC. Zabbix can use both of them, but before you can use them, the first thing to do is enable Zabbix to use ODBC and install the unixODBC layer. There are two ways to do that: one is with the package manager, and the other one is to go through the old way of downloading and compiling it from the source (currently, the latest stable version is 2.3.2):
$ wget ftp://ftp.unixodbc.org/pub/unixODBC/unixODBC-2.3.2.tar.gz
$ tar zxvf unixODBC-2.3.2.tar.gz
$ cd unixODBC-2.3.2
$ ./configure --prefix=/usr --sysconfdir=/etc
$ make
$ make install
The default locations are /usr/bin for binary and /usr/lib or /usr/lib64 for libraries depending on the version you have installed.
If you're looking to install unixODBC via the package manager, you need to run the following command from root:
$ yum -y install unixODBC unixODBC-devel
unixODBC supports a wide and almost complete list of databases. Most of the following widely diffused databases are supported:
- MySQL
- PostgreSQL
- Oracle
- DB2
- Sybase
- Microsoft SQL Server (via FreeTDS)
Note
The complete list of databases supported by unixODBC is available at http://www.unixodbc.org/drivers.html.
Now, if you have previously installed unixODBC via the package manager, you can follow the same procedure, for example, on Red Hat with the following command:
$ yum install mysql-connector-odbc
Otherwise, they are also available as a packet; you only need to download the package, for example, mysql-connector-odbc-5.1.13-linux-glibc2.5-x86-64bit.tar.gz.
Then, decompress the package and copy the contents in the /usr/lib/odbc and /usr/lib64/odbc/ directories as follows:
$ tar xzf mysql-connector-odbc-5.1.13-linux-glibc2.5-x86-64bit.tar.gz
$ mkdir /usr/lib64/odbc/
$ cp /usr/src/ mysql-connector-odbc-5.1.13-linux-glibc2.5-x86-64bit/lib/* /usr/lib64/odbc/
Now you can check whether all the needed libraries are present on your system using the ldd command.
This can be done on a 32-bit system with the following command:
$ ldd /usr/lib /libmyodbc5.so
This can be done on a 64-bit system using the following command:
$ ldd /usr/lib64 /libmyodbc5.so
If nothing is marked as Not Found, this means that all the needed libraries are found and you can go ahead; otherwise, you need to check what is missing and fix it.
All the installed ODBC database drivers are listed in /etc/obcinst.ini; this file, for MySQL 5, should contain the following:
[mysql]
Description = ODBC for MySQL
Driver      = /usr/lib /libmyodbc5.so
Setup       = /usr/lib/libodbcmyS.so
A 64-bit system should contain the following:
[mysql]
Description = ODBC for MySQL
Driver64        = /usr/lib64/libmyodbc5.so
Setup64         = /usr/lib64/libodbcmyS.so
Note
For all the available ODBC options, refer to the official documentation available at http://dev.mysql.com/doc/refman/5.1/en/connector-odbc-info.html.
Data sources are defined in the odnc.ini file. You need to create a file with the following content:
[mysql-test]
# This is the driver name as specified on odbcinst.ini
Driver = MySQL5
Description = Connector ODBC MySQL5
Database = <db-name-here>
USER= <user-name-here>
Password = <database-password-here>
SERVER = <ip-address-here>
PORT = 3306
In order to access a PostgreSQL database via ODBC, you need to install the appropriate drivers. They will be used by the Zabbix server to send the queries to any PostgreSQL database via the ODBC protocol.
The official ODBC drivers for PostgreSQL are available at http://www.postgresql.org/ftp/odbc/versions/src/.
Perform the following steps to work with the PostgreSQL database:
- You can download, compile, and install the psqlODBC driver with the following commands:
$ tar -zxvf psqlodbc-xx.xx.xxxx.tar.gz
$ cd psqlodbc-xx.xx.xxxx
$ ./configure
$ make
$ make install
- The configuring script accepts different options; some of the most important ones are as follows:
--with-libpq=DIR postgresql path
--with-unixodbc=DIR path or direct odbc_config file (default:yes)
--enable-pthreads= thread-safe driver when available (not on all platforms)
- Alternatively, you can even choose the rpm packages here and then run the following command:
$ yum install postgresql-odbc - Having compiled and installed the ODBC driver, you can create the
/etc/obcinst.inifile, or if you have installed the rpm, just check that the file exists with the following content:[PostgreSQL] Description = PostgreSQL driver for Linux Driver = /usr/local/lib/libodbcpsql.so Setup = /usr/local/lib/libodbcpsqlS.so Driver64 = /usr/lib64/psqlodbc.so Setup64 = /usr/lib64/libodbcpsqlS.so
- Now,
odbcinstcan be invoked by passing your template to that command.$ odbcinst -i -d -f template_filepsql - As the psqlODBC driver supports threads, you can alter the thread serialization level for each driver entry. So, for instance, the content of
odbcinst.iniwill be as follows:[PostgreSQL] Description = PostgreSQL driver for Linux Driver = /usr/local/lib/libodbcpsql.so Setup = /usr/local/lib/libodbcpsqlS.so Threading = 2
- Now you need to configure the
odbc.inifile. You can also useodbcinsthere, providing a template or simply a text editor, as follows:$ odbcinst -i -s -f template_file - You should have inside your
odbc.inifile something similar to the following:[PostgreSQL] Description = Postgres to test Driver = /usr/local/lib/libodbcpsql.so Trace = Yes TraceFile = sql.log Database = <database-name-here> Servername = <server-name-or-ip-here> UserName = <username> Password = <password> Port = 5432 Protocol = 6.4 ReadOnly = No RowVersioning = No ShowSystemTables = No ShowOidColumn = No FakeOidIndex = No ConnSettings =
Oracle is another widely used database and provides an ODBC driver as well. The following is a description of how to install Oracle's ODBC because at http://www.unixodbc.org, there isn't much information about it.
- The first thing to do is get the instant client from the Oracle website. Oracle provides some of the instant client packets as
rpmandtar.gz, as shown in the following commands:$ rpm –I oracle-instantclient11.2-basic-11.2.0.1.0-1.i386.rpm oracle-instantclient11.2-odbc-11.2.0.1.0-1.i386.rpm oracle-instantclient11.2-sqlplus-11.2.0.1.0-1.i386.rpm - Then, you need to configure some environment variables as follows:
$ export ORACLE_HOME=/usr/lib/oracle/11.2/client
$ export ORACLE_HOME_LISTNER=/usr/lib/oracle/11.2/client/bin
$ export LD_LIBRARY_PATH=$LD_LIBRARY_PATH :/usr/lib/oracle/11.2/client/lib
$ export SQLPATH=/usr/lib/oracle/11.2/client/lib
$ export TNS_ADMIN=/usr/lib/oracle/11.2/client/bin
- Now, you need to configure the
/etc/odbcinst.inifile. This file should have the following content:[Oracle11g] Description = Oracle ODBC driver for Oracle 11g Driver = /usr/lib/oracle/11.2/client/lib/libsqora.so.11.1
- In the
odbc.inifile, the relative DSN entry needs to be configured as follows:[ORCLTEST] Driver = Oracle 11g ODBC driver ServerName = <enter-ip-address-here> Database = <enter-sid-here> DSN = ORCLTEST Port = 1521
- You can test the connection as usual with the following command:
$ isql -v ORCLTEST
+---------------------------------------+
| Connected!                            |
|                                       |
| sql-statement                         |
| help [tablename]                      |
| quit                                  |
+---------------------------------------+
- Now your ODBC connection is fine.
Now, you are enabled to connect to most of the common databases. To check the connection, you can test it using isql, as follows:
- If you didn't specify the username and password inside the
odbc.inifile, it can be passed to the DSN with the following syntax:$ isql <DSN> <user> <password> - Otherwise, if everything is specified, you can simply check the connection with the following command:
$ isql mysql-test - If all goes well, you should see the following output:
+---------------------------------------+
| Connected!                            |
|                                       |
| sql-statement                         |
| help [tablename]                      |
| quit                                  |
|                                       |
+---------------------------------------+
SQL>
Note
If you get an error from unixODBC, such as
Data source name not found and no default driver specified, make sure that theODBCINIandODBCSYSINIenvironment variables are pointing to the rightodbc.inifile. For example, if yourodbc.inifile is in/usr/local/etc, the environments should be set as follows:export ODBCINI=/usr/local/etc/odbc.ini export ODBCSYSINI=/usr/local/etc
- If a DSN is presenting issues, the following command can be useful:
$ isql -v <DSN>
This enables the verbose mode, which is very useful to debug a connection.
A good thing to know is that /etc/obcinst.ini is a common file, hence you'll have all your unixODBC entries there.
Now if you connect to the target database that is to be monitored, it is time to compile the Zabbix server with ODBC support by performing the following steps:
- Now you can get the
configurecommand line with all the options used as specified in Chapter 1, Deploying Zabbix, by adding the--with-unixodbcparameter as follows:$ ./configure --enable-server -–with-postgresql --with-net-snmp --with-libcurl --enable-ipv6 --with-openipmi --enable-agent --with-unixodbc - You should see the following between the output lines:
checking for odbc_config... /usr/local/bin/odbc_config
checking for main in -lodbc... yes
checking whether unixodbc is usable... yes
- This will confirm that all the needed ODBC binaries are found and are usable. Once the configuring phase is completed, you can run the following command:
$ make - Once this is completed, just take a backup of the previous
zabbix_serverfile that was installed, and copy the new version. - On starting
zabbix_server, take a look into the log file, and you should see the following output:****** Enabled features ****** SNMP monitoring: YES IPMI monitoring: YES WEB monitoring: YES Jabber notifications: YES Ez Texting notifications: YES ODBC: YES SSH2 support: YES IPv6 support: YES ******************************
This means that all went fine.
Now it is time to use the Zabbix ODBC functionality. In order to do so, you need to create an item of the Database monitor type, as shown in the following screenshot:
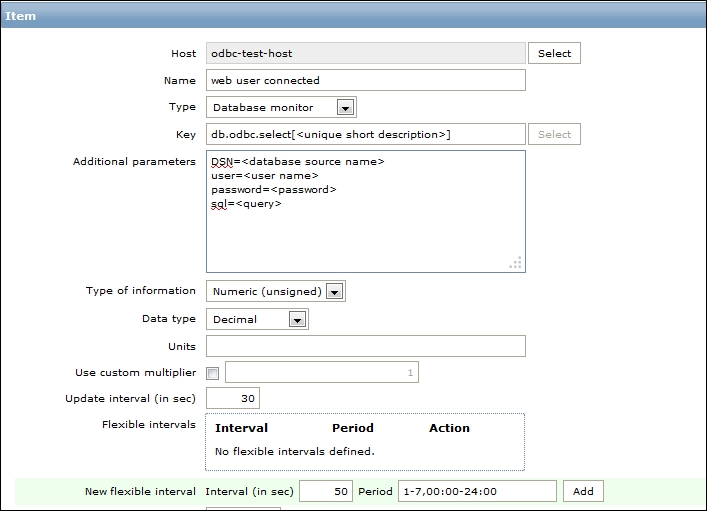
The item where the retrieved value will be stored is identified by the item key as follows:
db.odbc.select[<unique short description>]
<unique short description> is a string that must be unique and can be whatever you want. An example is as follows:
db.odbc.select[web_user_connected_on_myapp]
Inside the Additional parameters field, you need to specify the following:
DSN=<database source name>
user=<user name>
password=<password>
sql=<query>
Where the DSN should exist in /etc/odbc.ini and whether the username and password are stored in the DSN definition or not can be specified here. In the last line, you need to specify the SQL query.
The following are some restrictions to the use of, and things to consider about, a SQL query:
- The SQL must begin with a select clause
- The SQL can't contain any line breaks
- The query must return only one value
- If the query returns multiple columns, only the first one is read
- If the query returns multiple rows, only the first column of the first row is read
- Macros are not to be replaced (for example,
{HOSTNAME}) - The SQL command must begin with lowercase, that is,
sql= - The query needs to terminate before the timeout
- The query must return exactly the value type specified; otherwise, the item will be unsupported
As you can see, there are only some limitations that you can accept. In particular, you can't call a function if that function returns only one value. You can't execute a stored procedure; you can only select the data. Also, the query can't contain any line breaks, so long and complex queries will not be easily readable.
The following are some other points to consider:
- If the database is particularly loaded, it can respond with a delay (the login can also suffer a delay caused by the workload)
- Every query executes a login
- If the database is listening on
127.0.0.1, the connection can have issues - If you use proxies, they too need to be compiled with the unixODBC support
If you consider a database that will be under heavy stress, don't have a pool introduced for an overhead that is not necessary. Also, in this case, it is possible that just to have a connection, you need to wait for more than 5 seconds.
The 5 seconds mentioned previously is not a random value; indeed, the timeout of a connection is defined when you open a connection. During the initialization of that, you need to define your expected timeout before considering the connection impossible.
Zabbix defines this timeout in the following command:
src/libs/zbxdbhigh/odbc.c
On line 130 of the file, we have the definition of the connection timeout for Zabbix as follows:
SQLSetConnectAttr(pdbh->hdbc, (SQLINTEGER)SQL_LOGIN_TIMEOUT,
  (SQLPOINTER)5, (SQLINTEGER)0);
This (SQLPOINTER)5 sets SQL_LOGIN_TIMEOUT to 5 seconds. If your database doesn't respond in 5 seconds, you will get the following error inside the log file:
[ODBC 3.51 Driver]Can't connect to MySQL server on 'XXX.XXX.XXX.XXX' (4)] (2003).