 Configuring network discovery
by Andrea Vacche, Patrik Uytterhoeven, Rihards Olups
Zabbix: Enterprise Network Monitoring Made Easy
Configuring network discovery
by Andrea Vacche, Patrik Uytterhoeven, Rihards Olups
Zabbix: Enterprise Network Monitoring Made Easy
- Zabbix: Enterprise Network Monitoring Made Easy
- Table of Contents
- Zabbix: Enterprise Network Monitoring Made Easy
- Zabbix: Enterprise Network Monitoring Made Easy
- Credits
- Preface
- I. Module 1
- 1. Getting Started with Zabbix
- The first steps in monitoring
- Zabbix features and architecture
- Installation
- Summary
- 2. Getting Your First Notification
- 3. Monitoring with Zabbix Agents and Basic Protocols
- 4. Monitoring SNMP Devices
- 5. Managing Hosts, Users, and Permissions
- 6. Detecting Problems with Triggers
- 7. Acting upon Monitored Conditions
- 8. Simplifying Complex Configurations with Templates
- 9. Visualizing Data with Graphs and Maps
- 10. Visualizing Data with Screens and Slideshows
- 11. Advanced Item Monitoring
- 12. Automating Configuration
- 13. Monitoring Web Pages
- 14. Monitoring Windows
- 15. High-Level Business Service Monitoring
- 16. Monitoring IPMI Devices
- 17. Monitoring Java Applications
- 18. Monitoring VMware
- 19. Using Proxies to Monitor Remote Locations
- 20. Encrypting Zabbix Traffic
- 21. Working Closely with Data
- 22. Zabbix Maintenance
- A. Troubleshooting
- B. Being Part of the Community
- 1. Getting Started with Zabbix
- II. Module 2
- 1. Zabbix Configuration
- 2. Getting Around in Zabbix
- 3. Groups, Users, and Permissions
- 4. Monitoring with Zabbix
- Introduction
- Active agents
- Passive agents
- Extending agents
- SNMP checks
- Internal checks
- Zabbix trapper
- IPMI checks
- JMX checks
- Aggregate checks
- External checks
- Database monitoring
- Checks with SSH
- Checks with Telnet
- Calculated checks
- Building web scenarios
- Monitoring web scenarios
- Some advanced monitoring tricks
- Autoinventory
- 5. Testing with Triggers in Zabbix
- 6. Working with Templates
- 7. Data Visualization and Reporting in Zabbix
- 8. Monitoring VMware and Proxies
- 9. Autodiscovery
- 10. Zabbix Maintenance and API
- C. Upgrading and Troubleshooting Zabbix
- III. Module 3
- 1. Deploying Zabbix
- 2. Distributed Monitoring
- 3. High Availability and Failover
- Understanding high availability
- Understanding the levels of IT service
- Some considerations about high availability
- Implementing high availability on a web server
- Configuring the Zabbix server for high availability
- Implementing high availability for a database
- Summary
- 4. Collecting Data
- 5. Visualizing Data
- 6. Managing Alerts
- 7. Managing Templates
- 8. Handling External Scripts
- 9. Extending Zabbix
- 10. Integrating Zabbix
- D. Bibliography
- Index
When we want to do some automation in our network, the first thing that we have to do is the configuration of the network discovery tool in Zabbix. This way we can detect devices in our network based on some pre-defined settings such as devices with certain services active, pingable, and so on. In this recipe, we will show you how to configure the network discovery tool. Later we will show you how to automate things based on the discovery tool.
For this recipe to work, we need a Zabbix server with an administrator account or a super admin account.
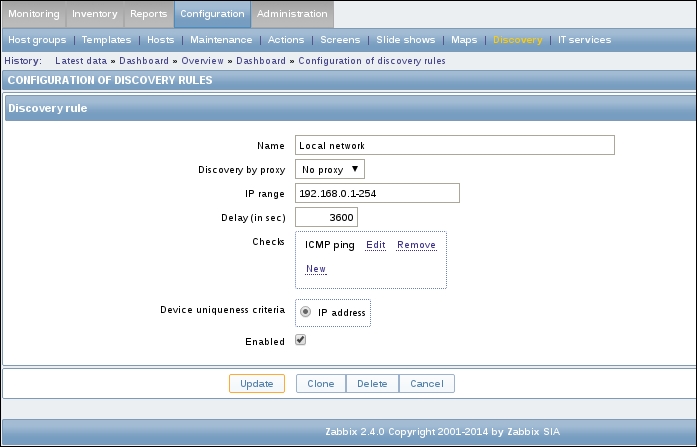
- Go in the Zabbix menu to Configuration | Discovery.
- Click Create discovery rule or edit the existing one.
- Give a Name, for example, the name of your network (LAN, DMZ, MGMT).
- In the Discovered by proxy box, you can select if you would like the discovery to be done by a proxy.
- In the box IP range, we have to put the range of the network that we would like to scan. We can make use of a CIDR notation here such as
192.168.0.1/24, or just as in the example define the range such as192.168.0.1–254or we can just add a single IP. - The delay is defined in seconds in the box Delay (in sec) and is the number of seconds Zabbix will initiate a new scan after the first scan is finished.
- In the box Checks, we can define certain checks that Zabbix will use for the discovery of the devices on the network.
- The Device uniqueness criteria box is where we can select how to make sure we will not have one device multiple times in our discovery list.
- Enabled will activate our discovery rule or keep it disabled.
- Once you update the details, click on Update to update the rule. Also, in case you have similar rule, then you can use the Clone option to clone and change IP range or other details accordingly.
When creating a discovery rule, Zabbix will scan the network range given in our configuration for hosts that can be reached based on our checks that we have defined. For this to work, you need to make sure that the subnet is reachable by Zabbix as the Zabbix server obviously cannot route to networks by itself.
Once a device is discovered, Zabbix will create an event. You can go to Monitoring | Events and select Discovery from the dropdown box under Source on the top right.
Since Zabbix 2.2.0, the hosts discovered by different proxies are always treated as different hosts. Discovery will not do much by itself and you would probably want to create some actions later based on the discovery rules you made. It's probably best to keep your discovery rules disabled until your action is created, as actions will be launched once events are generated.
Zabbix will periodically scan the IP ranges that were defined in network discovery rules. The frequency at which Zabbix does this is configurable for each rule individually. However every rule will only use one process.
Remember that the delay in seconds is the amount of time Zabbix will wait to start the next scan once the first scan is finished. This way, you will not initiate too much unneeded traffic on your network.
-
No Comment