
An even more useful and important feature of Zabbix templates is their ability to support special kinds of items, which are called low-level discovery rules. Once applied to actual hosts, these rules will query the host for whatever kind of resources they are configured to look for: filesystems, network interfaces, SNMP OIDs, and more. For every resource found, the server will then dynamically create items, triggers, and graphs according to special entity prototypes connected to the discovery rules.
The great advantage of low-level discovery rules is that they take care of the more variable parts of a monitored host, such as the type and number of network interfaces, in a dynamic and general way. This means that, instead of manually creating specific items and triggers of every host's network interfaces or filesystems or creating huge templates with any possible kind of item for a particular operating system and keeping most of these items disabled, you can have a reasonable number of general templates that will adapt themselves to the specifics of any given host by creating on the fly any entity needed based on discovered resources and previously configured prototypes.
Out of the box, Zabbix supports four discovery rules:
As discovery rules are effectively a special kind of item, you can create your own rules, provided you understand their peculiarity compared to regular items.
If we don't consider the fact that you need to create and manage low-level discovery rules in the Discovery rules section of the template configuration and not in the usual Items section, the main difference between the two kinds of items is that while a regular item usually returns a single value, as explained in Chapter 4, Collecting Data, a discovery item always returns a list of macro/value pairs expressed in JSON. This list represents all the resources found by the discovery items together with the means to reference them.
The following table shows Zabbix's supported discovery items and their return values together with a generalization that should give you an idea on how to create your own rules:
|
Discovery item key |
Item type |
Return values |
|---|---|---|
vfs.fs.discovery |
Zabbix agent |
{"data": [
{"{#FSNAME}":<path>",  "{#FSTYPE}":"<fstype>"},
{"{#FSNAME}":<path>",  "{#FSTYPE}":"<fstype>"},
{"{#FSNAME}":<path>",  "{#FSTYPE}":"<fstype>"},
…
] } |
net.if.discovery |
Zabbix agent |
{"data":[
{"{#IFNAME}":"<name>"},
{"{#IFNAME}":"<name>"},
{"{#IFNAME}":"<name>"},
…
]} |
system.cpu.discovery |
Zabbix agent |
{"data": [
{"{#CPU.NUMBER}":"<idx>",  "{#CPU.STATUS}":"<value>"},
{"{#CPU.NUMBER}":"<idx>",  "{#CPU.STATUS}":"<value>"},
{"{#CPU.NUMBER}":"<idx>",  "{#CPU.STATUS}":"<value>"},
…
] } |
snmp.discovery |
SNMP (v1, v2, or v3) agent |
{"data":[
{"{#SNMPINDEX}":"<idx>", "{#SNMPVALUE}":"<value>},
{"{#SNMPINDEX}":"<idx>", "{#SNMPVALUE}":"<value>},
{"{#SNMPINDEX}":"<idx>", "{#SNMPVALUE}":"<value>},
…
]} |
custom.discovery |
Any |
{"data":[
{"{#CUSTOM1}":"<value>","{#CUSTOM2}":"<value>"},
{"{#CUSTOM1}":"<value>","{#CUSTOM2}":"<value>"},
{"{#CUSTOM1}":"<value>","{#CUSTOM2}":"<value>"},
…
]} |
Tip
As with all SNMP items, an item key is not really important as long as it is unique. It's the SNMP OID value that you ask an agent for that makes the difference; you can create different SNMP discovery rules that look for different kinds of resources by changing the item key and looking for different OID values. The custom discovery example is even more abstract as it will depend on the actual item type.
As you can see, a discovery item always returns a list of values, but the actual contents of the list change depending on what resources you are looking for. In the case of a filesystem, the returned list will contain values such as {#FSNAME}:/usr, {#FSTYPE}:btrfs, and so on, for every discovered filesystem. On the other hand, a network discovery rule will return a list of the names of the discovered network interfaces.
When configuring a template's discovery rules, you don't need to care about the actual values returned in such lists, nor the lists' length. The only thing you have to know is the name of the macros that you can reference in your prototypes. These are the second half of the mechanisms of low-level discovery. You create them as regular template entities, thus making sure that you use the discovery item macros where needed, as exemplified in the following screenshot:
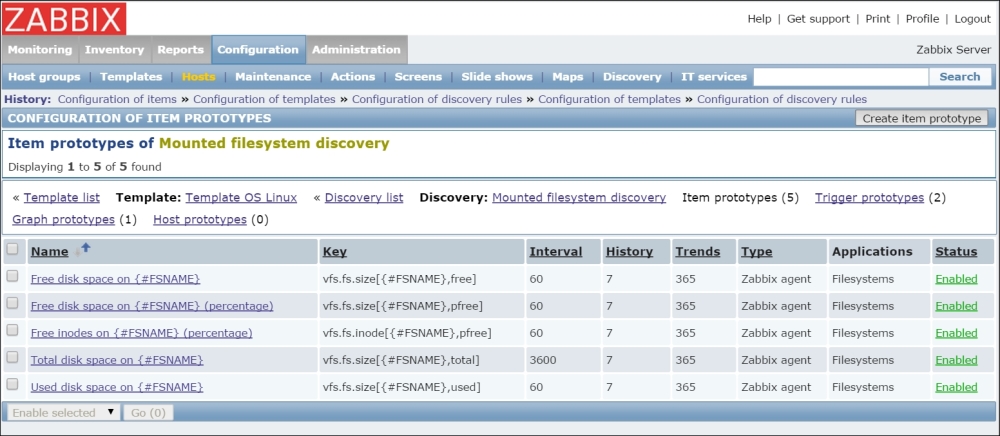
When you apply the template to a host, it will create items, triggers, and graphs based on the resources discovered by the discovery items and configured according to the discovery prototypes.
Custom discovery rules, from this point of view, work exactly in the same way as custom items whether you decide to use agent-side scripts (thereby using a custom zabbix.agent item key), external scripts, database queries, or anything else. The only things you have to make sure of is that your custom items' return values must respect the JSON syntax as shown in the preceding table and that you reference your custom macros in the entities' prototypes that you will create.
Now, let's see how you can create a custom script to implement simple, low-level discovery.
In this example, we're going to use low-level discovery to find all the hard disks connected to a physical server. First of all, here we require a script, and this script needs to be deployed to the agent side and, of course, needs to produce JSON-formatted output.
The shell script used in this example is the following:
#!/bin/bash
disks=`ls -l /dev/sd* | awk '{print $NF}' | sed 's/[0-9]//g' | uniq`
elementn=`echo $disks| wc -w`
echo "{"
echo ""data":["
i=1
for disk in $disks
do
if [ $i == $elementn ]
then
    echo "    {"{#DISKNAME}":"$disk","{#SHORTDISKNAME}":"${disk:5}"}"
else
    echo "    {"{#DISKNAME}":"$disk","{#SHORTDISKNAME}":"${disk:5}"},"
fi
i=$((i+1))
done
echo "]"
echo "}"
This script will produce the following JSON-formatted output:
{
"data":[
    {"{#DISKNAME}":"/dev/sda","{#SHORTDISKNAME}":"sda"},
    {"{#DISKNAME}":"/dev/sdb","{#SHORTDISKNAME}":"sdb"},
    {"{#DISKNAME}":"/dev/sdc","{#SHORTDISKNAME}":"sdc"},
   ...
]
}
Practically, the script lists all the sd<X> devices after taking care to remove the duplicates, if present, and even the partition.
To enable the script on the agent side, we need to change the zabbix_agentd.conf configuration file and add the following lines:
EnableRemoteCommands=1
UnsafeUserParameters=1
UserParameter=discovery.hard_disk,/<location-of-our-script>/discover_hdd.sh
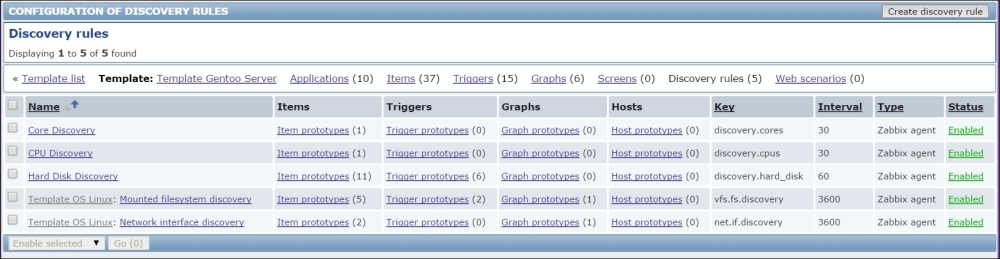
Of course, once done, we need to restart the Zabbix agent on the remote machine. Now it's time to define the discovery rule, as shown in the next screenshot:

Then, we need to define the item and trigger prototype based on #DISKNAME or #SHORTDISKNAME we've just found. A good example of an item prototype is the I/O currently in progress on our discovered hard disk. To acquire this metric, we can simply check /proc/diskstats:
$ grep sda /proc/diskstats |head -1 | awk '{print $12}'
19
And, as you can see, we get back the number of I/Os done at the moment.
Note
For greater detail about /proc/diskstats, refer to the official kernel documentation available at https://www.kernel.org/doc/Documentation/ABI/testing/procfs-diskstats.
You can see that there are quite a few interesting metrics that we can acquire and historicize for capacity planning and management. Then, we can register UserParameter in our Zabbix agent to retrieve those metrics. A good set of them can be:
UserParameter=custom.vfs.dev.read.ops[*],grep $1 /proc/diskstats | head -1 | awk '{print $$4}'
UserParameter=custom.vfs.dev.read.ms[*],grep $1 /proc/diskstats | head -1 | awk '{print $$7}'
UserParameter=custom.vfs.dev.write.ops[*],grep $1 /proc/diskstats |  head -1 | awk '{print $$8}'
UserParameter=custom.vfs.dev.write.ms[*],grep $1 /proc/diskstats |  head -1 | awk '{print $$11}'
UserParameter=custom.vfs.dev.io.active[*],grep $1 /proc/diskstats |  head -1 | awk '{print $$12}'
UserParameter=custom.vfs.dev.io.ms[*],grep $1 /proc/diskstats |  head -1 | awk '{print $$13}'
UserParameter=custom.vfs.dev.read.sectors[*],grep $1 /proc/diskstats |  head -1 | awk '{print $$6}'
UserParameter=custom.vfs.dev.write.sectors[*],grep $1 /proc/diskstats |  head -1 | awk '{print $$10}'
Once done, we need to restart the agent. We can now test the metric on the agent side itself with:
[root@ localhost ~]# zabbix_get -s 127.0.0.1 -k custom.vfs.dev.io.active[sda]
27
Now, let's define Item prototype using #SHORTDISKNAME, as shown in the next screenshot:
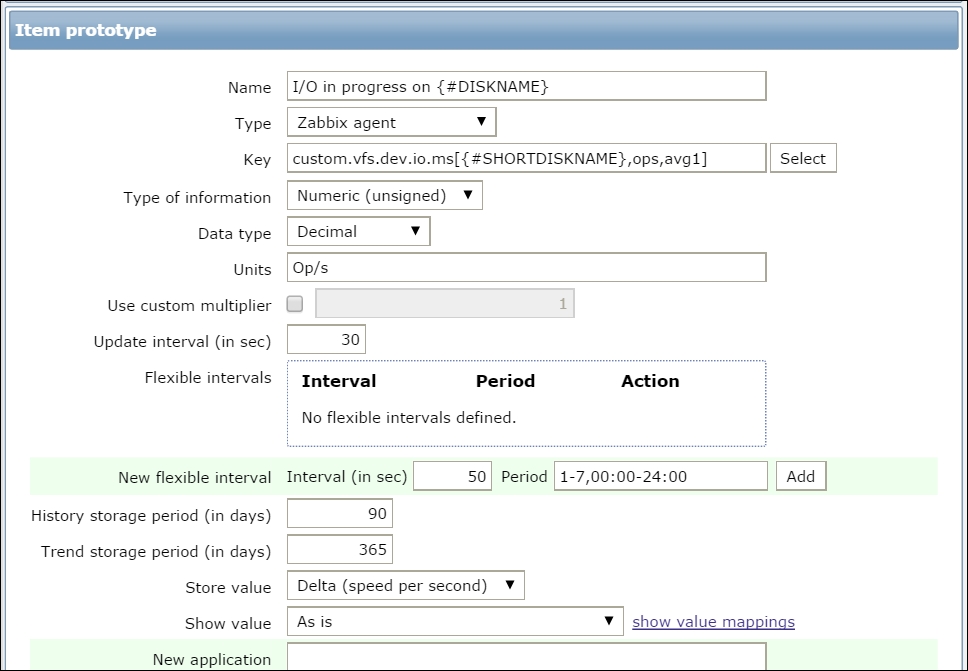
The {#SHORTDISKNAME} macro is used in the item's key, and, in the item's name, we're going to use {#DISKNAME}. Note that the $1 macro from the script references the first argument of the item's key. With the same process, we can create the prototype for all the other registered items. When you configure a template's discovery rules, there is no need to care about the actual values returned in their lists or about the list's length. The only thing that you have to know is the name of the macro that you can reference in your prototypes.
You can create them as regular template entities, such as Item prototype, Trigger prototype, Graph prototype, and Host prototype, making sure you use the discovery item macros where needed, and Zabbix will take care of the rest for you, by creating as many items as there are elements in the list returned by the discovery rule for each item prototype, as many triggers as there are elements in the list returned for each trigger prototype, and so on. The following screenshot shows this:
Host prototypes can be created with the low-level discovery rule, and then, when a server is discovered, the prototypes become real hosts. It is important to know that prototypes, before becoming discovered, cannot have their own items and triggers other than those from the linked templates. When a host is discovered, the hosts will belong to an existing host and will take the same IP of the existing host.