 The active agent auto-registration
by Andrea Vacche, Patrik Uytterhoeven, Rihards Olups
Zabbix: Enterprise Network Monitoring Made Easy
The active agent auto-registration
by Andrea Vacche, Patrik Uytterhoeven, Rihards Olups
Zabbix: Enterprise Network Monitoring Made Easy
- Zabbix: Enterprise Network Monitoring Made Easy
- Table of Contents
- Zabbix: Enterprise Network Monitoring Made Easy
- Zabbix: Enterprise Network Monitoring Made Easy
- Credits
- Preface
- I. Module 1
- 1. Getting Started with Zabbix
- The first steps in monitoring
- Zabbix features and architecture
- Installation
- Summary
- 2. Getting Your First Notification
- 3. Monitoring with Zabbix Agents and Basic Protocols
- 4. Monitoring SNMP Devices
- 5. Managing Hosts, Users, and Permissions
- 6. Detecting Problems with Triggers
- 7. Acting upon Monitored Conditions
- 8. Simplifying Complex Configurations with Templates
- 9. Visualizing Data with Graphs and Maps
- 10. Visualizing Data with Screens and Slideshows
- 11. Advanced Item Monitoring
- 12. Automating Configuration
- 13. Monitoring Web Pages
- 14. Monitoring Windows
- 15. High-Level Business Service Monitoring
- 16. Monitoring IPMI Devices
- 17. Monitoring Java Applications
- 18. Monitoring VMware
- 19. Using Proxies to Monitor Remote Locations
- 20. Encrypting Zabbix Traffic
- 21. Working Closely with Data
- 22. Zabbix Maintenance
- A. Troubleshooting
- B. Being Part of the Community
- 1. Getting Started with Zabbix
- II. Module 2
- 1. Zabbix Configuration
- 2. Getting Around in Zabbix
- 3. Groups, Users, and Permissions
- 4. Monitoring with Zabbix
- Introduction
- Active agents
- Passive agents
- Extending agents
- SNMP checks
- Internal checks
- Zabbix trapper
- IPMI checks
- JMX checks
- Aggregate checks
- External checks
- Database monitoring
- Checks with SSH
- Checks with Telnet
- Calculated checks
- Building web scenarios
- Monitoring web scenarios
- Some advanced monitoring tricks
- Autoinventory
- 5. Testing with Triggers in Zabbix
- 6. Working with Templates
- 7. Data Visualization and Reporting in Zabbix
- 8. Monitoring VMware and Proxies
- 9. Autodiscovery
- 10. Zabbix Maintenance and API
- C. Upgrading and Troubleshooting Zabbix
- III. Module 3
- 1. Deploying Zabbix
- 2. Distributed Monitoring
- 3. High Availability and Failover
- Understanding high availability
- Understanding the levels of IT service
- Some considerations about high availability
- Implementing high availability on a web server
- Configuring the Zabbix server for high availability
- Implementing high availability for a database
- Summary
- 4. Collecting Data
- 5. Visualizing Data
- 6. Managing Alerts
- 7. Managing Templates
- 8. Handling External Scripts
- 9. Extending Zabbix
- 10. Integrating Zabbix
- D. Bibliography
- Index
Starting with Zabbix 2.0, it is possible to instruct the active Zabbix agent for auto-registration. This way, new hosts can be added for monitoring without configuring them manually on the server. The auto-registration of an unknown host can be triggered when an active agent asks for checks. This feature can be precious to implement an automatic monitoring of new cloud nodes. When a new node in the cloud comes up, Zabbix will automatically start collecting performance metrics and checking the availability of the host.
The active agent auto-registration can also monitor hosts that have passive checks. When the active agent asks for checks, provide them to the Zabbix server's ListenIP and ListenPort configuration parameters defined in the agent configuration file.
On the server side, Zabbix uses the IP and port that has been received by the agent.
Let's see how we can configure this feature; we will look first at the agent side. On the agent side, you need to have the Server parameter specified within the agent configuration file. Then, if you've specified even the Hostname parameter in zabbix_agentd.conf, the server will use it to register the new monitored host; otherwise, Zabbix will use the physical hostname.
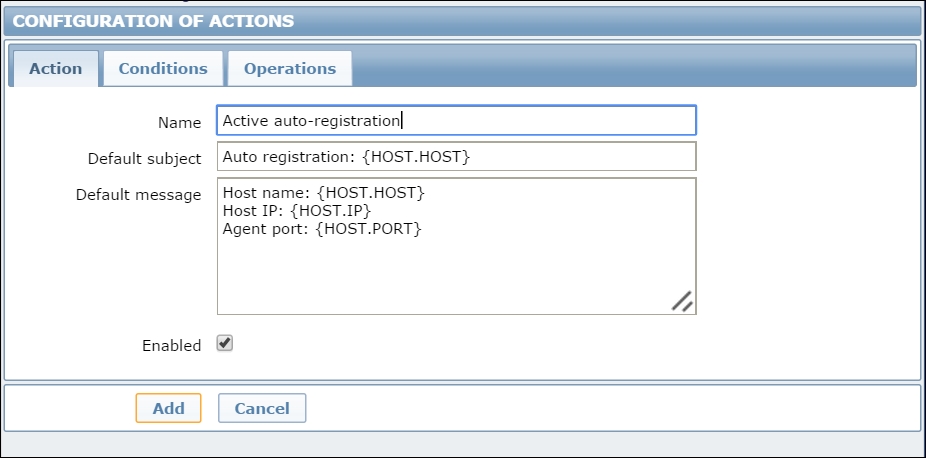
On the server side, we need to configure an action, select Configuration | Actions, select Auto registration as the event source, and then click on Create action. In the screenshot that follows, we've created an action named Active auto-registration:
Here, you can play as much as you want with automation. If the hosts that will be auto-registering are supposed to be only supported for active monitoring (for instance, hosts that are behind a firewall), then it is worth creating a specific template and linking it to the new hosts. Let's see how we can play with auto-registration.
Here, to customize properly and automate the host configuration, we can define HostMetadata and HostMetadataItem on the agent side. A good example to understand this automation can be the following scenario—we would like to link Template OS Linux to all the auto-registered Linux hosts.
To do this, we need to add the following value to the /etc/zabbix/zabbix_agentd.conf agent configuration file:
HostMetadataItem=system.uname
Then, in our real-world scenario, HostMetadataItem will contain:
Linux servername.example.com 2.6.32-504.16.2.el6.x86_64 #1 SMP Wed Apr 22 06:48:29 UTC 2015 x86_64 x86_64 x86_64 GNU/Linux
Then, on the frontend, our action will be configured as follows:
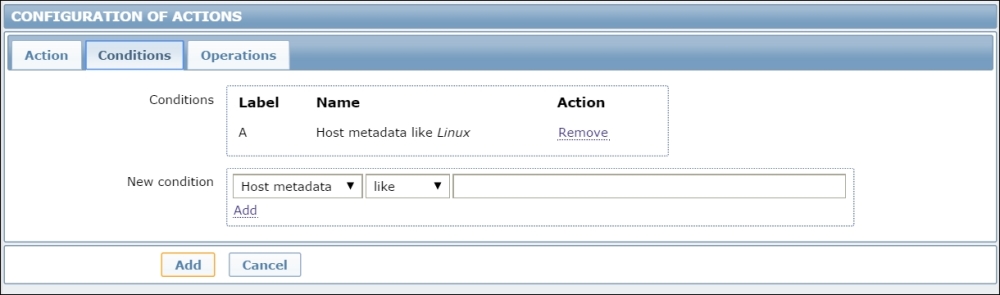
With Conditions such as Host metadata like Linux, the Operations tab will contain the elements shown in the following screenshot:
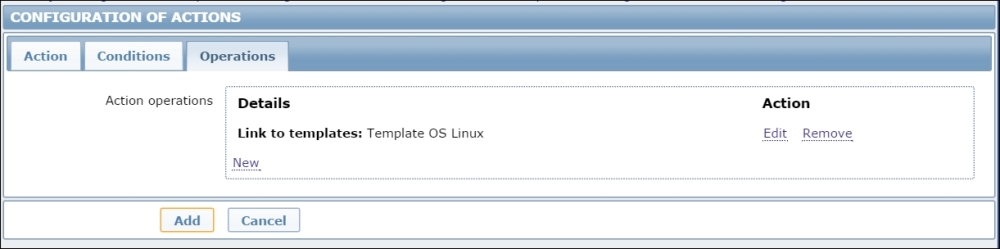
As you can see, once all the Conditions of the relative tab are satisfied, the Operation tab will link the host to Template OS Linux.
Now, as you can see, if we package the agent with the configuration file premade, we can heavily reduce the startup time of new hosts.
-
No Comment