
The first step in server-side attacks is information gathering. Information gathering is very important because it will show us the operating system of the target, the installed programs, the running services on the target, and the ports associated with these services. From these installed services, we can try and get into the system. We can do this by trying the default passwords. We saw this in the network penetration testing part where the iPad had an SSH service installed that basically gave us full access to the computer if the person still uses the default password, which was alpine. We can do this with any other service, and we will do so further in this section.
There's a lot of people that install services and misconfigure them, so we'll have another example of this as well. Sometimes, a lot of these services are designed to give someone remote access to that computer, but they obviously need to have some security implementations. People often misconfigure these services, so we can take advantage of these misconfigurations and gain access to these computers. Another problem with these services is that some of them might even have backdoors, and we'll see an example of that too. A lot of them will have vulnerabilities, such as remote buffer overflows or code execution vulnerabilities, and this will allow us to gain full access to the computer.
The simplest way of doing this is something that we've seen before: Zenmap. We use Zenmap with the IP. We get a list of all of these services, and then Google each one of them to see if they contain any vulnerabilities. We've seen how we can use Zenmap in previous chapters, but we just want to convey the idea that anything is a computer. We've seen before how the Metasploitable device is actually a website. It has a web server running; websites are no different than this. If we want to get the IP of a website, all we have to do is ping. For example, if we're targeting Facebook, we have to ping facebook.com, and we'll get their IP. We will have Facebook's IP and we'll be able to run Zenmap against it and get a list of all the running services on Facebook. Now, obviously we are not going to do that because we are not allowed to do that. What we are going to do is run Zenmap against this Metasploitable device, which basically is a computer device, and that's what we're interested in testing.
We going to run Zenmap in the same way that we did before. We will go to Activities. We are just going to look for Zenmap and open it. Now we are going to enter the IP of our target, of the Metasploitable device, which was 10.0.2.4 in our example. Remember that in Chapter 4, Network Penetration Testing we used to put the base IP and put it over 24 to cover all the IPs around us in the network. In this case, you might be testing a remote IP. For example, in the case of Facebook, all you have to do is just put the Facebook target IP in there and test it. But since we don't have permission to do so, we are not going to do that. We do have permission to test our own device, though, which is installed on the same network as us, so that's why we will be putting in that IP. We can literally put any IP we want in there and test it. We are going to use Scan, and this will give us a list of all the installed applications as shown in the following screenshot:

Once the scan is finished, we will have a lot of open ports and a lot of services. It is advisable that we go on the Nmap Output tab, check port by port, read what the services are, and Google the names of the services. For example, we have port 21 in the following screenshot, which is an FTP port. FTP is a service that's installed to allow people to upload or download files from the remote server. FTP services usually use a username and a password, but we can see that this service has been misconfigured and it allows an anonymous FTP login. Unlike the SSH that we used before in the network penetration testing, we can use the default password. With this we will be able to log in without a password, note the next screenshot:
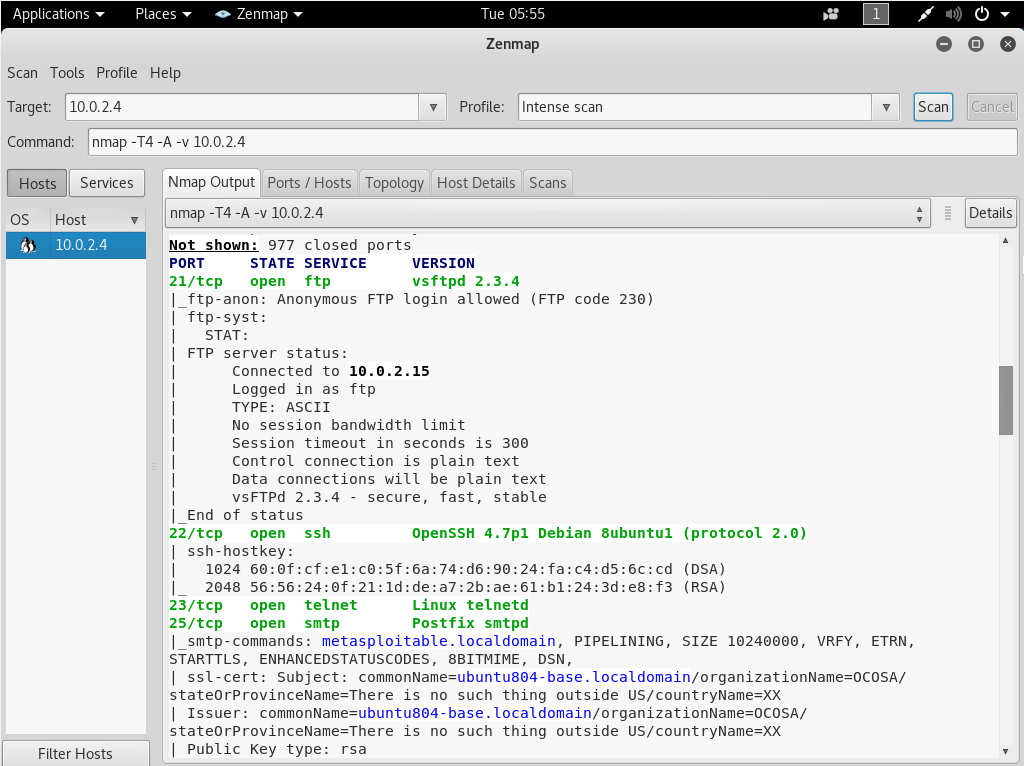
All we have to do is download an FTP client, such as FileZilla, and we will be able to connect using this IP address on port 21. We won't go into the details of how to do it, as it is very simple. We just have to download the application and connect to it. We can also Google an FTP server, which in our case is vsftpd 2.3.4, and see whether it has any issues, if it has any misconfigurations, or it has any known code execution exploits. Once we Google this, we can see that this particular application, vsftpd 2.3.4, has a backdoor installed with it. It literally came with a backdoor when it was released. We need to Google the services one by one and check whether they have any misconfigurations or any exploits installed, or any known exploits.
Now we are going to have a look at port 512. Let's assume we went on them one by one, we couldn't find anything, and we reached the 512 TCP port, as shown in the next screenshot:
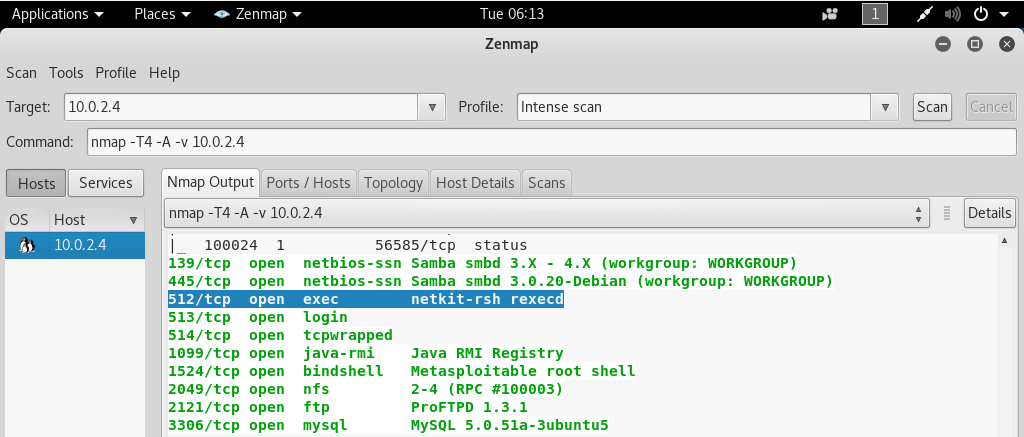
We are going to Google the service that's running on this port, as we don't know what it is. After a little Googling, we know that netkit-rsh is a remote execution program. If we manage to log in with this, we'll be able to execute commands on the target computer, and it uses the rsh rlogin, which is a program that ships with Linux. It allows us, similar to SSH, to execute remote commands on the target computer. Let's go back and see how we can connect to the rsh rlogin service. Let's look at the netkit-rsh package, and what comes with this package. As we can see, this is Ubuntu. The target computer system is running on Ubuntu, and we can see that in here it uses the rsh-client service to connect. We need to install a package to connect to that service. It is a client program for a remote shell connection. Now go back, and let's install rsh-client. As we did before when we needed to install something, we run apt-get, and we do install. We'll type the name of the program that we want to install, so it's rsh-client. The command to install rsh-client is as follows:
apt-get install rsh-client
apt-get is going to install it for us and configure it, and once it's installed, we're going to use rlogin to log in, because the first page told us that it uses the rlogin program to facilitate the login process. We are going to do rlogin, and again, if we don't know how to use this app, we use --help to see how to use it, as shown in the following screenshot:

What's important here is the username (-l) and the host, which is the target IP. Now we are going to do rlogin. We are going to put the username as root, which is the user with the most privileges on the system, and we'll put the target IP, which is 10.0.2.4. Here is the command:
rlogin -l root 10.0.2.4
And now we are logged into the Metasploitable machine. If we execute the id command to get the ID, we can see that we are root. If we do a uname -a it will list the hostname and the kernel that's running on the machine. We can see that we are in the Metasploitable machine with root access, shown as follows:

This is a basic manual way of gaining access to the target computer by exploiting the misconfiguration of an installed service. The rlogin service was not configured properly. All we had to do was just Google what came with that port, and we managed to log in and gain full access to the target computer.