
In the last chapter, we set the Wi-Fi card into monitor mode, so that we can sniff packets that are within our Wi-Fi range, even if they're not directly connected to our device, and even if we are not connected to a network with a username and password. Now, we're going to use a tool called airodump-ng, part of the Aircrack-ng suite. It's a packet sniffer, and it allows us to capture all of the packets around us. We can run it against all of the networks around us and collect any packets within our range. We can also run it against a certain access point (AP) so that we only collect packets from a certain Wi-Fi network.
First, let's look at how to run the program. You'll need your Wi-Fi card in monitor mode; in our case, the name of the Wi-Fi card is wlan0. So, we'll run the airodump-ng wlan0 command—it's as simple as that. The name of the Wi-Fi card that has monitor mode enabled on it is wlan0. As you can see in the following screenshot, this will list all of the networks around us:
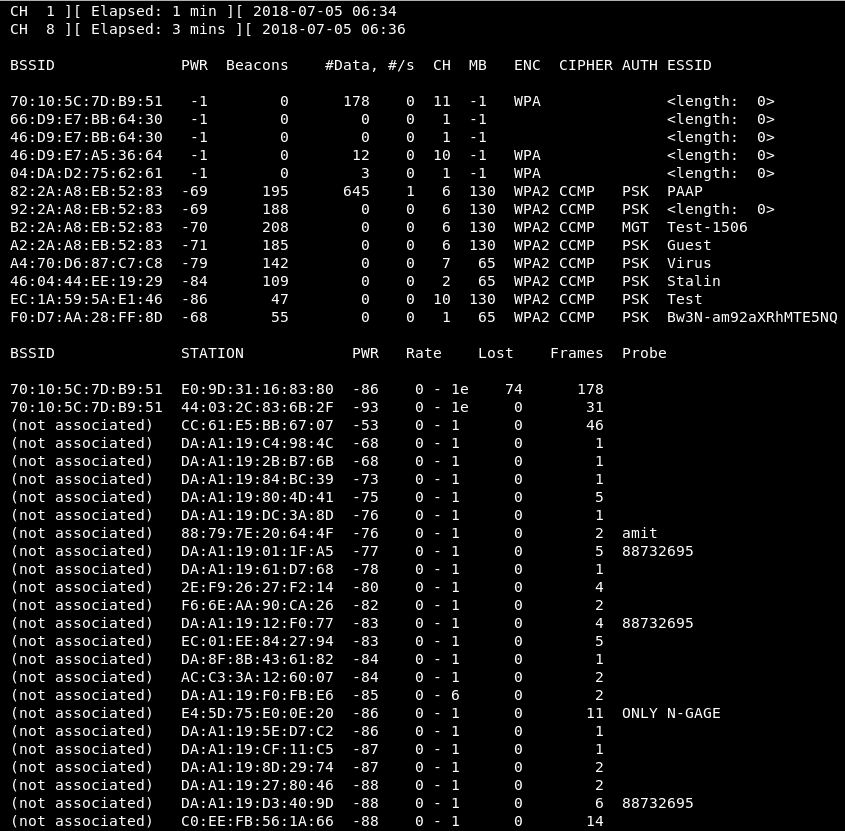
Another use of airodump-ng is to identify all of the devices connected to the networks around us.
We can press Ctrl + C to stop sniffing. We didn't save the packets that we sniffed, so there was no point in analyzing them—we just ran airodump-ng against the APs around us to see what networks there were and to gather information about them. From the preceding screenshot, we can see that there are quite a few networks around.
In the preceding screenshot, there are a few parameters we have to familiarize ourselves with, so that we can analyze the output:
- The BSSID is the MAC address for the AP; as we know, each network device has a MAC address.
- PWR is the power—how far the AP is from our Wi-Fi card. Test is the test router that we will be running a few attacks against. As you go down, you can see that the networks are further and further away. The closer the network is, the easier it will be for you to sniff the packets. The closer the network is, the more effective the attack will be, and the quicker you will gain access and achieve your goal.
- Beacons are the signals that the AP sends; each AP sends a certain type of packets, to tell the clients around that it exists. So, even if the network is hidden, it will still send these beacons, to tell everyone around that it is there. Our BSSID is EC:1A:59:5A:E1:46, and we are running on -34 information. So, 50 is the number of Beacons that each AP is sending.
- The Data is the number of useful packets that we have sniffed; we'll talk about this in detail later on, when we study WEP decryption and encryption.
- S is the number of data packets that we have collected in the past 10 seconds; as we can see, we have a 0 here, so 0 data packets have been collected in the past 10 seconds.
- The Channel is the number of channels that the AP is broadcasting on. Each AP broadcasts on a certain channel, used so that there will be no interference between APs that are beside each other. Suppose that we have an AP, and five meters away, there's another one; if both of them are running on the same channel, there will be interference between those two APs, and the signal between them will be shorter, so their range will be shorter.
- MB is the maximum speed supported by this AP; it can go up to 54.
- ENC is the encryption that's used in the AP; we have WEP, WPA, WPA2 encryptions. If it's an open network we will see OPN in the encryption.
- CIPHER is the cipher that's used to decrypt the packets. For WEP it's WEP but for WPA2, it can be CCMP or TKIP; we'll talk about these later when we get into WPA cracking.
- AUTH is the type of authentication that's required for this AP. We can see pre-shared key (PSK), and also MGT. We'll also talk about these later when we get into WPA cracking.