
Now, let's see how to run an actual ARP poisoning attack, redirecting the flow of packets and making it flow through our device. We're going to talk about a tool called arpspoof, which is part of a suite called dsniff. dsniff is a suite that contains a number of programs that can be used to launch MITM attacks. We're just going to talk about arpspoof, and we're going to see how to use it to carry out ARP poisoning, which redirects the flow of packets through our device. The arpspoof tool is old, but it still works, and because it's so simple it's been ported to Android, iOS, and other smaller operating systems. There's a lot of people that actually like to use it to do ARP poisoning, which is why we're going to show you how to use this tool. In the next section and all the sections after that, we're going to use a tool called ettercap. We'll see how we use it and how to do ARP poisoning with it, but for this section we just want to show how to use arpspoof because it's going to be used a lot, so we need to know how to use it. It's very simple, anyway.
So, we are connected now to the target network. Let's see how we use the tool. It's going to be arpspoof -i, to choose our internet card (virtual card), so it's eth0. Then we're going to put in the target IP address. So, our target is the Windows device, with its IP, 10.0.2.5. Then we will put the IP address for the access point, which is 10.0.2.1. We will tell the access point that the client IP address has our MAC address, so basically, we're going to tell the access point that we are the target client:

After this, we're going to have to run arpspoof again, and instead of telling the access point that we the target client, we are going to tell the client that we are the access point, so we're just going to flip the IPs:

So, by running both the preceding commands we're going to fool the access point and the client, and we're going to let the packets flow through our device.
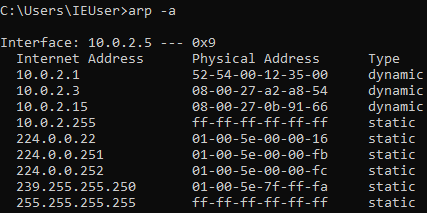
Now, let's see, at the target, Windows is the target device, so we are going to the ARP table. So, if we just run the arp -a command in the Windows machine, it's going to show us the ARP table. So, we can see in the following screenshot that the IP address for the access point is 10.0.2.1, and we can see its MAC address is 52-54-00-12-35-00. It's stored in this ARP table:
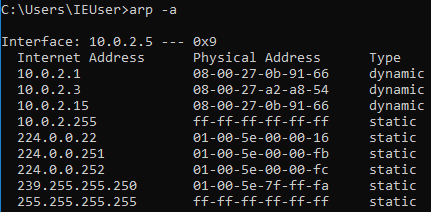
Now, once we do the attack, we will see that the MAC address 08-00-27-0b-91-66 for the target access point is going to change, and it's going to be the attacker's MAC address:
We'll also need to do something called enabling IP forwarding. We do that so that when the packets flow through our device they don't get dropped, so that each packet that goes through our device gets actually forwarded to its destination. So, when we get a packet from the router it goes to the client, and when a packet comes from the client it should go to the router without being dropped in our device. So, we're going to enable it using this command:
echo 1 > /proc/sys/net/ipv4/ip_forward
The Windows device now thinks the attacker device is the access point, and every time it tries to to access the internet, or every time it tries to communicate with the access point, it's going to send these requests to the attacker device instead of sending it to the actual access point. This will place our attacker device in the middle of the connection, and we will be able to read the packets, modify them, or drop them.
We're going to see how we do that in the next sections; for now we just need to know how to do basic ARP poisoning. We're going to need to do this every time we try to do a MITM attack.