
To allow users to access your new Alfresco repository, you will need to configure Moodle to allow access to the repository. The new repository architecture of Moodle 2 enables developers to create plugins to connect Moodle with other systems. Each system will have its own type of plugin to allow a direct connection between Moodle and the system. To enable Moodle to talk to an external repository, we need to enable the plugin and any associated options.
To enable the Alfresco repository plug-in, go through the following steps:
- Login to Moodle as a Moodle admin.
- From the Site administration menu, select Plugins and then Repositories.
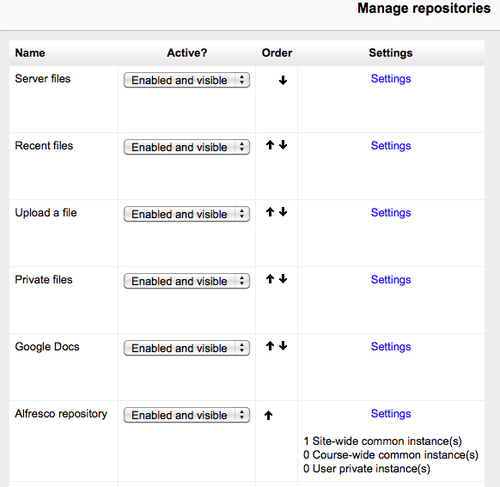
- The Manage repositories screen allows you to select from all of the available plugin repositories. For now, we will focus on the Alfresco repository. From the menu in the Active column, select Enabled and visible.
The Alfresco plugin allows users in Moodle to add multiple instances of the repository. Most of the time, you will not want to allow users to add additional instances of the repository. As the admin, you can create a single site-wide instance of the repository plugin to allow users to link to Alfresco files. However, if you have more than one Alfresco instance, you can allow multiple users to create additional repositories at either the course level or the user level.
- Click the Save button to save the initial settings. This will return you to the Manage repositories page.
- Click on Settings under the Settings column to the right of the Alfresco repository row.
- This will take you back to the Alfresco settings page, but will provide an additional ability to add a repository instance at the site level.
- Click the Create a repository instance button at the bottom of the page.
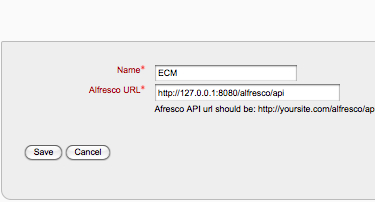
- Give the name of your Alfresco instance. If this is an institutional repository, give it the same name as you commonly use. For example, if you commonly refer to your Alfresco instance as the "ECM" (for Enterprise Content Management), name the Alfresco instance ECM.
- Add the URL of your Alfresco site. Be sure to point to the Alfresco Explorer, not the Share application. You will also need to add the API pointer at the end of the string. For example, if you are pointing to the locally installed Alfresco which we described in the preceding case, the URL should be
http://127.0.0.1:8080/alfresco/api. - Click on Save. You will now have an instance of Alfresco available for users to add content to their courses.
Tip
If you get the following error: Notice SOAP extension must be enabled for Alfresco plugin, then make sure that the SOAP library is enabled in your php.ini file. The location of the file will vary depending on the system you are using. Find the php.ini file and un-comment the extension=php_soap.dll line. Then restart Moodle and this should solve the error.
You have just configured the Alfresco repository plugin to enable Moodle to talk to Alfresco. When you bring up the file picker in a course or at the site level, you should now see the Alfresco repository as an option.
Later in this chapter, we will configure the Google Docs plugin for Moodle, but there are a number of other plugins. Picasa and Flickr are two photo repositories on the web where many people share their photos. Wikimedia and YouTube are two very popular sources of media as well. Enable one or two of these additional plugins to practice configuring Moodle on your own.