
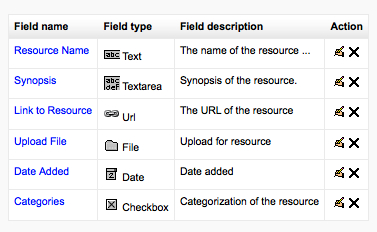
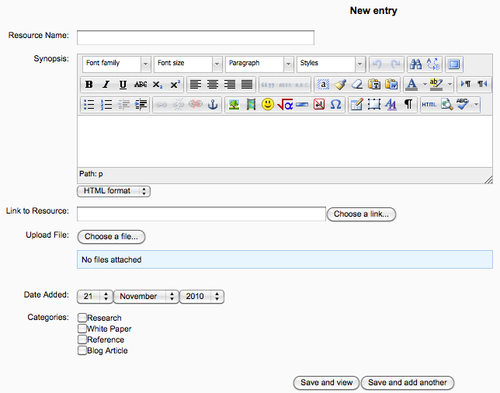
In the Fields tab of the database we created, you can create the fields that will store the data you want your users to enter. For an annotated bibliography, we want to create fields for a resource name, a synopsis, a pointer to the resource (most likely a URL), an area to upload a resource, a time added field, and some topic categories.
- To create the resource name field, select Text from the field drop-down list. Give it a name using the Field Name field and set autolink to allow any mention of the resource to be linked back to the original entry.
- The synopsis field will require more space than the resource name. Select text area to create a larger text entry field (like the instruction fields in most Moodle activities).
- Next, we want to add two fields for the resource itself. We want to add a URL field for a web resource and a file upload field if the user wants to upload the file directly to Moodle.
- Add a URL field type by selecting Url from the dropdown list. Give it a Field name like Link to Resource and a Field description like The URL of the resource. To make it easier to layout your display pages, the Forced name for the link will make the link text the same for every link. Enter Link in the Forced name. Check Autolink the URL to link any occurrence of the URL to the database entry.
- Next, we need to create an area for community members to upload files directly, rather than simply sharing a link to another website. Select File from the fields drop-down. Name the field Upload File and set the maximum file size to something you think will enable a useful upload without creating long upload or download times. The largest upload size is set by your Moodle administrator.
- A date added field will enable users to add a date to the resource. Select Date from the Fields menu.
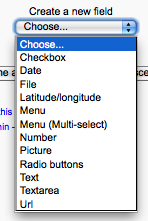
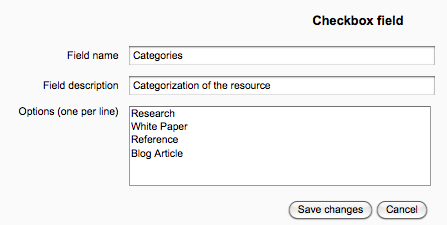
- Finally, we want to create a way for users to categorize their entry, to make it easier for other users to find it. There are two methods you can use to do this. First, you can create a list of checkboxes with predefined categories, or you can create a text box for users to enter searchable tags.
- To create a series of checkboxes with predefined categories, select Checkbox from the Fields menu. Set the name to Categories and enter a field description. In the Options (one per line) box, put one option per line. Moodle will create one checkbox for each option.
- Once you have created all of the fields, you will need to save the default templates to see how Moodle is going to arrange your new fields by default. Select the Templates tab from the menu. Then select the List template from the sub-tabs.
- At the bottom of the screen, select the Save template button. This will save the default template for the list view.
- Repeat the last two steps for the Single template and the Advanced search template.
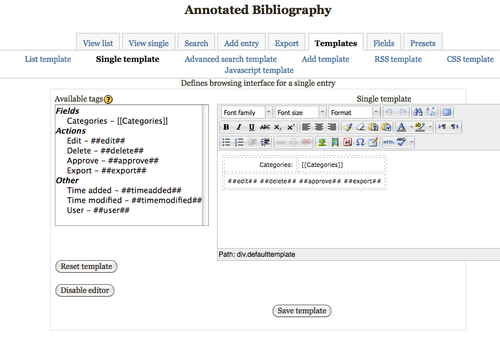
- You can see how the default display template will look by selecting the Add entry tab. This provides a default layout for your fields in the order you created them. In the next section, we will look at how to change the layout template.
- Create an entry in the Add entry tab, so you can look at the View list and View single templates.
..................Content has been hidden....................
You can't read the all page of ebook, please click here login for view all page.