
Moodle's database authentication plugin allows Moodle to use a table in an external database to check a user's name and password. The external table enables you to use the usernames and passwords in an application like Peoplesoft or a portal system like Drupal. The plugin is relatively simple, but very flexible. All you need is a database table with your usernames, passwords and any profile fields you want to import into Moodle. Give Moodle access to the table (it can be read-only access to ensure the table can only be changed by your external authority) and your users can use their passwords from your other application to log in to Moodle.
To set up Moodle's database authentication plugin:
- Login to your Moodle as an administrator.
- From the Site administration menu, select Plugins. Then select Authentication.
- You will now be on the Manage authentication page. You will see a list of available authentication plugins. To enable the Database server plugin, scroll down the list to Database under the Name column and then click on the eye to the right. When the eye is open, the plugin is enabled. You will now be on the settings page for External database. See the following figure.
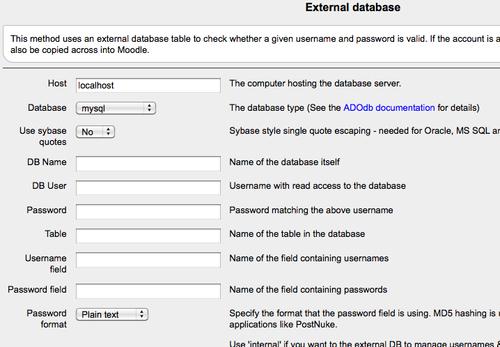
- Now we need to configure the plugin to use the table that you have set up. Start by providing the URL for the computer hosting the database you want to use in the Host field.
- Next, select the type of database hosting the table from the Database drop down menu. Check with your IT person and select the right database type here.
- If your database type above is Oracle, MS SQL, or a few other types, set the Use Sybase Quotes to Yes.
- Set DB Name to the name of the database with the user's table.
- The DB User field should be set to the username Moodle will use to log in to the database.
- Set the Password field to the password for the user in the preceding field.
- The Table field stores the name of the table with the Moodle usernames and passwords in the database you set in step 4.
- In the Username field, put the name of the field in the table containing the usernames.
- In the Password field, enter the name of the field in the table containing the passwords for your Moodle users.
- Set the Password Format option to the password storage format in the external database. Most web-services use MD5 encryption to store passwords to make them more secure. If you set this to Internal, Moodle will only use the external database for user information, not passwords. Users will need to manage their password from within Moodle.
- The
External db encodingtells Moodle how the database encodes its text strings. - The SQL setup command is used by some databases to set the encoding. This is usually used by MS SQL and Postgre databases.
- If you need to test your database connection later, set the
Debug ADOdbto Yes. Do not leave this set to Yes on a production site. - If you have an external location for users to change or recover their passwords, put the URL for that site in the Password-change URL field.
- The next setting,
Removed ext user, determines what happens when your Moodle cron runs and does a mass synchronization. If users in Moodle disappear from the database when Moodle checks, Moodle has three options. If you leave this option at Keep Internal, Moodle will keep the user active. This would allow the user to continue to log in if the Hide Passwords setting is set to No. With the second option, Suspend Internal, Moodle will keep the users, but make them inactive. The user will not be able to log in, but their account will not be deleted. If the user reappears in a later database synchronization, their account will be reactivated. Selecting Full delete Internal will delete the user if they do not appear in the database. Moodle will remove them from the database and if they reappear later, Moodle will create a new user account. The safest option here is to Suspend Internal in case users have been accidentally removed from the database and you need to add them back later. - In the Data mapping section, you can tell Moodle how to handle user profile information stored in the external database. For each field, you can choose when Moodle's local data is updated. You can set the field to update only on account creation (when the user is first added to Moodle) or you can set it to update every time the user logs in. Setting this to update on login will ensure more accurate data but will increase the load on your database server and the impact speed of the login.
- The Update external setting determines whether Moodle can pass data back to the database table. If the table is the canonical source of data owned by HR and IT, you will probably want to set this to Never. If you want users to be able to maintain their data in Moodle, set this to On Update and Moodle will send any changes back to the database when the user saves the change in their profile.
- If you want to always maintain user profile data in Moodle as it appears in the external table, set the Lock Value to Locked. If the field is locked, then no one can make changes. If you have set the Update external to On Update, be sure to unlock the field.
- Once you have set all of your profile fields, click on Save changes. Be sure to test your new database authentication by logging in to Moodle as a user with an account in the external table.
You now know about the different authentication options available to you in Moodle and how to set up two of those options, LDAP and external database.
If your organization provides single sign-on through LDAP, then use the Moodle plugin to look up and confirm user login information.
The other method we explored was using an external database to confirm user login information. This is a good option if you want to integrate with a human resource management system such as PeopleSoft or a content management system such as Drupal.