
So let's create our flat file to enroll the five new hires in the safety course.
- Open up a new spreadsheet in Excel or Open Office.
- Since this is a self-paced course, we are only going to create a four field flat file. The first column will be for the operation. The second column will be for the role you are assigning the user. Make sure you use the roles that are located in the Flat file mapping section of the Flat file settings. The third column will be for the user id number. The fourth column will be for the course id number. Do not include a header row in your spreadsheet. Only include the enrollment information.
- The two values that can be entered in the operation column are add, to add a user, or del, to delete a user. For the first five rows under the first column, enter add because we are adding five new users to the course.
- The roles that can be assigned with the flat file plugin are defined at the bottom of the settings page. We are going to keep the default role mapping in the Flat file settings page. For the first five rows under the second column, enter student because all the new hires will need to take the course as a student and will not be given access to teacher resources in the course.
- You may have the user
idnumbersfrom an external database or server, but for this example, we are going to look in the user profile field for this number. For our example I created five new users in Moodle to represent the new hires. To look up their ID numbers, we will go to the Site administration menu, select Users, then select Accounts. Further, select Browse list of users, and then select the Edit link next to the user. You will now see the user's profile. Scroll down toward the optional fields, to the ID number field, for the user ID number. ID number is an optional field in Moodle. For business purposes you will probably have the person's employee number in the field. Enter the five unique user ID numbers, for the users you want to enroll in the course, in the five rows under the third column. - To obtain the course ID number, from the Site administration menu, select Courses, and then select Add/edit courses. You will then see the Course categories page. Select the category your course is under, then select the edit icon next to the course. You will now be on the Edit course settings page. The fourth line down is the Course ID number. Remember Course ID number is not a required field, but it is one you will want to use when creating courses because it comes in handy when automating enrollment. Copy the Course ID number and paste it in the first five rows under column four, since we are adding all the users to the same course in our example.
- Finally, save the spreadsheet with the title
enrollmentsin CSV format. Yourenrollments.csvfile for this example should look like the following image: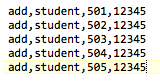
..................Content has been hidden....................
You can't read the all page of ebook, please click here login for view all page.