
You've decided that a single sign-on for all your internal corporate systems is imperative for the success of Moodle in your company. You know several institutions that have had success with an LDAP server and you also want the ability to import other user information into the Moodle user profile fields.
Tip
You must have the LDAP extension for PHP installed and enabled on your server prior to enabling the LDAP plugin.
The first step is to enable the LDAP authentication plugin:
- Log in as the administrator
- Go to the Site administration menu
- Select Plugins from the menu
- Select Authentication and then select Manage authentication
You will now be on the Manage authentication page. You will see a list of available authentication plugins. To enable the LDAP server plugin, scroll down the list to the LDAP server under the Name column and then click on the eye to the right of LDAP server. When the eye is open, the plugin is enabled.
You will notice that once you have enabled a plugin, it moves to the top of the list with all the other enabled plugins. Next, click on the Settings link to the right of the LDAP server. You will be brought to the following LDAP server screen.
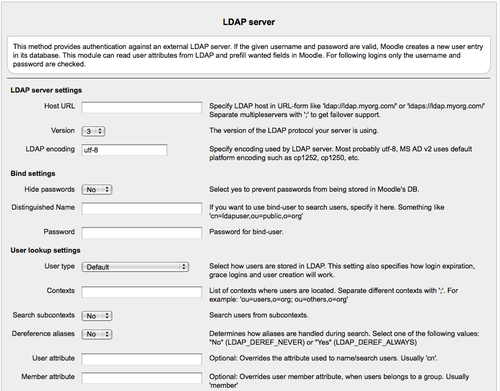
Begin by specifying the URL of your LDAP server in the Host URL setting. If you have multiple LDAP servers for failover, separate the URLs with a;.
Next, select whether your LDAP server is using version 2 or 3 of the LDAP protocol from the Version drop down menu. The MS Active Directory supports both LDAP 2 and 3 and so does OpenLDAP (the open source Linux LDAP server).
The LDAP encoding setting tells Moodle how your LDAP server encodes characters. Most modern LDAP servers use utf-8. Hence, unless your system administrator tells you otherwise, leave this as the default.
The Hide Passwords setting will determine whether Moodle stores passwords locally, or always needs to check the user password against the LDAP server. Setting this to No will make your system more robust by reducing the number of round trips Moodle needs to make to log in a user. Also, if your LDAP server goes down, Moodle can use the locally stored password instead of trying to connect to the LDAP server.
The next two settings are used to set the "user" that Moodle will use to log in to the LDAP server. The bind user should have limited access, that is, access to only those parts of the server to which Moodle needs to authenticate users. The Distinguished Name is the path through the LDAP tree to the Canonical Name (CN) of the user that Moodle should use to log in.
The Password in the Bind Settings sets the password for the Moodle user.
The User lookup settings will determine how Moodle looks for users in your LDAP server. The first option, User type, is to select the schema used to store users in your system. For most OpenLDAP systems and Mac OS X, you will use the posixAccount (rfc2307) schema. If you are using Novell eDirectory or MS ActiveDirectory, then choose those options.
Next we need to list the LDAP Contexts where users for Moodle are located. You may not want everyone in your LDAP directory to have an account on Moodle, especially in the early days. For example, if your first rollout is targeted at the HR department, you may want to restrict your users to just the HR LDAP context.
The next option tells Moodle whether it should Search sub-contexts in the LDAP directory. If your HR department has a Benefits Office and a Hiring Office as HR sub-contexts, then you'll want to set this to Yes assuming that you want all of the HR users to be included.
If your LDAP schema uses alias entries, you may want to set the Dereference aliases option to Yes, to allow Moodle to follow the alias to find those users.
If your LDAP schema uses a different attribute for users other than the default CN, put it in the User attribute option. Usually, you will leave this blank to use the default CN.
If your LDAP schema uses a different attribute for a user's membership in a group other than the default 'member' attribute, put it in the Member attribute option. Usually, you will leave this blank to use the default 'member'.
You can also override the defaults to reflect how your LDAP schema handles membership. If your member attribute uses the dn attribute, leave this blank. Otherwise put in a 0 or 1 to override the dn value.
You will probably leave the Object class blank, unless you have a very customized LDAP setup and need to change the code used to search users on your LDAP.
Now that Moodle has searched the LDAP tree for users, we need to tell Moodle how to handle their passwords. The first option allows you to force users to change their LDAP password when they log in to Moodle the first time. Unless Moodle is the primary LDAP password management system for your users, leave this set to No. You usually don't want users to need to change their corporate SSO password when they log in to Moodle for the first time.
If you want to allow users to change their passwords using the Moodle interface, set the Use standard page for changing password to Yes. This will present the user with the Moodle change password page if they are either forced or choose to change their password. If you set this to No, you will need to set Password-change URL to redirect the user to your corporate "change password" page.
The next setting determines how a password is encrypted before it is sent to the LDAP server, if the user has changed their password in Moodle. MS ActiveDirectory uses plain text, but other systems use encryption to accept changed passwords.
The next field lets you set the Password-change URL to redirect users to change their password.
The Expiration settings here only work with Novell eDirectory and MS ActiveDirectory. So if you are not using one of those servers, leave this set to No and skip to the Enable User Creation settings. Otherwise, choose whether you want Moodle to check the LDAP server for password expiration.
If you set the password Expiration to Yes, set the Expiration Warning to tell Moodle when to warn the users that their password is about to expire.
If your LDAP schema is non-standard, set the LDAP attribute where the expiration time is stored here. Usually, you will not change this.
The next setting, Grace logins, is specific to Novell eDirectory, which allows a grace login. The grace login allows the user a certain number of logins after their password has expired.
Ignore the Grace login attribute. This isn't actually used in the code anywhere.
So far we've searched the LDAP for users, added them to Moodle, and told Moodle how to handle their passwords. Now we need to tell Moodle whether it can create new users in the LDAP server. In most corporate settings, you will want to leave Create users externally set to No, as the IT department will have policies and procedures for adding users to the LDAP. However, in certain cases you may want to add users to your LDAP tree if you are selling courses and want to give users access to other systems, like a portal.
If you do choose to create new users, be sure to specify a context to keep them separate from other users and keep your site secure.
The Creators option allows you to specify contexts and groups of users which are allowed to create new courses.
The next setting, Remove ext user, determines what happens when your Moodle cron runs and does a mass synchronization. If users are removed from the LDAP tree, Moodle has three options. If you leave it at Keep internal, Moodle will keep the user active. This would allow the user to continue to log in if the Hide Passwords setting is set to No. The second option is for Moodle to Suspend internal. Moodle will keep the users, but make them inactive. The user will not be able to log in, but their account will not be deleted. If the user reappears in a later LDAP sync, their account will be reactivated. The final option, Full delete internal, will delete the user if they do not appear in an LDAP sync. Moodle will remove them from the database and if they reappear later, they will have a new user account. The safest option here is to use the Suspend internal option, in case the user has been accidentally removed from the context that Moodle is searching for users.
The next four options deal with NTLM SSO, or Windows internal SSO. If you are using a Windows network with NTLM authentication (see http://docs.moodle.org/en/NTLM_authentication for details on setting up your Moodle server to use NTLM), Moodle will try to pass the user's Windows authentication to the LDAP server. So if a user logs in to his/her desktop with his/her ActiveDirectory password, the user will automatically be logged in to Moodle, if this is enabled.
The Subnet will restrict authentication with NTLM to certain ranges of IP addresses.
If the user has Internet Explorer, you can enable MS IE fast path to improve the speed of the SSO.
For most of the cases, you will leave the Authentication Type set to NTLM.
Now that we have the users, their passwords, and other details set up, we can tell Moodle how to handle the profile information stored in the LDAP server. The Data Mapping section lists all of the standard Moodle profile fields and allows you to map those to LDAP fields. For each Profile Field, set the corresponding LDAP field. See the image below for the data mapping settings.

For each field, you can choose when Moodle's local data is updated with the Update local setting. You can set the field to update only on account creation (when the user is first added to Moodle) or you can set it to update every time the user logs in. Setting this to update on login will ensure more accurate data but will increase the load on your LDAP server and the speed of the login.
The Update external setting determines whether Moodle can pass data back to the LDAP. If the LDAP is the canonical source of data owned by HR and IT, you will probably want to set this to Never. If you want users to be able to maintain their LDAP data in Moodle, set this to On update and Moodle will send any changes back to the LDAP server when the user saves the change in their profile.
If you want to always maintain user profile data in Moodle as it appears in the LDAP server, set the Lock value to Locked. If the field is locked, then no one can make changes. If you have set the Update external to On update, be sure to unlock the field.
Once you have set all of your profile fields, click Save changes. Be sure to test your new LDAP authentication by logging in to Moodle as an LDAP user.