Now we have to get the module into our Moodle. You will need to have FTP access to your Moodle site to install the module. If you don't have access, talk to your host who looks after the site for you, or your IT department as required.
- Unzip the module download file using your available application. This should create a folder called
adobeconnect. Inside this folder there are more folders, and lots of files which make up the module. - Using your FTP client, connect to your Moodle site host server (I use WinSCP for Windows).
- Using your FTP client, browse to the
modfolder inside your Moodle installation. - Select your
adobeconnectfolder (not just the files) and upload this to the mod folder. You should now see the folder along with the assignment, and any othermodsyou may have installed. Depending on whether you are using a fast connection or not, it may take some time to upload each part of the module. - Once all the files are uploaded, you need to log into your Moodle site.
- Once logged in as admin, you need to click on the Notifications link in your Site administration block or go to http://yourmoodle.com/admin/index.php. This link triggers the installation of any newly uploaded module. The setup then auto-creates database tables and settings options for the Adobe Connect integration.
- If all has gone well, it should say adobeconnect tables have been set up correctly. Click on the Continue button.
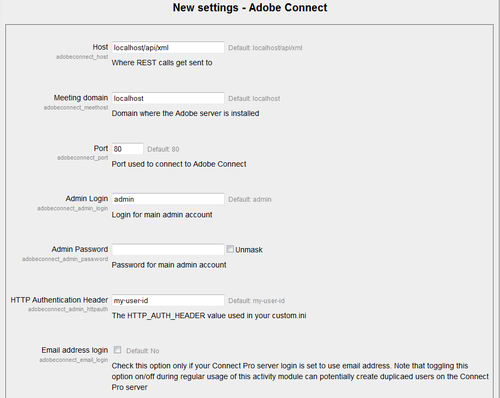
- You will be displayed the new settings options for the Adobe Connect module. There are seven options to edit. I will cover these next.

In the Host field, you enter the URL of the Adobe Connect Pro Server which accepts the REST calls. For example, if you are using example.com as the domain for the Adobe Connect Pro server, then you should use example.com/api/xml in the Host field unless you have set up your Adobe Connect Pro differently.
- The Meeting domain field needs the domain name of the host, but without the
/api/xmlincluded. So if the host wasexample.com/api/xmlthen the domain would beexample.com. - On most servers the standard Port is 80 for running a web application, and in this case you can leave the default 80 in the Port field. Change this setting only if you know that Adobe Connect Pro is running on a different port.
- The Adobe Connect integration requires you to enter in the Adobe Connect Pro server admin username and password in the Admin Login and Admin Password respectively. This account is used to make all the requests to create users and assign roles.
- To complete the HTTP Authentication Header field, you need to consult with your
custom.inifile belonging to the Adobe Connect Pro server. The file will have a line where it specifies theHTTP_AUTH_HEADER=something. You need to copy the text after the=sign. In this example, we have used "something". Put this into the HTTP Authentication Header field. - The Email address login field is only enabled if your server is set up to use the email address as login. This is found under Administration | Users and Groups | Login and Password Policies on the Adobe Connect Pro admin site.
- Once you have entered all the required information on this settings page, click on the Save changes button at the bottom of the page.
After we had downloaded the module from the Moodle.org site, we had to unpackage it (unzip it) and then upload the files to the Moodle site using an FTP program. We were careful to upload the full folder of the files inside the moodle/mod folder on the server. This is because this module is a Moodle mod. Other integrations may be activities, or blocks, and may be uploaded to other locations. Always follow the README or documentation for this guidance.
Once uploaded, we logged into our Moodle website, and triggered the installation of the module using the Notifications link in the Site administration block. This created database tables required to run the module and activate it within Moodle.
We then entered in the key configuration information including the Host, Domain, Port, Admin user login and password, and the HTTP Authentication Header value so that the Moodle site could talk to the Adobe Connect Pro server.
Finally, we saved the settings and are now ready to create an Adobe Connect activity within a test Moodle course.
As mentioned earlier, when you install this module, you give the module the "admin" information so that it can set roles based on Moodle roles. The module created three roles—Adobe Connect Host, Presenter, and Participant within Moodle during installation. Users can be assigned these roles through Moodle and with the single-sign on; they will have the corresponding roles on the Adobe Connect Pro server when they join it.
