
There are a number of built-in formats in Moodle which help you lay out your course. The most commonly used include:
- Weekly format: This course is organized week-by-week starting with the date that you enter in the course settings.
- Topics format: This course is broken up into topic sections where you put a set of resources and activities.
- Social format: This course type is designed around the use of one main forum and arguably isn't even a course, just a social discussion area.
- Scorm format: This is a pre-packaged course format usually used when you have a large bundled course bought off the shelf from a supplier like Skillsoft (for example).
From my experience, the most used course format is the Topic format and that is what we are going to use for this example. Now we will go through the basic settings that you would want to use in creating the course itself.
In Chapter 1, Getting Started with Moodle, we went through the process of creating a course, so here we will focus on the key fields that you will want to use, and skip the rest.
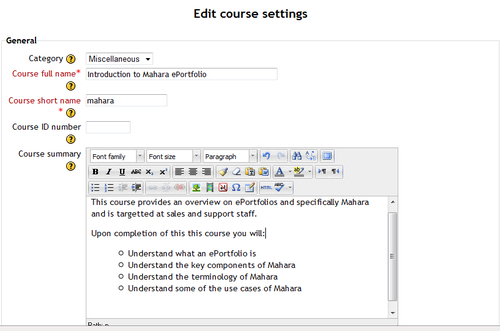
- From within Course categories, click on Add a new course which brings you to the Edit course settings page.
- For Course full name enter in the name of your training course.
- The Course short name is a shortened course name that is used in the navigation which should be short and snappy, but meaningful. Feel free to use X123 or similar if that is meaningful to your organization.
- You can ignore the Course ID number and now fill in the Course summary. This can fit many purposes, but most often is the advertising or marketing "pitch" of what the course covers, its objectives, and requirements. So your summary sheet from the Scheme of Work is a good starting point for text.
- When you scroll down, make sure that the Format is Topics format.
- You can set the Number of weeks/topics to whatever you want, but as a general rule, if you have three lessons, add two extra topics, so this would need five: One topic for introduction, one topic per lesson, and one for wrap up. You can ignore most of the other settings for now. However, the last section on Role renaming can be edited at this point to whatever language you use with your organization. Here I have changed the role names from Manager to Supervisor, from Teacher to Trainer and from Student to Participant. This is the text that appears in places during the course, so having familiar wording is important.
- Click on Save changes.
- When you get prompted to Enroll users on the Enrolled users page, you can simply skip this by clicking on the Course short name in the Navigation block. You can come back and enroll participants at a later stage when the course is ready.
We have set up the course the way we need it. The course name is meaningful and the description outlines what the course is about. The course has enough topics for the course purpose, but nothing extra. The wordings of the roles have been changed to reflect the organization.
Now we can continue to create the overall structure.