
Enrolling users with a flat file is the easiest way to automate enrollment. For this example we are going to assume you are the Director of Training for your company and you are responsible for making sure employees are enrolled in the appropriate compliance training. We will use the course we created in Chapter 4 for safety training. You need to make sure that all new hires are enrolled in the safety training course. You have five new hires this week. They have already been given user accounts in Moodle, you just need to enroll them in the safety course.
The first step is to enable the flat file enrollment plugin.
- Log in to your Moodle site as the administrator.
- Go to the Site Administration menu, select Plugins, then select Enrollments.
- From the Enrollments menu, select Manage enrol plugins.
- From the list of Available course enrollment plugins, select the eye under the enable column next to Flat file (CSV). The open eye means it is enabled.
Click on the Settings link to the right of the Flat file (CSV).
We have now enabled the flat file plugin for enrollment. Now we need to create the file to add and enroll users.
Before we edit the settings for the Flat file (CSV) plugin, we need to create the file. You will see on the settings page for Flat file (CSV) that Moodle provides you with guidelines for the formatting of your text file. See the following screenshot.
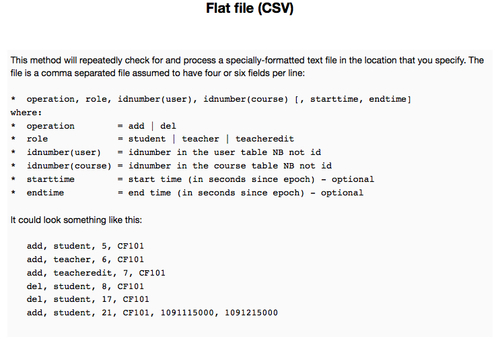
A flat file, or CSV file, refers to a text file with comma separated values. You can easily create a CSV file by creating an Excel file and saving it in the csv format. This saves the Excel file in a text format where each cell is separated by a comma and each row appears in its own line. I usually create my flat files in Excel or Open Office and save it as a csv file.
The flat file that you will use in Moodle for enrollments will either consist of four or six fields per line as shown in the preceding figure. The four fields you will definitely use are: Operation, role, idnumber (user), and idnumber (course). The operation field is used to add or delete a user from a course. The role field is the role you want to assign to the user in the course. The roles you can assign are mapped out on the settings page, but the three main roles you will probably be applying are student, editing teacher, and non-editing teacher. The user idnumber is a unique identifier for the user. The course idnumber is a unique identifier for the course.
The other two fields, starttime and endtime, are used when you want to restrict enrollment to a specific time period. For our example, we are going to assume that we do not require a specific time period for enrollment. Our training courses are self-paced and employees can take as long as they like to complete a training course.