
- Log in to your Moodle site as an administrator. Create a course for your compliance training by following the instructions in Chapter 1, Getting Started with Moodle.
- Click the Turn editing on button in the top-right corner.
- Go to the section you want to add the lesson to and from the Add an activity drop-down menu, select Lesson. You should now be on the Adding a new Lesson page.
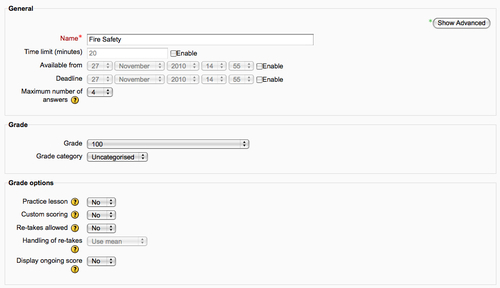
- The first section of the page is the General section.
- In the Name field, enter the title of your lesson, for example "Fire Safety".
- If you want to enter a time limit for the lesson, click the checkbox to the left of Enable at the Time limit (minutes) field and enter the time limit you want implemented, in minutes, for the lesson. For the purposes of this example, assume that if I do not give you a specific value to enter for a field, leave it set at the default.
- If you want to restrict the availability of the lesson to certain dates, then click the checkboxes next to Enable and enter the Available from date and Deadline date.
- Under Maximum number of answers, select the maximum number of answers that may be used in the lesson. For example, if it only consists of True/False questions, this would be 2.
Note
There are a lot of settings in the lesson module. You are not expected to remember them all. I don't! Next to most of the settings is a ? icon. Select this icon for a description of the setting anytime you can't remember what its purpose is.
- Grade is the next section on the Adding a new Lesson page.
- For Grade, select the maximum score that can be given for the lesson from the drop-down menu. If there is no grade, then select no grade from the drop-down menu. We are not going to use question pages for our case study example, so for here select no grade.
- The Grade category refers to the category in the grade book. We have not set the grade book up yet, so leave this as the default Uncategorised. There will be nothing else available yet in this drop-down menu if you have not set up categories in the grade book.
- Next go to the Grade options section and select your settings.
- In the Practice lesson setting, select No from the drop-down menu if you want the grades for this lesson to be recorded.
- The Custom scoring setting allows you to give a score (positive or negative) for each answer. For our example, select No. This could be a useful tool if there are different levels of right and wrong answers and you wish to capture this in the grade book.
- If you want to allow re-takes, select Yes from the drop-down menu at the Re-takes allowed setting.
- If you selected Yes in the previous setting and are allowing re-takes, then you need to select the method for grading in the next setting—Handing of re-takes. Your two choices from the drop-down menu are Use mean or Use maximum.
- The Display ongoing score setting, if Yes is selected from the drop-down menu, will allow the user to see their current score out of total possible thus far in the lesson. The following screenshot shows the General, Grade, and Grade options sections of the Create a lesson page.
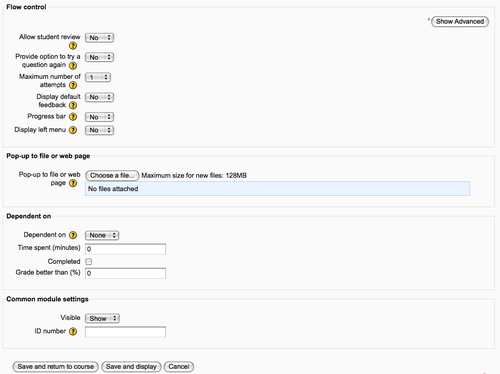
- Now go to the Flow control section and select your settings.
- Allow student review, if Yes is selected, gives the user the option of going through the lesson again from the start after they have completed the lesson.
- Provide option to try a question again, select Yes from the drop-down menu to give the user the option to take the question again for no credit or continue with the lesson if they answer a question incorrectly.
- If you selected Yes for the previous setting, then in the next setting, Maximum number of attempts, you must select the number of attempts allowed from the drop-down menu. If the user answers the question incorrectly repeatedly, once the maximum number of attempts is reached the user will proceed to the next page in the lesson.
- If you want the default feedback for correct and incorrect answers to be shown when no feedback has been specified for the question, then at the Display default feedback section, select Yes from the drop-down menu. Default feedback for a correct answer is "That's the correct answer" and for an incorrect answer is "That's the wrong answer".
- If Yes is selected for the Progress bar setting, then a progress bar is displayed at the bottom of each page.
- When set to Yes the Display left menu setting provides a list of all the pages in the lesson on the left side of each lesson page.
- The Pop-up to file or web page section allows you to choose a file to display in a pop-up window at the beginning of a lesson. It also displays a link to reopen the pop-up window in every subsequent page in the lesson.
- The Dependent on section allows you to restrict access to the lesson based on performance in another lesson in the same course. Restrictions can be based on any combination of completion, time spent, or minimum grade required.
- Under Dependent on, select the lesson required before access to this lesson from the drop-down menu.
- Time spent (minutes): If time spent is one of the requirements, then enter the minimum number of minutes required.
- Completed, if completion is a requirement, then check the box.
- If a minimum grade is required, then for the Grade better than (%) setting, enter the minimum grade required. The following screenshot shows the Flow control, Pop-up to file or web page, and Dependent on sections of the create a lesson page.
- Once you have entered all your settings on the lesson page, click on the Save and display button at the bottom of the page. You are now on the editing page for the lesson you just created. See the following example:

..................Content has been hidden....................
You can't read the all page of ebook, please click here login for view all page.