 Time for action - creating groups in your course
by Jason Cole, Jeanne Cole, Gavin Henrick
Moodle 2.0 for Business Beginner's Guide
Time for action - creating groups in your course
by Jason Cole, Jeanne Cole, Gavin Henrick
Moodle 2.0 for Business Beginner's Guide
- Moodle 2.0 for Business
- Moodle 2.0 for Business
- Credits
- About the Authors
- About the Reviewers
- www.PacktPub.com
- Preface
- 1. Getting Started with Moodle
- Why Moodle?
- Why open source?
- Installing Moodle for experimentation
- Time for action - download and run the Moodle installer
- Creating a course
- Time for action - creating your first course
- Basic Moodle tools
- Time for action - adding a resource
- Creating a forum
- Time for action - creating your first forum
- An eLearning framework for implementing Moodle
- Case Study—OpenText
- What was the business problem(s) for which Moodle was chosen as the solution?
- What was the solution and how did they arrive at the solution?
- Why did they choose Moodle?
- Was the project a success?
- What were the benefits gained?
- What lessons were learned?
- Do you have any advice for future businesses who plan to implement Moodle?
- Any other thoughts or comments?
- Summary
- 2. Moodle in Hiring and Interviewing
- Creating an assignment for submitting resumes/CVs
- Time for action - creating the assignment
- Enabling user account creation
- Time for action - how to enable self registration
- Assessing submitted resumes/CVs
- Time for action - screening the resumes/CVs
- Creating competency tests with the Moodle quiz module
- Time for action - enabling conditional activities
- Time for action - creating a quiz
- Time for action - adding questions to the quiz
- Time for action - creating a Question Bank
- Time for action - grading competency test responses
- Creating a choice module to schedule interviews
- Time for action - creating a choice module
- Creating resources and forums for the decision makers
- Time for action - creating resources and forums for the decision makers
- Time for action - creating question and answer forums
- Case Study—A&L Goodbody
- Summary
- 3. Rollout Products and Services with Moodle
- Some points to keep in mind
- Setting up a course for a new product
- Time for action - creating a Scheme of Work
- Time for action - creating the course
- Time for action - editing topic summaries
- Time for action - adding labels to each topic
- Creating a glossary of terminology
- Time for action - creating a glossary
- Time for action - adding entries to the glossary
- Time for action - adding the random glossary entry block
- Time for action - adding a category
- Implementing role-playing
- Time for action - creating a chat
- Time for action - a look at chat logging
- Creating and assessing product knowledge sheets
- Time for action - creating the outline of the product knowledge sheet
- Time for action - creating the database
- Time for action - adding a field to the database
- Time for action - adding an entry to the database
- Case Study—AA Ireland
- What was the business problem(s) for which Moodle was chosen as the solution?
- What was the solution and how did they arrive at the solution?
- Why did they choose Moodle?
- Was the project a success?
- What were the benefits gained?
- What lessons were learned?
- What advice does AA Ireland have for businesses that plan to implement Moodle?
- Reflection
- Summary
- 4. Moodle for Managing Compliance Training
- Using the lesson module as a training tool
- Time for action - creating a lesson module
- Time for action - creating a content page
- Time for action - creating a question page
- Time for action - creating page jumps
- Time for action - testing your lesson
- Creating groups and groupings to manage employees going through training
- Time for action - creating groups in your course
- Time for action - enabling groupings in your course
- Time for action - enabling group mode
- Time for action - creating groupings
- Time for action - filtering activity access via groupings
- Time for action - adding users to groups
- Using completion tracking
- Time for action - enabling completion tracking
- Time for action - configuring completion tracking in your course
- Time for action - configuring completion tracking at the activity level
- Course completion reports
- Time for action - adding the completion status block to your course
- Case Study—Aer Lingus
- What was the business problem(s) for which Moodle was chosen as the solution?
- What was the solution and how did they arrive at the solution?
- Why did they choose Moodle?
- Was the project a success?
- What were the benefits gained?
- Summary
- 5. CPD and Competency Tracking with Moodle
- Some points to keep in mind
- Enabling Outcomes in Moodle
- Time for action - enabling Outcomes
- Time for action - creating a scale
- Time for action - editing topic summaries
- Time for action - adding an Outcome to a course
- Adding an Outcome to an activity
- Time for action - adding an Outcome to an online assignment
- Grading an Outcome in an assignment
- Time for action - grading the assignment
- Time for action - viewing reports
- Case study—National Health Institute, Italy
- What was the business problem(s) for which Moodle was chosen as the solution?
- What was the solution and how did they arrive at the solution?
- Why did they choose Moodle?
- Was the project a success?
- What were the benefits gained?
- What lessons were learned
- What advice does National Health Institute, Italy, have for businesses that plan to implement Moodle?
- Some thoughts
- Case study—Gulf Agency Company
- Summary
- 6. Communities of Practice in Moodle
- Creating a wiki for your community
- Time for action - adding a wiki to the community site
- Time for action: Revert a wiki page
- Creating a collaborative glossary
- Time for action - creating a glossary
- Time for action - creating the basic database shell
- Time for action - Creating the database fields
- Time for action - edit the display template for a database
- Creating community moderators
- Time for action - creating the moderator role
- Time for action - Assigning the role to a user in a forum
- Editing privileges for an existing role
- Time for action - editing the privileges in a forum
- Time for action - checking the users permissions
- Using RSS feeds to improve communication
- Time for action - Enabling RSS
- Time for action - Enabling RSS in a forum
- Time for action - creating an RSS feed block
- Case Study—Adapt
- What was the business problem(s) for which Moodle was chosen as the solution?
- What was the solution and how did they arrive at the solution?
- Why did they choose Moodle?
- Was the project a success?
- What were the benefits gained?
- What were the lessons learned?
- Do you have any advice for future businesses that plan to implement Moodle?
- Summary
- 7. Web Conferencing with Moodle
- Some points to keep in mind
- Background on web conferencing
- Technology and web conferencing
- Time for reflection
- Using Adobe Connect Pro with Moodle
- Time for action - find and install the module
- Time for action - unzipping and uploading
- Time for action - creating an activity
- Time for reflection
- Using BigBlueButton with Moodle
- Time for action - find and install the Module
- Time for action - Unzipping and uploading
- Time for action - creating a BigBlueButton activity
- Time for reflection
- Case study—Remote-Learner
- What was the business problem(s) for which Moodle and Web Conferencing was chosen as the solution?
- What was the solution and how did they arrive at the solution?
- Why did they choose Moodle with these web conferencing platforms?
- Was the project a success?
- What were the benefits gained?
- What lessons were learned?
- What advice does Remote-Learner have for businesses that plan to implement Web Conferencing with Moodle?
- Some thoughts
- Reflection
- Summary
- 8. Integrating Moodle with Other Systems
- Managing content in repositories
- Time for action - installing Alfresco on your test site
- Time for action - add a repository plugin to Moodle
- Time for action - adding content to Alfresco
- Time for action - adding content from Alfresco to Moodle
- Time for action - creating a content conversion space
- Time for action - adding a content rule to a space
- Time for action - testing your new rule
- Time for action - configuring the Google Docs plugin
- Time for action - adding a Google Doc to your Moodle course
- Time for reflection
- Exporting content to e-portfolios
- Time for action - installing Mahara
- Time for action - configuring the networking and SSO
- Time for action - enabling Mahara portfolio plugin
- Time for action - enabling Mahara to listen to Moodle
- Time for action - creating a Mahara portfolio
- Time for action - setting up the Google Docs portfolio plugin
- Time for action - exporting from a forum to Google Docs
- Case study
- Summary
- 9. Integrating Moodle into Enterprise
- Authentication plugins available in Moodle
- Time for action - enabling the LDAP plugin
- Time for action - enabling the external database plugin
- Time for reflection
- Enrollment plugins available in Moodle 2.0
- Time for action - automating enrollment with flat file
- Time for action - creating an enrollment flat file
- Time for action - editing flat file enrollment plugin settings
- Time for action - automating enrollment with external database plugin
- Time for reflection
- Customizing the look of your Moodle site
- Time for action - applying standard themes
- Time for action - customizing themes with theme customization forms
- Time for action - changing the site header
- Time for action - editing language strings
- Case study—Raiffeisen International Fund Advisory
- What was the business problem(s) for which Moodle was chosen as the solution?
- What was the solution and how did they arrive at the solution?
- Why did they choose Moodle?
- Was the project a success?
- What were the benefits gained?
- What were the lessons learned?
- Do you have any advice for future businesses which plan to implement Moodle?
- Do you have any other thoughts or comments on Moodle?
- Summary
- A. Case study credits
To create a group in your course follow these steps:
- Make sure you are logged into your course as an administrator or teacher and editing is turned on.
- From the Course administration menu under the Settings block, select Users, and then select Groups.
- Click on the Create group button located at the bottom left of the screen.
- Enter the group name in the Group name field. For our example, enter "Safety L1".
- Enter a group description in the Group description text area if needed.
- Leave the Enrolment key blank for this example. In the future, if you add an enrolment key to your group and a user enrols in a course with that key, they will be automatically added to that group. This could be helpful once you have your course set up and want to automate enrolment in a track.
- If you want, you can assign a picture to a group. This is what the last two settings are about. If No is selected for the Hide picture setting, then if there is a picture associated with the group it will be displayed. The last setting, New picture, is where you can upload the picture you want associated with the group. The following screenshot shows the Create group page for our example:
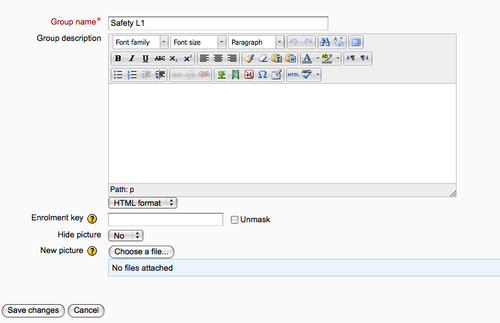
- Scroll to the bottom of the page and click the Save changes button.
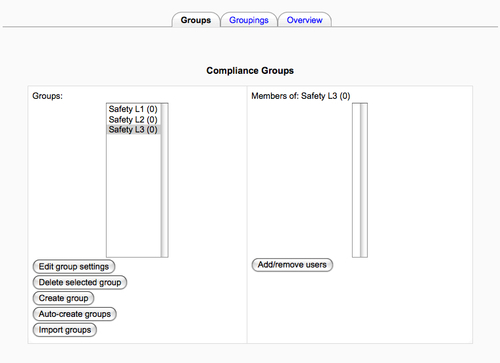
- For our example, go through steps 1 to 8 two more times to create the following groups: Safety L2 and Safety L3. Once you have created three groups, you should see them listed on the Groups page as shown in the following screenshot:
-
No Comment
..................Content has been hidden....................
You can't read the all page of ebook, please click here login for view all page.