
Once you've configured Moodle for Mahara networking, you must also enable Mahara to listen for Moodle users. There are two steps to this process. First, we need to enable networking at the site level. Then, we need to create an institution for the Moodle users in Mahara.
- Login to Mahara as a site admin.
- In the menu at the top of the page, click Site administration.
- From the Admin home page, select the Configure Site tab. Then select the Networking sub-tab.
- Set Enable networking to Yes.
- Be very careful if you decide to enable Auto-register all hosts. This will allow anyone who has a Moodle site and knows the URL of your Mahara instance to connect their Moodle to your Mahara.
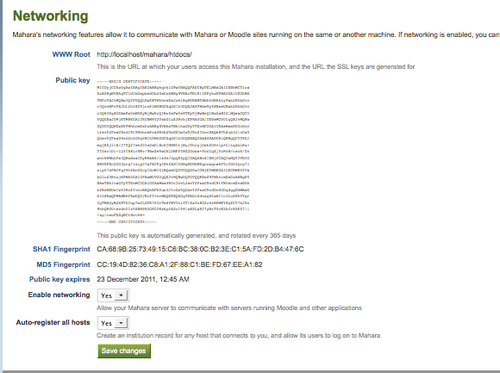
- Click on Save changes.
- Now we need to create a new institution for your Moodle site. Institutions in Mahara are like sub-sites, with their own collection of users and peer groups. To start the process, click on the Institutions tab.
- From the Administer Institutions page, click the Add Institution button.
- Set the institution name to the name of your Moodle website. Set the display name to a shorter but understandable version of the name.
- Leave the institution expiry date set at Not specified.
- Uncheck the Registration allowed button. This will disable the manual registration for this institution and force all user accounts to be created through Moodle.
- Leave the Default Membership Period, Theme, and Maximum User Accounts blank.
- Click on Submit. Mahara will take you to the editing screen for your new institution.
- Now we have a base institution but we need to associate this institution with Moodle. We will use an authentication plugin to enable Mahara to communicate with Moodle. From the Authentication plugin menu, choose XMLRPC—Authenticate by SSO from an external application and click Add.
- The Add an Authority window will pop up. The Authority we are adding is your Moodle server. The Authority Name should be something to help you identify the server later. Use "Moodle" or something similar.
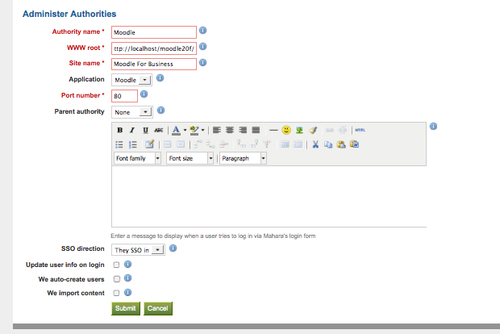
- Copy the base URL for your Moodle server into the WWW root field.
- The Site name is a display field to help users identify from which site they have come to Mahara.
- Set the Application menu to Moodle.
- If your Moodle site is running on a different port than the standard port 80, enter the port here.
- If you set a Parent authority, users will be able to log in using that login method as well as the Moodle SSO. If you want users to directly log in to Mahara as well as come through Moodle, set this to Internal.
- If you don't set the Parent Authority, and users have the URL for the Mahara login, then you will need to add a login error message to the text area below the parent authority. Be sure to include the link to your Moodle login with the error message.
- The SSO direction sets the direction of the authentication. To enable Moodle users to login to Mahara, leave this set to They SSO in.
- Set the checkbox for Update user info on login. This will enable Moodle to update any user profile information that may have changed between logins.
- The We auto-create users enables Mahara to automatically create users who come from Moodle but don't have accounts in Mahara. You will usually want to set this to Yes.
- The We import content option will allow your users to export content from Moodle and save it in Mahara. Check this box.
- Click on Submit.
- You will now be taken back to the Administer Institutions page. Click on Submit again.
..................Content has been hidden....................
You can't read the all page of ebook, please click here login for view all page.