
The default layout for the display templates in Moodle is usually not refined enough to use on a community site. Since the templates are automatically generated, the display is usually too generic. We'll look at how to change the List template in this example. Many of the skills we will learn here will enable us to modify other templates.
- Select your database as a user with editing privileges for the course.
- From the database page, select the Templates tab. From this page, you can edit the display templates for the database.
- Select the List template from the list below the tabs. We'll focus on this template for this example. We would like to create a list view with each resource on one row.
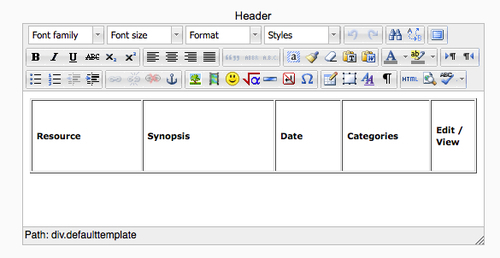
- The Header field displays the header for the page. It is only displayed once, so we'll use it as the header row in our list. We want it to display the name of each field which we will display in the list view. Create a table of one row with five columns. In each column, put the label for the data: Resource, Synopsis, Date, Categories, and a column for the Edit and View buttons.
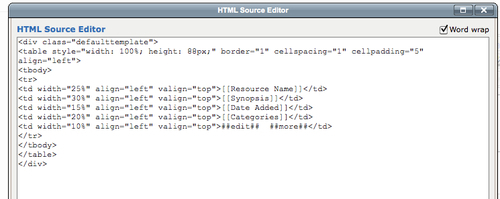
- If you want finer control over the display of the table, switch to HTML mode by selecting the HTML button. This will switch the editor over to code view. You can then enter the HTML by hand, which enables you finer control and will make it easier to line up the columns in the header and the repeated entry. For this example, I used the following code to display the header table:
<div class="defaulttemplate">
<table style="width: 65%; height: 88px;" border="1" cellspacing="1" cellpadding="5" align="left">
<tbody>
<tr>
<td width="25%" align="left" valign="middle"> <strong>Resource</strong></td>
<td width="30%" align="left" valign="middle"> <strong>Synopsis</strong></td>
<td width="15%" align="left" valign="middle"> <strong>Date</strong></td>
<td width="20%" align="left" valign="middle"> <strong>Categories</strong></td>
<td width="10%" align="left" valign="middle"><strong>Edit / View</strong></td>
</tr>
</tbody>
</table>
</div>
- Now we need to create the repeating row for each entry. Copy your table from the Header area and paste it into the repeated entry to get the basic structure of the table.
- Now we need to tell Moodle to replace the text in the table cells with the data from the database. Field replacement is designated by double square brackets on both sides of the field name. For example, to replace the text in the Resource cell with the actual name of the resource, enter [[Resource Name]]. The Available Tags window on the left side displays all of the available tags to help you remember what you named your fields.
- In the Edit/View column, we want to display the icons to edit or view the entry in the database. To replace the text with an action button, use a double hash around the command. For example, to place an edit button on the screen, use
##edit##to tell Moodle to display the edit icon, instead of the word "edit". The available action buttons are listed in the Actions list in the Available Tags window on the left side.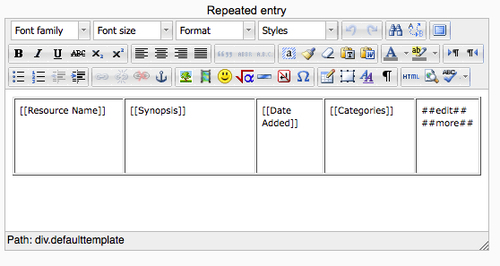
- Again, you can use the HTML view to gain finer control over the display of the table. The code that I have used in this example is:
<div class="defaulttemplate">
<table style="width: 100%; height: 88px;" border="1" cellspacing="1" cellpadding="5" align="left">
<tbody>
<tr>
<td width="25%" align="left" valign="top">[[Resource Name]]</td>
<td width="30%" align="left" valign="top">[[Synopsis]]</td>
<td width="15%" align="left" valign="top">[[Date Added]]</td>
<td width="20%" align="left" valign="top">[[Categories]]</td>
<td width="10%" align="left" valign="top">##edit## ##more##</td>
</tr>
</tbody>
</table>
</div>
- Once you have made your changes, be sure to click on Save template at the bottom of the screen. It's quite frustrating to make a number of changes to the template only to lose them by selecting the View List tab before saving your changes.
- After you have clicked on the Save template button, select the View List tab. You should see all of the resources listed in a nice tabular format.
You have just modified the display template for the database list view. Creating a useable, nice looking interface for the database will increase the likelihood of community members engaging with the activity and sharing resources with each other.
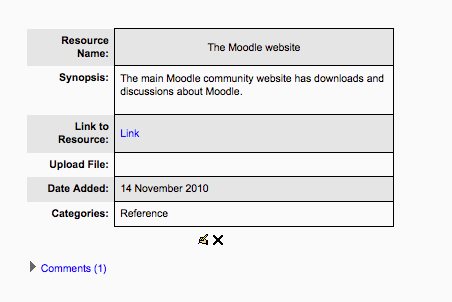
Improve the View Single template to make it easier to read. Add a border around the table and alternate the background shading in every other row. See the following image for an example.
As you build tools for your community, refer to the framework from Chapter 1, Getting Started with Moodle. In your community site, how will you measure the impact of the "community of practice" on your organization? What problems are you hoping to solve by implementing a community of practice?