
To create an activity, we must first either create a test course, or go into an existing course which you have editing rights on. As always, when planning changes, make sure that editing is turned on to allow you to add activities.
- In the topic you want to add the Adobe Connect activity, select the Add an activity dropdown and select the Adobe Connect option. This brings up the Adding a new Adobe Connect screen.
- As normal with activities, the first field is the text which appears on the course page for the link to the activity. Type Test Adobe Connect Room in the Adobe Connect field.
- The Intro field should hold any guidance information that you want participants to follow when entering the room. This could be information about login (if you are using the hosted account) or a link to the "Acceptable User Guidelines" for interactions in virtual classrooms.
- The Meeting URL is an optional field. If you want to customize the URL of the room you can do so. However, in this case, we won't. So leave it blank. If you want more information on this setting, you can check out the "help" icon which explains how to customise the URL.
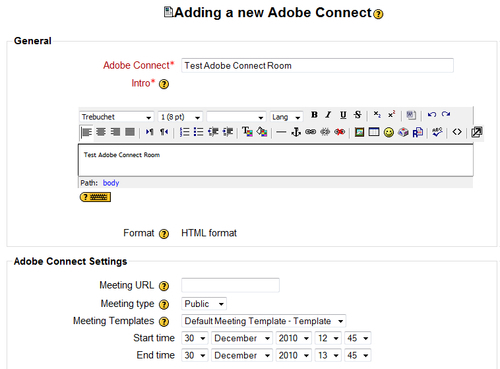
- The Meeting type field allows you to set the meeting type. Private will be available to just those with privileges and Public will be available to anyone who has the URL of the meeting. For this example, create a Public meeting room by leaving the fields to their default information.
- If there are meeting templates on the server, the Meeting Templates drop-down will provide a choice of the type of template to use in creating the meeting.
- The Start time field should be filled in with the information about when the meeting will begin. You should remember that some people would like to be able to join a few minutes early, so take this into account when setting meeting times. If you leave the field with the default information, the meeting will be set to begin immediately.
- The End time option is also set to the same time as the start, by default. If you want the meeting to be one hour long, increase the time field of the End time.
- For this example, you can leave the Common module settings to their default values. There is support for Moodle groups in Module which enables us to ensure that only the users who are part of a group can join meetings for their specific group. However, for this example you can leave that setting to its default.
- Click on Save and Return to Course.
- You will notice the entry Test Adobe Connect Room is now displayed in the topic that you added it to.
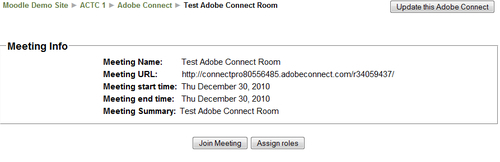
- Click on the link Test Adobe Connect Room and it will display the summary of the meeting information. This is what the users will see when they click on the link.
We just added an Adobe Connect test room to our course. The default setting options are easy enough to follow, but the available options give you a lot of control over the usage of the meeting room.
We also looked at the basic configuration options and the summary information page for the meeting. There are two options left, either to enable roles on the room using the Assign roles button or to Join Meeting. Enabling roles can be done when the meeting is set to private. The person who creates the room is automatically assigned the role of Host for the Adobe Connect meeting. A public meeting also automatically assigns users the role of a participant unless they are assigned Host or Presenter in the roles screen.
After clicking Join Meeting, you will be brought to a new window or tab depending on your browser settings. If you are the presenter and have not been presented with Adobe before, you will be prompted to install the updated Adobe Connect Add-in to share your screen with other users, upload files, and experience the enhanced version of the VOIP. This is advisable to get the most out of the Adobe Connect Pro meeting room, but it's not required. I clicked on Yes.
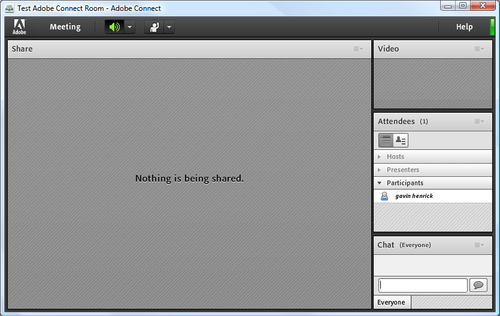
The screen you see that is displayed when you are a participant looks like the the following image. This is the standard meeting layout, with the Share, Video, Attendees, and Chat blocks on the window.
The Host and Presenter roles are given a different view. There are a lot of extra possibilities in layout and content of the screen. An example of a default layout is shown in the following image. As you can see, as a host, you are prompted if you want to share your screen, documents, or a whiteboard. This is a very user friendly interface.
