
Unzip the module download file using your available application. This should create a folder called bbb_activity_module_moodle20. Inside this folder, there is a mod folder which contains the actual bigbluebutton folder of files.
- Using your FTP client, connect to your Moodle site host server.
- Using your FTP client, browse to the
modfolder inside your Moodle installation and to themodfolder in yourbbb_activity_module_moodle20folder. - Select the local
mod/bigbluebuttonfolder and upload this to themodfolder on the Moodle server. - Once all the files are uploaded, you need to log into your Moodle site.
- Once logged in as admin, you will be prompted to upgrade to include the new plugin.
- Click on the Upgrade button at the bottom of the page.
- If the installation has gone well, the screen will display the name of the mod followed by Success. You then click on the Continue Button.
- One of the nice things about using this module is that it comes with some test settings already, as shown in the following image:
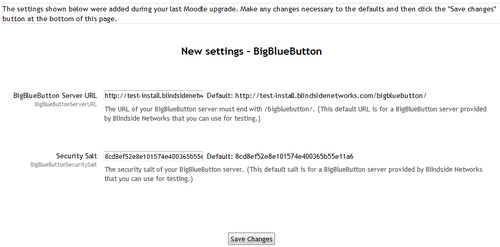
However, if you have your own server setup, or a hosted server to which you have the URL and Security Salt settings, you should use them here.
- Once you have completed all the settings, click on Save changes.
After we had downloaded the BigBlueButton module from the Moodle website, we had to unpack it (unzip it) and then upload the files (mod) to the Moodle site with FTP.
Once uploaded, we logged into our Moodle website as administrator and triggered the installation of the module using the Upgrade button. This created any database tables required to run the module and then enabled the block by activating it within Moodle.
We then entered in the key configuration information which we would have got from the BigBlueButton Server Administrator or chosen to leave the test settings as they were.
Finally, we saved the settings and are now ready to create a BigBlueButton activity within our Moodle course.
The BigBlueButton Meeting Module has some different features from the Adobe Connect Pro Module. This is a very simple integration. There are other more complex integrations available, and you may want to assess the other ones at some other time.
The BigBlueButton Module interacts with the BigBlueButton server over web services allowing an admin or teacher to schedule a meeting as a Moodle activity. The user management takes place with Moodle so that students do not require a second login. Students will join the virtual classroom as a viewer, and the admins or teachers on Moodle will join as moderators.