
A full discussion of the features and uses of Mahara is beyond the scope of this book. There are a few titles available for a fuller coverage of Mahara's features. To get us started with Mahara and explore the Mahara/Moodle integration, we'll explore creating a simple portfolio.
Each portfolio in Mahara is called a view. You can create a view for different audiences, organizing your files and other information tailored to each group of readers. You can also set access controls on each view, providing you with the ability to share information with select groups of users.
- Login to Moodle and go to Mahara using the SSO we configured previously. (Alternatively, login to Mahara as a user).
- Select the My Portfolio tab at the top of the screen. This will take you to the My Views sub-tab as well.
- To create a new view, click the Create View button in the upper-right corner of the My Views area. This will take you to the Edit Content and Layout screen.

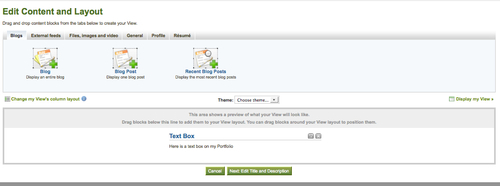
- The Edit Content and Layout screen has three main sections. Below the heading are the tabs for the various view widgets which you can add to your view. Below the tabs are the widgets you can drag into the layout area. To add a widget to your view, simply drag it from the widget display box to the layout area.
- To add content saved from Moodle, click on the Files, images, and video tab. To allow the user to see a single Moodle posting or other activity, drag an HTML widget to the layout. In the Configure pop-up window, navigate to the file from Moodle at the bottom of the screen in the Home files browser. Click on the Select button to choose the file, then click on Save.
- To allow users to view all of the content from Moodle, you can add a folder to your view. Drag the A Folder widget into your layout. In the Configure pop-up, navigate to the folder with your Moodle content and click on Select. Click on Save to return to the layout view. The folder widget will list all of the files in the folder you selected.
- Add other widgets, including any profile information or information from your resume.
- When you have added all of the widgets you want on your layout, click on the Next button.
- On the Edit Title and Description screen, give your view a title. Make sure that the title is descriptive for your intended audience.
- In the View Description box, provide a brief description for the view.
- If you want to add meta tags to your view, add them to the tag's text field. Separate each tag with a comma.
- In the Name Display Format, choose how you want your name to be displayed in this view.
- Once you have finished on this screen, click on the Next: Edit Access button.
- The Edit Access screen allows you to set a number of view options for your view. Allow Comments allows users to leave comments on your view. This is not a recommended option for views available to the public.
- Checking Moderate Comments is recommended to ensure you can control the comments in your view.
- Allow Copying will allow other users to make copies of your view, including files or folders.
- The next section determines who can access your portfolio. To add a group, click the Add button next to the group name. The default groups include:
- Public: Allows anyone to view your profile
- Logged in users: Your view will be available to anyone with an account and logged into the system.
- Friends: Only people you have identified as Friends in Mahara will have access to your view.
- Secret URL: This option makes your portfolio visible only to people who know a special URL. While this option prevents people from randomly guessing the URL of your view, it does not provide any security.
- Overriding Start/Stop Dates allows you to set start and stop dates for views of your profile, irrespective of the level of other access you may have granted them.
- Make your selections and click on Save.
- Once you click on Save, you will return to the My Views screen. The synopsis of your new view will be listed there. If you want to share a particular view with an audience, you can copy and paste the URL from your My Views list and they will be able to go directly to your view.
You have now created a view of your work in Mahara. This is the basic function of Mahara, to present views of collections of work for viewing and evaluation by others. Mahara has many more features, but they are beyond what we can cover in these pages.
While Mahara is a very well featured, dedicated e-portfolio system, it may not be suitable for all businesses. As we discussed with repositories, Google Docs may provide a simple solution for exporting content from Moodle for sharing with other audiences. For example, if someone in a community of practice has posted a solution for a problem in a forum, you may want them to export their post to Google Docs for final editing and sharing as a best practice.