Your first step in creating the competency test using the Moodle quiz module is to create a quiz and set up the conditional availability to the competency test. We will set it up so that only applicants with a score greater than 85% will be allowed to move on to the next step and take the competency test.
- Create a label for Section 2 using the process you used for Section 1. Call Section 2 Competency Test.
- Under the Add an activity... menu in Section 2, select Quiz.
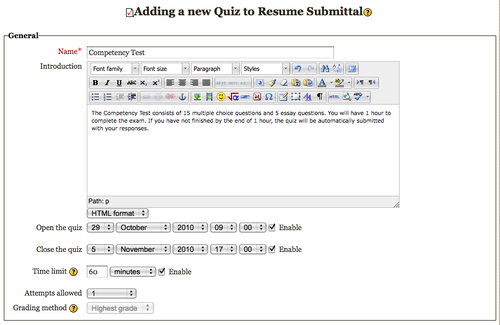
- You will then be brought to the Adding a new Quiz page. On this page you will enter the title of the quiz in the Name field. For our example, we will keep it simple and call it Competency Test.
- In the Introduction field, enter the instructions for the quiz. These usually cover any instructions or tips you would like to give the user. For our example, we've listed the number of questions and the time they have to take the exam. Refer to the next screenshot.
- The next two fields are Open the quiz and Close the quiz. These allow you to enter the dates from which the quiz will be available to applicants. To set the open and close dates for the quiz you must first select the Enable checkbox, and then enter the dates. For the purposes of this example, we will choose the date all resumes had to be submitted by as the start date and close the quiz a week later.
- Next is the Time limit field. Here you can enter the amount of time that the applicants will be given to complete the exam. If you want to set a time limit, click the Enable checkbox and then enter the amount of time allotted for the exam. If you enable the Time limit feature, then during the exam the applicant will see a timer window with the countdown. After time is up, the quiz will be submitted automatically. For our example, we will give them 60 minutes to complete the competency test.
- The Attempts allowed field allows you to enter the number of times an applicant is allowed to retake the test. If no retakes are allowed, then enter 1.
- If you have entered more than 1 in the Attempts allowed field, then you will need to select the Grading method in the drop-down menu found at the end of the General section. There are four different grading methods:
- Highest grade: The final grade given will be the highest grade of all attempts.
- Average grade: The final grade given will be an average of all attempts.
- First attempt: The final grade given will be the grade received in the first attempt.
- Last attempt: The final grade given will be the grade received in the last attempt.
- In our example, we are only going to allow one attempt, therefore we will not need to enter anything for the Grading method. The next screenshot shows the General section completed with our example:
- The Layout section comes after the General section. Question order allows you to select if the questions will be displayed randomly or in the order in which you enter them into the quiz. We will select As shown on the edit screen from the drop-down menu because you will probably want to have control over the order of the questions.
- The New page field under the Layout section allows you to select the number of questions displayed per page. We will leave it at Every question so that there is one question per page.
- In the Question behavior section, you can select whether you want possible answers to be shuffled for the questions. If you have a test with a lot of multiple choice questions, with responses that don't need to be in a particular order, then it is good practice to select Yes for this and shuffle the question answers.
Tip
Beware of "All/None of the above" responses.
We once had a client for whom we were converting quizzes from print to Moodle quizzes and the client wanted the answers to shuffle with every attempt. There were several questions that had "All/None of the above" responses. This is fine in print or if you are not going to shuffle the answers. However, when the answers are shuffled and "All/None of the above" ends up somewhere other than the last option, it can be confusing.
Unfortunately, we did not catch this until many of the quizzes were already done. We then had to go back over several questions and change all these responses to "All/None of these are correct". It is a silly mistake, but it can be very time consuming to correct.
- The Adaptive Mode setting is applicable if you are allowing multiple attempts, which for a competency test is unlikely, so we will set this to No.
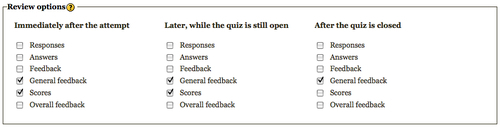
- Under the Review options section, you can select what type of feedback/results you want the applicants to have and when you want them to receive their feedback/results. This can be an effective tool in a learning process; however in a competency test this is not as important. We will select to let the applicants view their score on the test immediately after their attempt and later, while the quiz is still open. To set this up you simply select the checkboxes next to the review options you want applied. See the following screenshot for this example:
- Below the Review options section is the Display section. The first field, Show the user's picture, can be very useful in a proctored exam because while the user is taking an exam their picture will show up on the screen making it easy to confirm their identity.
- The other two fields in the Display section relate to the number of digits displayed after the decimal point when showing grades. The grades stored in the database are calculated to full accuracy; these settings just refer to the display of the grade. There are two fields: Decimal places in grades (which refers to the display of overall grades) and Decimal places in question grades (which refers to the display of your grade on a question). For our example, we will leave the default, which is 2 for both overall and question grades.
- Extra restrictions on attempts is the next section. For our example we don't need any extra restrictions so we will skip this section.
- In the Overall feedback section, you can provide feedback based on the score achieved on the quiz. It is likely that you will require a minimum score on the Competency Test before the applicant can move on to the next stage in the hiring process. The Overall feedback section is a good place to let the applicant know if they have passed the requirement and will move on to the next stage. Let's say the passing grade for the Competency Test is greater than 70%. You will set up an additional grade boundary to the first 100%. For the second Grade boundary enter 70%. In the first Feedback box, enter the feedback the applicant will receive if they obtain a grade between 70% and 100%. In the second Feedback field, enter the feedback the applicant will receive if they score below 70%. The following screenshot shows these fields completed for our example:

- Finally in the last section, Restrict access, we will set up the condition for being allowed access to the Competency Test. Under the Grade condition field, select the activity from which a minimum grade is required. In this example it will be the activity created to submit their resume/CV, entitled, Please submit your resume for the Available Position here. Then enter the minimum grade requirement, which is 85% for our example.
- In the Before activity can be accessed field, select whether you would like the activity to be grayed-out with the restricted information listed or whether you want it to be invisible before the activity is available to applicants. We will let it be grayed-out for this example.
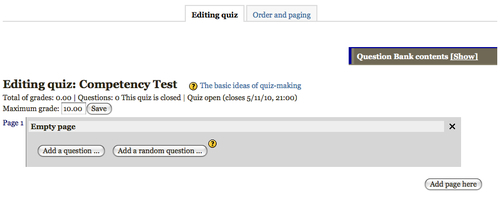
- Click on Save and display at the bottom of the page. You will then see a screen as shown in the following screenshot. You have now created a quiz and set up the conditions, but now we need to add questions!