
To create a wiki in your community site:
- Log in to Moodle as an administrator. Create a course for your "community of practice" following the instructions from Chapter 1, Getting Started with Moodle.
- Turn editing on in your course.
- Select Wiki from the Add an Activity menu in the first section.
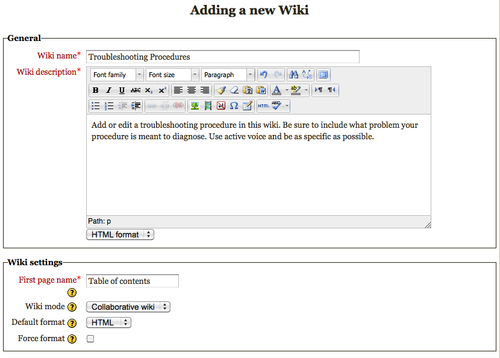
- On the Adding a new Wiki page, give the wiki a name. Give the wiki a descriptive name that explains the purpose of the wiki. For example, call the wiki Troubleshooting Procedures rather than something vaguer like Community Wiki.
- Fill in the wiki description area with instructions to the users about the purpose of the wiki and any suggestions for community standards or referencing. Do all of their statements need references? What sort of language is expected? Is the tone of the wiki formal or informal?
- In the wiki settings area, change the name of the first page. Make the name specific to help your audience understand the purpose of the wiki. For example, call the first page Table of Contents, rather than First page.
- For a wiki that everyone in the course can edit, leave the Wiki Mode set to Collaborative Wiki. Changing the mode to Individual Wiki will give each user his/her own wiki. This would be useful if you want everyone to write their own essay, but not as useful for a knowledge sharing site.
- Leave the Default format set to HTML. This will allow the users to stick with the HTML editor, rather than trying to learn the Creole or nWiki markup tags.
- If you want to prohibit users from using alternative markup, select the Force format checkbox.
- In the Common module settings, you will usually leave the Group mode set to No groups. However, if you have groups in the course, it might be useful to give them their own wiki space. To quickly enable a wiki for each group, set the Group mode to either Separate groups or Visible groups. Separate groups prevents group members from seeing another group's wiki area. Visible groups enables them to see, but not edit, another group's wiki.
- If the wiki is ready to go live, then make sure the Visible indicator is set to Show.
- For most communities of practice wikis, you don't want to restrict the availability of the wiki. You want it to be available to everyone in the community to collect the ideas of as many people as possible. I would recommend leaving the restrict availability settings as they are.
- Once you have entered the wiki settings, click the Save and display button. The next page will ask you to create the first page in the wiki. The new page title you entered in the settings page will be there. If you haven't forced the markup type in the settings, you can set the markup for the first page here. For the purposes of our example, I'll leave it set to HTML Format.

- After you select Create Page, Moodle will display the editing page for your new wiki page. The tabs across the top present your administration options.
- The View tab displays the page in read-only mode.
- The Edit view gives you the tools to edit or create the page. The comments tab allows users to leave comments on the page rather than edit the page.
- The History tab enables users to see the history of changes to the page, and even revert the page to an earlier version. The Map tab displays how the page is linked to other pages.
- In the Edit tab, the General area is for editing the page itself. Add the text for your page to the Content area. You can use the HTML editor as normal on this page.
- Below the General editing, you can add tags to the page to help other people find what you have written. Tags can be selected from the Official tags (tags created at the site level).
- To create a new page in the wiki, you first need to link to that page from the first page. To create a link with the HTML format, put a double square bracket around the words you want to link to a new page. The link to the new page should look like [[Link Text]] in the editor. Once you click on Save, the link text will be highlighted. Click the text and you will see the Create Page dialog. Click the Create Page button and you will be taken to the editing screen for your newly created page.
- Once you have created your page draft, select Save to save the page, or Preview to look at what you have done before making it public.
You have now created a wiki and the first page for your community members. The link to the wiki will appear in the topic where you added the activity. Community members can now begin to add new pages and edit each other's contributions to develop a community knowledge base.
Once you have created your community wiki, the community will have the ability to add and edit content. You or someone in the community may need to play the role of a wiki moderator to help shape the contributions and ensure that the wiki is useful to the community. There are a few tools in the wiki which you should know in order to help the community members create a useful resource.
..................Content has been hidden....................
You can't read the all page of ebook, please click here login for view all page.