
Database Roles
In the context of most applications, people naturally fall into groups of users that perform similar functions. Domino provides a security feature called Roles, which enables you to design the security of an application around required functions rather than around people.
Users, groups, and servers can be assigned roles, and after roles have been implemented, you can use them to control
Access to specific views or folders
Who can read documents
Who can create documents
Who can edit documents
Who can access sections within a document
Who can use actions or buttons that have been hidden with hide-when formulas
Who can see text hidden with hide-when formulas
Who can run an agent
Some of the many advantages of using roles include the following:
Roles rarely, if ever, change, whereas users and groups often change.
Roles reduce or eliminate the need to change the design of an application when users or groups change.
Roles can be used in formulas such as hide-when and in Readers fields.
Roles can be used to secure forms, views, documents, sections, fields, and agents.
Roles are database-specific, which means there is no need have access to the Domino Directory to create them.
Roles are easy to understand and implement.
Roles can simplify and reduce administrative overhead.
Creating a Role in the Database ACL
Creating a Role is easy, but you must have Manager access to a database to add, update, or delete roles. Follow these steps to create a role:
1. | Select the database in which you want to add a role. You must have Manager access to do this. |
2. | Select File, Database, Access Control from the menu. Alternatively, you can right-click the database icon and choose Database, Access Control. |
3. | Click Roles (at the left of the Access Control dialog box, marked by the happy and sad masks) to open the ACL Roles dialog box, shown in Figure 10.7. |
4. | Click the Add button, which opens the Add Roles dialog box. |
5. | Enter the name of the new role. Keep in mind that the maximum allowable number of characters is 15. |
6. | Click OK to add the role. |

After a role has been created, you can assign it to users and groups in the ACL (if you have Manager access to the database). To do so, follow these steps:
1. | Select the database in which you want to add a role. |
2. | Select File, Database, Access Control from the menu. Alternatively, you can right-click the database icon and choose Database, Access Control. |
3. | Select any entry in the ACL. |
4. | Select a role from the Roles dialog box. (A check appears beside each role that has been applied to an ACL entry.) The resulting settings appear in the Basics option of the ACL dialog box, as shown in Figure 10.8. Figure 10.8. The Basics option of the database ACL dialog box with roles selected.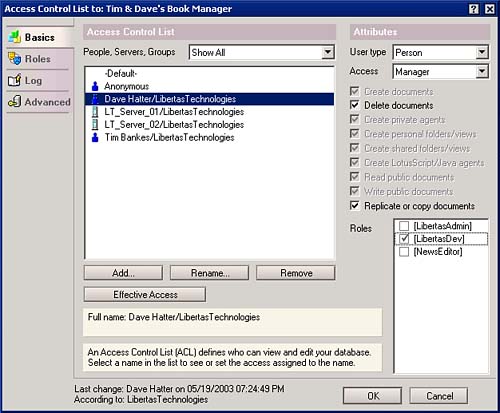 |
 | Be sure to remember that when a Role is created, Domino automatically encloses it in square brackets ([]). For example [Libertas Admins]. If you use a role, you must include the brackets. |
After associating roles with entries in the ACL, you may begin using the roles in design elements and documents to dictate what users can do and see in each Domino database.
Using Roles to Determine User Access
Roles can be used in two basic ways to determine what a user can do. Roles can be
Specified in a Form Access, View Access Folder Access, Section Access, or Agent Access list, or as the value of a Readers or Authors field.
Used in a formula to determine whether a user can see a design element or use a feature such as an action.
To specify a role in a Form Access, View Access, Folder Access, Section Access, or Agent Access list, select the properties for that design element, choose the Security tab, and select the appropriate role from the list of choices.
To use roles in Readers and Authors fields, it is a simple matter of either hard-coding the appropriate role into the field formulas or using a formula to compute the proper role. (I would recommend the latter approach in most cases.)
If you want to use roles to selectively hide or show design elements within a form, you should familiarize yourself with three very important @functions that facilitate working with roles in formulas. These functions are @UserRoles, @UserNamesList, and @IsMember, each of which is defined in Table 10.1.
 | Hide-when formulas do not provide true security because a user may be able to read the contents of a hidden field in other ways such as though the Document properties box, in a different form or view, or in the source code of a Web page. If absolute security is required, use one or more Readers fields in a document and/or encrypt the most sensitive fields. |
| Function | Description |
|---|---|
| @UserRoles | This function takes no parameters. For a database on a server, or a local database with the Enforce a Consistent Access Control List Across All Replicas option enabled, this function returns a text list of roles that have been assigned to the current user. Each role is enclosed in square brackets, as in [LibertasDev]. For a local database without the Enforce a Consistent Access Control List Across All Replicas option enabled, or if the user has no roles, an empty string (“”) is returned. If a database is being opened by a Web client, the value $$WebClient is appended to the list of user roles. |
| @UserNamesList | This function takes no parameters. For a database on a server, or a local database with the Enforce a Consistent Access Control List Across All Replicas option enabled, this function returns a text list consisting of the current username, as well as group names and any roles for the current user. Each role is enclosed in square brackets, as in [LibertasDev]. For a local database without the Enforce a Consistent Access Control List Across All Replicas option enabled, or if the user has no roles, an empty string (“”) is returned. |
| @Ismember(string, list) | This versatile function can be used in many instances, but makes working with lists easy. It takes two parameters: a string to find within a list, and the list to search. It returns TRUE (1) if the string is found and FALSE (0) if not. You can use this function in conjunction with either @UserRoles or @UserNamesList to determine whether a user has been assigned a role. |
The examples in Table 10.2 illustrate using these functions to determine a user's roles.
| Example | Result |
|---|---|
| @IsMember(“$$WebClient”;@UserRoles); | -TRUE (1) if the client is a Web browser, otherwise FALSE (0). |
| @IsMember(“[LibertasAdmin]”;@UserRoles); | -TRUE (1) if the user has been assigned the [LibertasAdmin] role, otherwise FALSE (0). |
| @IsMember(“[Readers]”;@UserNamesList); | -TRUE (1) if the user has been assigned the [Readers] role, otherwise FALSE (0). |
To use roles in hide-when formulas to selectively show or hide a design element, use the following steps:
1. | Select a design element, such as a field or action, and open its properties box. |
2. | Click the Hide-When tab. (It looks like a window shade.) |
3. | Click the Hide Paragraph If Formula Is True option. |
4. | Enter a formula that will ultimately evaluate to TRUE (1). |
