
Creating, Modifying, and Troubleshooting Shared Actions
An action is a programmable button that can be used to automate tasks. Actions normally appear in the Action bar, which can be displayed in forms, subforms, pages folders, and views. There are two types of actions: single-use actions and shared actions. A single-use action can only be used in the form, view, folder, or page where it is created. (Single-use actions are covered in Chapter 4.) Shared actions can be shared across design elements in a database, allowing you to modularize your applications and save time.
Additionally, shared actions can be used anywhere that single-use actions can be used, including in the Actions menu in the Notes client. Actions are most often used in the following situations:
When you want to automate a function but don't want the code stored with each individual design element.
When Web clients need substitutes for Notes client menu choices (through the Action bar).
When users need to see all the possible choices in a nonscrolling row at the top of a form, page, or view. When buttons are placed in a form or page, they scroll with the form.
When the function the action performs isn't limited to a particular section of a form or page.
When you want to share an automated function among several design elements, making the maintenance of the application easier.
Action Coding Choices
When you create an action, you have several coding choices, depending on which environment (Web or Notes client) the action will be used in. Additionally, you may elect to use one of the predefined System actions Lotus has included.
Notes Client Coding Choices
Actions that will be used in Notes client applications can be programmed using any of the following choices:
Simple actions
Formulas
JavaScript
Common JavaScript (shared library)
LotusScript
Web Coding Choices
Actions that will be used in Web client applications can be programmed using either of the following choices:
JavaScript
Common JavaScript (shared library)
System Actions
Domino provides a set of predefined actions, known as System actions, that automate some of the most basic and common Notes features. The System actions are described in the following list:
Categorize— Used to add values to the Categories field in the current document
Forward— Used to copy the current document to a new email memo
Move to Folder— Used to move the current document to a specified folder
Remove from Folder— Used to remove the current document from a specified folder
 | System actions that use system commands will not work on the Web. Instead, you should create custom actions to replicate their functionality. |
Creating Shared Actions
Follow these steps to create a shared action that can be used in any form, page, or view.
1. | In the Notes Designer client, open the database that will contain your shared action. |
2. | Select Shared Code, Actions, which will display the list of existing shared actions. |
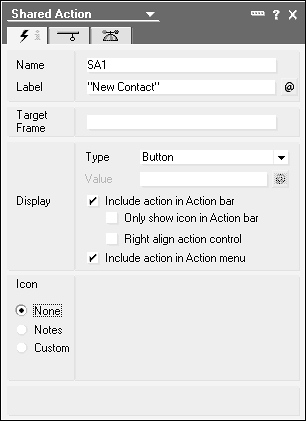
3. | Click the New Shared Action button. This opens the Shared Action properties box shown in Figure 9.2. |
4. | Enter a name for the action. |
5. | (Optional) Enter a label, which is descriptive text displayed to the user. To enter a label, write a formula that will compute a value to display for the action's label. If a label is not supplied, the action's name will be used for the label. |
6. | (Optional) If you plan to display the action within a specific frame, select the target frame. |
7. | Select the location and position of the action and optionally enable the following options:
|
8. | If you are displaying the action as a button on the Action bar, you can select a graphic icon to display in the button. If you want to use an image, determine whether it is to be Notes (which uses the palette of available icons that comes with Notes) or Custom (which enables you to select an image resource of type GIF or JPEG). |
9. | |
10. | Select the appropriate choices, all of which are fairly self-explanatory. If the action should be hidden under certain conditions, check the Hide Action If Formula Is True check box and enter a formula that evaluates to TRUE when the hide-when conditions are met. |
11. | (Optional) Define OLE settings for the action in the Advanced tab (the third tab). |
12. | Close the Action properties box. |
13. | In the Objects tab of the Programmer's Pane, select the action you just created. |
14. | Expand the Run pull-down list and choose the environment in which the action will run: Client or Web. |
15. | Choose a coding choice appropriate for the selected environment and enter your code. |
16. | Save the shared action. |
Using a Shared Action
Once you have created a shared action, using it is simple. Just follow these steps:
1. | In the Designer client, open the database that contains the form, page, or view in which you want to use the shared action. |
2. | Open the form, page, or view. |
3. | Choose Create, Action, Insert Shared Action. This opens the Insert Shared Action dialog box. |
4. | Choose one or more of the shared actions displayed and click insert. |
Modifying Shared Actions
To modify a shared action, follow these steps:
1. | In the Designer client, open the database that contains your shared action. |
2. | Select Shared Code, Actions, which will display the list of existing shared actions. |
3. | |
4. |
Troubleshooting Shared Actions
Problems with actions usually fall into one of two categories: actions that are either hidden or visible at inappropriate times, and programming problems. Each is examined in the following sections.
Troubleshooting Action Hide-Whens
Follow these steps when troubleshooting action hide-whens:
1. | In the Notes Designer client, open the database that contains your shared action. |
2. | Select Shared Code, Actions, which will display the list of existing shared actions. |
3. | |
4. | Click the Hide When tab. |
5. | Check the hide-when settings. If a hide-when formula has been used, ensure that the formula returns the value TRUE. If you are unsure, one easy way to test the formula is to create a Computed for Display field in a form and paste the formula into it. Then open the form and examine the value in the field. It should contain 1, the formula language value for TRUE. |
6. | Save the design element. |
7. |
Troubleshooting Action Programming
Follow these steps when troubleshooting action programming:
1. | In the Notes Designer client, open the database that contains your shared action. | ||||||||
2. | Select Shared Code, Actions, which will display the list of existing shared actions. | ||||||||
3. | Click the action to display the action's contents in the Programmer's Pane. | ||||||||
4. | Begin to debug the action. The type of action determines the most appropriate method of debugging. Table 9.1 lists the best way to debug a particular action based on its code.
| ||||||||
5. | Save the form or view. | ||||||||
6. | |||||||||
7. | Repeat steps 4–6 until the action works as expected. |