
The Domino Designer Application and Design Environment
Although there are numerous ways to open the Domino Designer, the easiest is to select a database and right-click it, which displays a pop-up menu. Select Open in Designer, which opens the Domino Designer shown earlier in Figure 12.1.
There are two basic “panes” within the Domino Designer window: the Design Pane and the Work Pane. The Design Pane maintains a list of databases that have recently been opened in the Designer, as well as a list of the design elements they contain. You can click the type of design element on which you want to work, and the Designer displays a list of those elements in the Work Pane.
The Work Pane displays a list of design elements of a given type, such as forms, views, or agents, within the selected database. A developer can then double-click the design element to open it, which then modifies the display of the Designer, as shown in Figure 12.2.
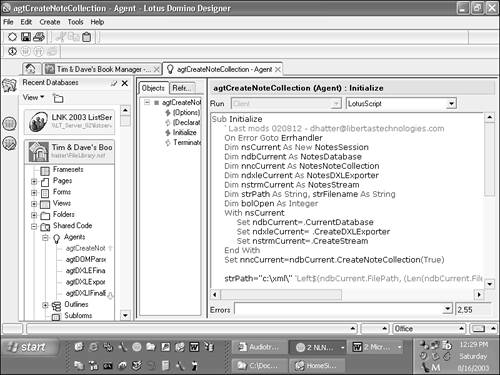
Opening a design element such as an agent makes Designer split the window into three panes. The Design Pane remains on the left side of the screen, providing quick and easy navigation between elements and databases, while the Work Pane is displayed at the top of the screen and is joined by the Programmer's Pane displayed at the bottom of the screen, as shown in Figure 12.2. The design element opened is displayed in the Work Pane and developers can modify user interface elements of the selected element, such as adding fields to a form, or modifying the columns within a view.
The Programmer's Pane at the bottom is used to enter programming code and provides a plethora of handy features that will simplify and speed your development efforts.
Automatically Enable Option Declare
The bane of all experienced LotusScript programmers is the use of implicitly declared variables, which are variables that are not formally declared in the code before they are used. The LotusScript language enables developers to manually specify that all variables be formally declared before they are used (explicit declaration) through the use of the Option Declare statement in the Options section. Designer 6 now enables you to automatically insert the Option Declare statement in the Options section, ensuring that developers must explicitly declare their variables, which is a good idea because it ensures cleaner, more maintainable code.
 | It is a best practice to require explicit variable declaration. The Option Declare statement is a handy new feature that makes it easier to write good code. I highly recommend that you enable this feature. |
To enable this option, open an element coded in LotusScript and follow these steps:
1. | Right-click in the Programmer's Pane and choose Programmer's Pane Properties from the menu, which opens the Programmer's Pane Properties dialog box. |
2. | Click the Format tab (second tab) to access the Format options, shown in Figure 12.3. Figure 12.3. The Format tab's options.
|
3. | Click the Automatically Add “Option Declare” check box in the Options section. |

Using the Programmer's Pane Auto-complete
Auto-complete is a very handy new feature of Domino 6 that uses type-ahead functionality to select and paste certain syntax elements directly into the Programmer's Pane as you are coding. If the syntax element that you have selected takes parameters, the valid parameters are displayed in the pop-up to help guide you as you code.
Auto-completion is available when coding the following:
@Commands
@Functions
LotusScript classes
Using the Auto-complete with @Functions
Auto-complete is a handy new tool that can aid developers using @Functions to code formulas. An @Function is a native function that can perform a calculation or task and return a value. To use Auto-complete when coding @Functions in the Programmer's Pane, follow these steps.
1. | Enter the “at” symbol (@) and pause momentarily to launch the Auto-complete pop-up, which displays a list of all available choices, as shown in Figure 12.4. |
2. | Begin typing the name of a function (type-ahead) or scroll through the list and select the appropriate function. For example: @Left( |
3. | After you have located the functions, press Enter to paste the function into the Programmer's Pane and close the pop-up list. |
4. | Optionally, for functions that take parameters, type a left parenthesis “(“ to launch a pop-up containing the syntax of the first signature. The first valid parameter appears bolded. If up and down arrows display, they indicate that you can press the up and down arrow keys to display the various options. |
5. | Optionally, if the function takes multiple parameters, enter a semicolon ( ; ) between each parameter, and the next parameter appears bolded. |
6. |

Using Auto-complete with @Commands
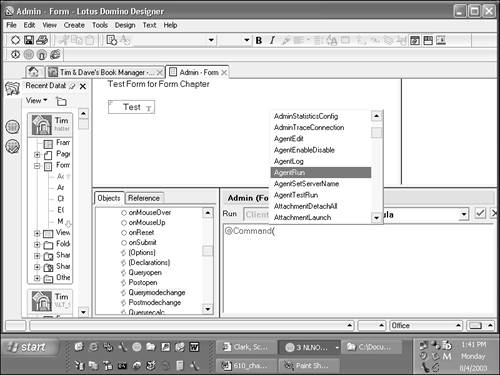
Auto-complete can also help developers using @Commands to code formulas. @Commands are a special type of @Function that provide a mechanism for developers to programmatically execute a Lotus Notes/Domino command. To use Auto-complete when coding @Commands in the Programmer's Pane, follow these steps:
1. | Enter the “at” symbol (@) and pause momentarily to launch the Auto-complete pop-up, which displays a list of all available choices, as shown in Figure 12.5. |
2. | Begin typing Command (type-ahead) or scroll through the list and select @Command, which then displays a list of valid commands. For example: @Command( |
3. | Begin typing the name of the desired command (type-ahead) or scroll through the list and select the appropriate command. After a command is selected, square brackets ([ ]) are added automatically. For example: @Command([AddBookmark]) |
4. | Optionally, for commands that take parameters, type a left parenthesis “(“ to launch a pop-up containing the syntax of the first signature. The first valid parameter appears bolded. If up and down arrows display, they indicate that you can press the up and down arrow keys to display the various options. |
5. | Optionally, if the command takes multiple parameters, enter a semicolon ( ; ) between each parameter, and the next parameter appears bolded. |
6. |
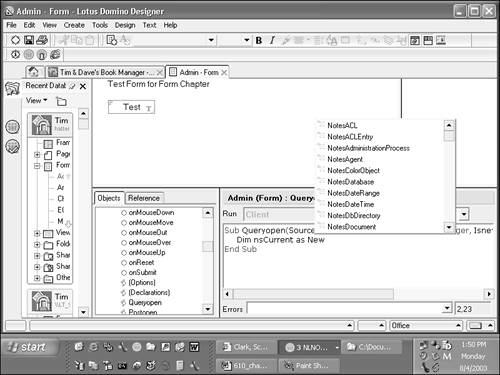
Using Auto-complete with LotusScript
With LotusScript, follow these steps to use Auto-complete when coding @Commands in the Programmer's Pane:
1. | Declare an object and enter a space following the As keyword to open a pop-up list of available classes, as shown in Figure 12.6. |
2. | Begin typing the name of a valid object, or scroll through the list and select the appropriate object. |
3. | Optionally, enter a period (.) after an object name, which opens a pop-up of methods and properties. |
4. | Optionally, from the pop-up list of methods and properties, either type ahead to select the desired element or scroll through the list and select it. Press Enter to paste the element into the Programmer's Pane. |
5. | Optionally, for methods that take parameters, type a left parenthesis “(“ to display a pop-up box displaying the parameter list. The first parameter appears bolded. |
6. | Optionally, enter a comma (,) between each parameter, which makes the next parameter bolded. |
7. |
Using Find and Replace in the Programmer's Pane
Another very useful feature of the Programmer's Pane is the Find and Replace capability it provides. In a nutshell, Find and Replace works much like the Windows find and replace tools: It enables you to quickly and easily find text in your code and optionally replace it. Using Find and Replace is quite simple. In the Programmer's Pane press Ctrl+F or choose Edit, Find/Replace from the menu, either of which opens the Find and Replace dialog box, as shown in Figure 12.7.

Using Find and Replace is pretty straightforward. Enter the text string to find in the Find box, or select a previous entry in the dropdown (it conveniently remembers previous searches) and choose the scope of the search in the Scope box. You have three choices for scope:
Current Section Only— search only the current section of code
All Objects— Search all code related objects in the current element
After you have entered the text to search for and selected the scope, click the Find Next button to initiate a search. You can then continue to click the Find Next button to find all the matching text strings. If you want to replace the text for which you are searching, simply enter a new text string in the Replace box and then click the Replace button to replace the current text, or click the Replace All button to replace all matching instances.
The Find and Replace dialog also has several advanced searching features that enable you to further refine and speed your searches. These options include:
Case sensitive
Accent sensitive
Whole words
Direction
Wrap at start/end
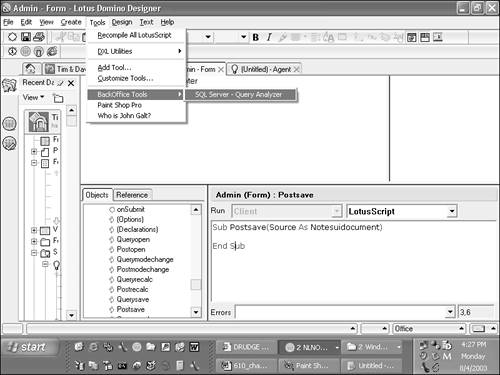
Making Preferred Tools Available via the IDE
Another cool new feature in the Domino 6 Designer is the really cool capability to customize and extend the Tools menu in the Designer client. You can now include menu items that launch other commonly used applications such as a graphics editing tool or CSS editor, or you can write your own formulas to run. You can also create submenus under which you can group related tools. A customized Tools menu is shown in Figure 12.8, later in this section.
Figure 12.8. The Add Tool dialog box makes it easy to add Tools menu options.

Additionally, when you add a new tool to the menu, you can define when the tool will be available so that the tool appears in the menu only when you need it. For example, you might want to keep your graphics editor available all the time, whereas the CSS editor menu option appears only when you are editing a form, page, or subform.
 | Be prepared to see questions about the new Tools menu options on the exam. |
Adding a New Tool to the Tools Menu
Adding a new tool to the Tools menu is easy; just follow these steps:
1. | Select Tools, Add Tool from the menu in the Designer client, which opens the Add Tool dialog box, shown in Figure 12.8. |
2. | Enter a descriptive name for the menu option in the Tool Name field. Make sure to use a name you'll recognize later as this is what will be displayed in the Tools menu. |
3. | Choose Run Program or Run Formula for the Tool Action, based on these guidelines:
|
4. | In the Tool Context box, choose one or more contexts in which the new menu option should be displayed. To ensure that the tool is always displayed, choose Always; otherwise, select one or more contexts in which the menu item should be displayed. |
5. |
Editing a Custom Tool
After you have added a custom tool, it appears in the Tools menu for the contexts you defined.
To edit an existing custom tool, follow these steps:
1. | Select Tools, Customize Tools from the menu, which opens the Customize Tools dialog box shown in Figure 12.9. Figure 12.9. The Customize Tools dialog box.
|
2. | Select the context that contains the tool to be modified and click the arrow beside it to expand the list of tools in that design context. |
3. | |
4. | Click OK to save changes. |


Deleting a Tool from the Tools Menu
To delete a tool from the Tools menu, follow these steps:
1. | Select Tools, Customize Tools from the menu, which opens the Customize Tools dialog box shown earlier in Figure 12.9. |
2. | Select the context that contains the tool to be deleted and click the arrow beside it to expand the list of tools in that design context. |
3. | Select the tool and click Cut to remove it. |
Customizing the Tools Menu
To further enhance its usability, you can divide the Tools menu into logically grouped categories by sing submenus. Figure 12.10 shows my customized Tools menu.
Figure 12.10. Customizing the Tools menu is a handy way to speed development.
To add a submenu to the Tools menu, follow these steps:
1. | Select Tools, Customize Tools from the menu, which opens the Customize Tools dialog box shown in Figure 12.10. |
2. | Select the context in which the submenu should display and then click the Add Submenu button, which opens a prompt. |
3. | Enter a name for the submenu in the Submenu name field and click OK. |
4. |