
Wine Label
Design a premium wine label
The Brief
Design a wine label for a premium brand
Trim Size
5 × 5 inches (127 × 127 mm)
Learning Points
Using Photoshop Layer masking
Leveraging OpenType features
Creating a 3D mockup in Dimension
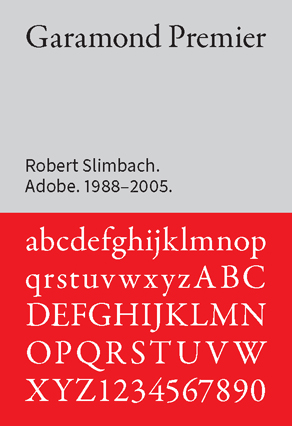
Fonts Used
Garamond Premier, Beloved
Tools
Illustrator, Photoshop, Dimension
Inspiration
Everyone loves an ampersand. We bet that if there were a poll to determine the world’s favorite logogram, the ampersand would be the runaway winner. It’s beautiful, elegant, mysterious, and delightful. As well as being a fascinating character, the ampersand is also a very flexible and noncontroversial concept. It can be — and is — used as the name for all sorts of businesses. Check your local business directory and you’ll be sure to find Ampersand something or other. So why not a wine brand? We looked and there didn’t seem to be one already — although there is an Apostrophe.
We started by auditioning a number of ampersands (literally a ligature of e and t, et being and in Latin). There are many beautiful, highly stylized examples out there. Because our target market is someone who doesn’t know much about wine, tends to judge by the label, and who doesn’t want to look cheap when they turn up with an offering at a dinner party (hey, that sounds like us!), we decided we needed an ampersand that conveyed tradition, elegance, and sophistication.
Choose the type
So we chose Garamond Premier Pro. Designers often refer to Garamond as a typeface, but really it’s a group of typefaces, named for 16th century Parisian engraver Claude Garamond. While all are oldstyle serifs, one can look quite different from the next. One person’s Garamond could be another person’s Granjon or Sabon. Think of it as a classic with almost as many interpretations as George Gershwin’s Summertime, the most covered song of all time.
Garamond Premier Pro is considered an authentic revival by Robert Slimbach. But what really appealed to us was that it’s available in optical sizes and in particular that there is a special display version, that is lighter, the shapes more graceful, and suitable for use at large sizes.
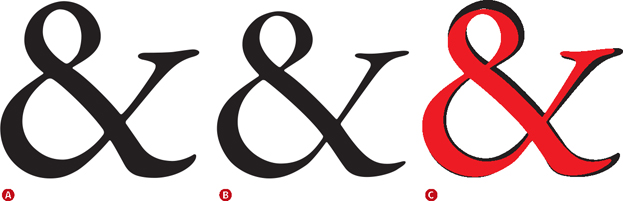
Garamond Premier Pro Regular (A) and Display (B)
Display (red) superimposed on Regular showing the difference in weight (C)
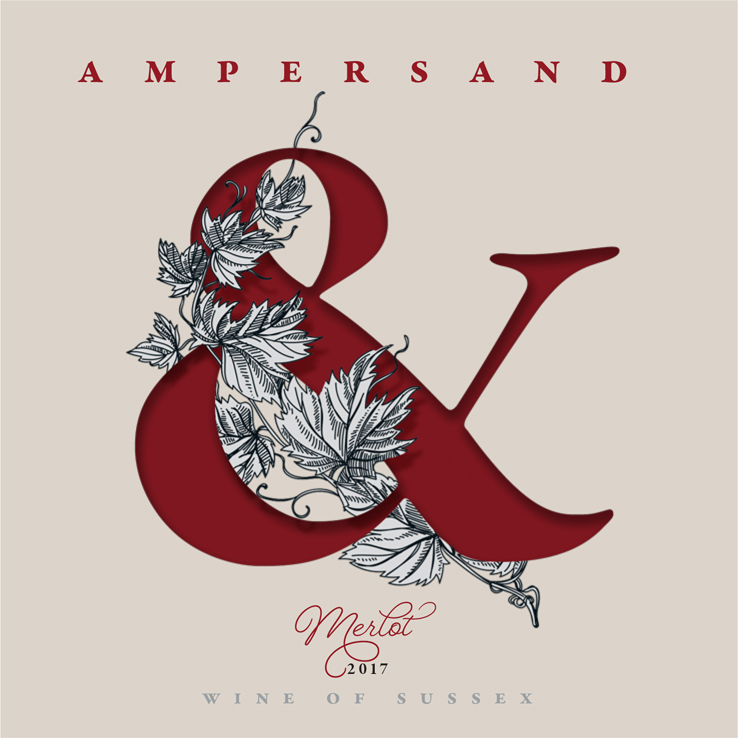
We thought it would be effective to entwine our ampersand with a grapevine. We considered a photograph, but ended up going with a vintage-style line- art drawing, downloaded from Adobe Stock. Before we could use it, some prep was required to fill the shapes with a color.
To combine the ampersand with the grapevine we could have used an opacity mask in Illustrator (see “Art Nouveau: Tangled up in vines”), but we find that Illustrator opacity masks fry our brains, whereas the equivalent layer mask in Photoshop is a joy to use. So we copied and pasted the colorized line art into the Photoshop document where we had our ampersand prepared on a Type layer, in a deep red, Merlot color. When prompted, we chose to place it as a Smart Object and positioned it on the canvas relative to the ampersand.
Add the mask
To create the interaction between grapevine and ampersand, we made a selection of the ampersand, by Cmd/Ctrl-clicking its layer thumbnail, moving to the Grapevine layer, and converting the active selection to a layer mask. It turned out to be the opposite of what we wanted (if we’d thought ahead, we would have held the Option/Alt key), but no worries — we just pressed Cmd/Ctrl+I to invert the values of the mask. This technique of using the contents of one layer to mask another is simple and yet so powerful. Now all we had to do was get a white brush and paint on the layer mask to restore parts of the grapevine, creating the illusion of the ampersand and the grapevine being entwined.
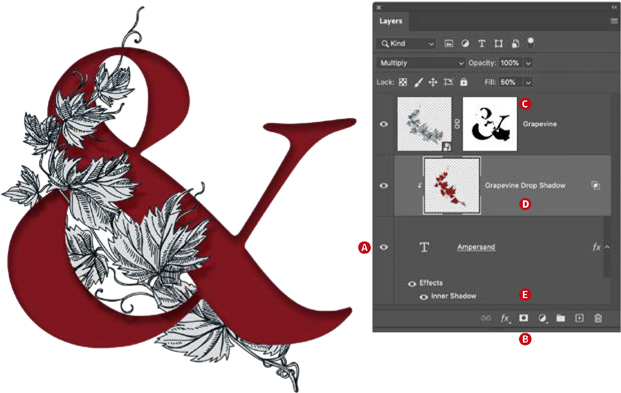
Combining the ampersand and grapevine:
Cmd/Ctrl-click the Ampersand layer to make an active selection (A).
Select the Grapevine layer and Option/Alt-click Add Layer Mask to make a layer mask that hides the selection and reveals the background (B).
Paint on the layer mask to reveal parts of the grapevine and entwine it with the ampersand (C).
From the fx menu add a drop shadow to the grapevine. So that this is cast only onto the ampersand, choose Layer > Layer Style > Create Layer. Then clip the resulting layer to the ampersand layer beneath Layer > Create Clipping Mask (Cmd+Option+G/Ctrl+Alt+G) (D).
Optional: Add an inner shadow to the ampersand (E).
To create some depth, we used layer effects to add a inner shadow to the ampersand and a drop shadow to the grapevine. This second part required an extra step because we wanted the shadow to be cast on only the ampersand itself, and not on the background. This involved separating the drop shadow layer effect to its own layer (Layer > Layer Styles > Create Layer) and then clipping the resulting layer to the layer below by pressing Cmd+Option+G/Ctrl+Alt+G to create a clipping mask. After adjusting the opacity of the shadow, we saved the result as a Photoshop (PSD) document.
Format the type
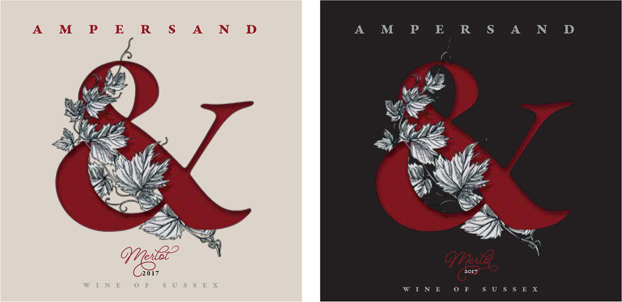
Moving back to Illustrator, we placed the PSD onto an Illustrator artboard to which we had added a chalk-colored background (C13 M13 Y18 K0, because there’s chalk beneath the soil of our vineyards!) and keyed the type. The watchwords here were elegance and simplicity. To signal sophistication, we used all small caps with very generous tracking. Real small caps are more squat and sturdy than their regular cap counterparts, and this is the look we were after. We allowed the stem of the grapevine to almost pierce the negative space between the letters to create an interaction between the type and the image.

The Garamond ampersand is classic, elegant, and perfect in every way. But it has a rival in the italic ampersand found in Adobe Caslon. This character is so decadent that it is actually just one giant flourish. Use it when you want to dazzle!
All caps (top) versus real small caps below, which are more compact, with thicker stems.
For the word Merlot, we introduced contrast in the form of a script face called Beloved by Laura Worthington. Whenever we need a script, Laura Worthington is our go-to type foundry. She has created some gorgeous scripts, many of them rich with extras in the form of related ornament sets and lots of contextual alternates. Beloved was a case in point. Even though there are only six letters, we can make the treatment bespoke by mixing and matching the alternate characters
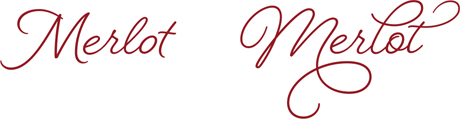
Beloved script “off the peg” left and after experimenting with alternate characters
For the year, the obvious choice would have been to use proportional oldstyle numerals. In the context of a paragraph, we think proportional oldstyle look great because they don’t overwhelm the text, but when the numerals stand alone as they do here, they look a bit weird, especially when loosely spaced to make them stylistically consistent with the other text. So for this reason we chose proportional lining numerals.
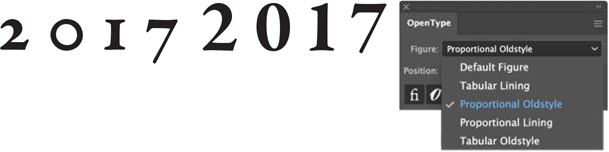
Choosing a figure style Left: Proportional Oldstyle; Right: Proportional Lining
To experiment with colors, we dragged off a copy of the artboard. We liked the drama of reverse version, but felt that on a dark bottle, it would lack attention-grabbing contrast.
Finally, to get a better sense of how the label would look on a bottle, we made a simple mockup in Adobe Dimension.

Sales of Merlot reportedly nosedived after the release of the film Sideways in 2004, in which a character repeatedly slanders this perfectly fine wine. No worries — we don’t mind the price cut.