
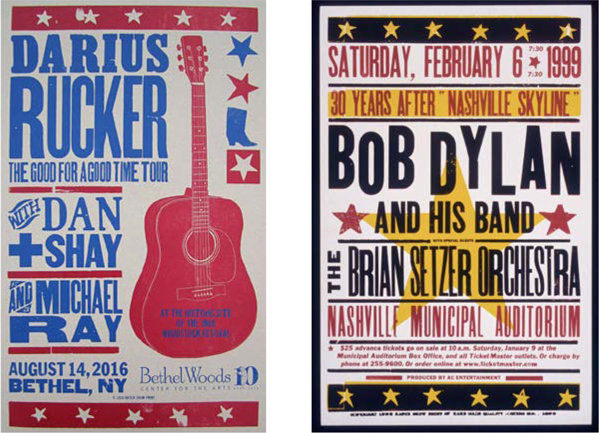
Country Music Poster
Create a Hatch Show Print–inspired poster
The Brief
Design a poster in the style of Hatch Show Print and American letterpress printing
Trim Size
Tabloid/A3
Learning Points
Working with outlines in Illustrator
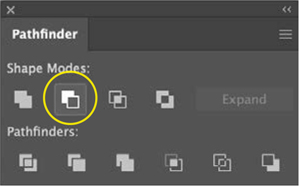
Editing and combining shapes with Pathfinder
Creating overprinting effects
Tools
Illustrator
Fonts Used
Thunderhouse, Playbill, Rock Wood Display
Inspiration
The folks behind the venerable Hatch Show Print, in Nashville, Tennessee, have produced posters for almost every country music act since the 1950s. Their work is instantly recognizable for its use of bright, overprinted color, large, extremely legible type, and a handmade aesthetic that stands out in a world where digital tech makes neat, clean design so easy and so common.
Sometimes, their work seems designed to drive one of the aestheticians of the Bauhaus school mad. They purposely embrace the awkwardness, imperfections, and flaws of the wood type and old paper they run by hand through their letterpress printers, a technology that’s been around since the 15th century; see “Letterpress Gig Poster: Grooving with Moveable Type in the 21st Century.” Perfect alignment in this system is almost impossible, so the Swiss theory ends up in the recycling bin, alongside the many test prints.
For this project, we thought it would be fun to try to create a poster in the Hatch Show Print style using digital tools. Heresy! A fool’s errand! Yes, but we are sick to death of perfectly aligned type.
Choosing the type
A letterpress print shop can have only so many fonts, and only so many letters of the right size — the type is old, expensive, and scarce. Designers learn to make do by swapping in different letters, using the type until it’s worn out, and mixing and matching type in all sorts of creative, unorthodox ways. Walter Gropius would not approve, but what he doesn’t know won’t hurt him.
Some classic letterpress posters from Hatch Show Print. Note the variation in weights of the type, and the fact that things don’t align perfectly. That’s inevitable when you’re working with a limited set of wood type. But also, the designers are less worried about consistency than they are about impact. The flaws in the printing are part of the aesthetic.


Access the Glyphs panel to see the alternates in any font. Thunderhouse has several, which helps it approximate that American wood type feel.
For this project, we’ll make heavy use of Thunderhouse, which approximates the look of the wood type common in letterpress printing: big, bold shapes of slightly different sizes and weights, rough around the edges, with some of that texture results when type impresses the paper in an irregular fashion. It also has a ton of alternate letters, which is perfect for getting that letterpress look. To access alternates, you can select a letter, and any alternates in the font will appear at small size beside your cursor — click one to select. Alternatively, you can access the Glyphs panel (Window > Type > Glyphs) and see the whole set.
For the supporting details — the venue and date — we’re using Playbill and Rock Wood Display, respectively.
We started by setting the type for our two headliners in bright red on a tabloid-size document. Then we set the type for the venue, location, and date using totally different typefaces. Do they complement one another? Do the baselines match up? Who cares?
We found some public domain, vintage line art of some tomatoes, which seemed like a family-friendly image, saved that as a grayscale TIF so that we could apply color, and placed it on its own layer.
We love the way Hatch Show Print designers allow things to overlap, letting the inks print right over top of one another, so we’re letting the image sit awkwardly under the type, not worrying about perfect alignment. Inspired by one of their posters, we chose a color scheme that poses bright red and gold against a bright turquoise. (Green and red are complementary colors, and in this case, the turquoise functions as a green.)
Hatch Show designers often overlay the print elements they have on hand, so for this poster we wanted to also have two large stars in the background, on their own layer behind the type and the art. We used the Star tool and made a five-pointed star with an inner radius of about a third of the outer radius.
We also emulated a standard border you see in many Hatch Show prints: a rough rectangle with stars punched out of it. To create this, we made more stars and dragged off copies using the Option/Alt key. Then we punched the stars out of their box using Pathfinder > Minus Front. We put this on the layer with the art, because we wanted to keep the turquoise items together.


Inside Hatch Show Print — images from an author field trip
Next, we set about engaging in what can only be described as abuse of the artboard. We want some of that rough-hewn, damaged quality that wood type has, so we selected the stars and added slightly different Roughen effects to each one (Effect > Distort and Transform > Roughen). We played with the sliders and options until we had something rough, but not so jagged that it didn’t look like old wood.)
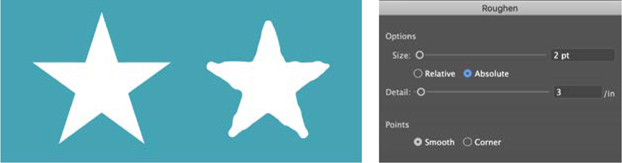
It’s fun to roughen up your shapes in Illustrator. Clean and precise are overrated anyway.
We selected a couple lines of type and rotated them ever so slightly. We turned the type to outlines and then nudged the type slightly out of alignment. We even (gasp) messed up the kerning!
Did we feel guilty? A little. But that’s part of the thrill.
Next, we created some print effects. We selected the art on each layer by clicking the bullseye to the right of the layer name, and set the blend mode to Multiply. The colors should bleed into each other in subtle ways. On the bottom layer, we flooded the page with a warm gray, to approximate the cheap paper that many old letterpress posters are printed on. Then we adjusted the opacity on each layer slightly. It ought to look a little faded — as if its best days are behind it, but it is still bright and powerful, rather like an aging country music star.

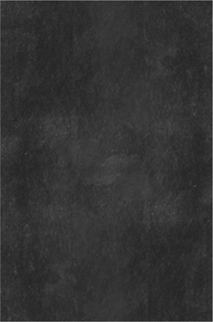
Oftentimes, people use a pale texture set to Multiply, one of the darkening modes. We thought it would be interesting to try the opposite: a dark texture, set to one of the lightening modes. We used Color Dodge, with a transparency of 66%. By doing this, the variations in the color tend to be at the light end of the scale; the texture brightens, rather than darkens the image.
Finally, we added a paper texture on top. We downloaded a dark black texture from texturepalace.com and placed it over everything on the top layer. Then we played with transparency and chose a lightening blend, Color Dodge, with an opacity of 66%.