
Form Design
No hanging chads
The Brief
Redesign a form that you come across in your day-to-day life. Your type choices and treatment should make the form approachable.
Trim Size
US Letter/A4
Learning Points
Using InDesign tables
Thinking carefully about micro white space
Indicating hierarchy with the fewest number of changes
Tools
InDesign
Fonts Used
Source Sans
Inspiration & Resources
For the story of the butterfly ballots used in the 2000 election check out episode 187 of the fantastic 99% Invisible podcast: 99percentinvisible.org/episode/butterfly-effects
No one becomes a graphic designer because it is their dream to design forms. But when you’re a graphic designer, you will inevitably have to design some forms. And forms are important. Just ask Al Gore.
The 2000 presidential race between Republican George W. Bush and Democrat Al Gore came down to contested votes in four counties in Florida. At the center of the controversy was Palm Beach County, where they had used a butterfly ballot with two columns of names one on either side of a central spine. Voters cast their votes by punching out holes down the center, corresponding to their choice of candidate on either side of the spine.
While the option for George W. Bush was clear (the first hole), the option for Al Gore (the third hole) was not obvious to voters, many of whom assumed the second name on the left would correspond to the second hole. Lifelong Democrats later discovered they might have voted for conservative Reform Party candidate, Patrick Buchanan (the choice on the butterfly ballot below Bush, but above Gore). To compound the problem, the vote counting machines couldn’t read ballots with “hanging chads” — those holes that were incompletely punched.
You’ll forgive us our hyperbole then, if we suggest that a badly designed form set in motion a chain of events, the consequences of which we’re living with today.
Too often we accept ugly forms — like poorly justified text in newspapers — as a sad inevitability in a typographically compromised world. But badly designed forms do not have to be a fact of life. Applying some commonsense design thinking, such as contrast, color, hierarchy, and white space, can make all the difference.
Format the table
For this project, we’ve redesigned a typical form that one might encounter in daily life. The original is not a particularly bad example; it works as is, we just thought it could be better.
Designing a form provides the opportunity for us to work with InDesign tables, which is an essential skill. Here are some tips for creating tables that are readable, friendly, and easily editable.
Firstly, avoid data prison. It’s an occupational hazard that when you’re designing with tables, everything looks like a cell: There are row strokes and columns strokes, and table borders, and the contents end up looking confined. When you convert text to a table, these strokes are on be default. Before we go any further, we like to use the Preview Proxy to clear them all and then reintroduce only those that are needed.


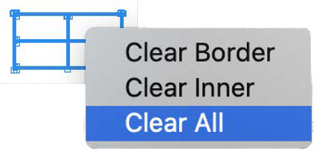
Right-click the Preview proxy, choose Select All, and then set the color to None to remove all the table border, row strokes, and column strokes. Gradually reintroduce only those strokes that you need.
To create tables efficiently, use Table Styles and Cell Styles. The unfortunate thing is that, of the many different InDesign styles, table and cell styles involve the most amount of work for the least amount of reward. They are confusing (to us at least), and even when you get them right, they won’t take you the whole way because you can’t incorporate column widths into their definitions. Is this a reason to not use them? No. They still speed up formatting and help you maintain consistency — especially if you’re working with multiple tables. We suggest that you reduce your expectations, grit your teeth, and be prepared to add the finishing touches as overrides to your styles. Where they helped us here was by allowing us to experiment with differing amounts of cell padding for the kinds of cells that we identified. The careful dispersal of the very limited white space in a document like this is critical for providing visual cues and pauses. Once the cell styles had been applied, we tweaked their definitions to get the result that we wanted.
Table Tips
There are some frequently used table tasks that lack keyboard shortcuts. Two in particular that we used a lot on this example are Merge Cells and Split Cell Vertically. Do yourself a favor and choose Edit > Keyboard Shortcuts to create keyboard shortcuts for them.
Make sure you have Drag and Drop Text Editing turned on (it’s off by default). You’ll find it in Preferences > Type. We find this option convenient in all situations, but with tables it’s essential.
When it comes to guides, we’re superfans, but when working with tables, we turn them off (Cmd/Ctrl-J); in Normal View mode you’ll still see your table borders, and it’s these that you need to pay attention to.
Pressing Esc will select the table cell; pressing Cmd/Ctrl+A will select the contents of the cell.
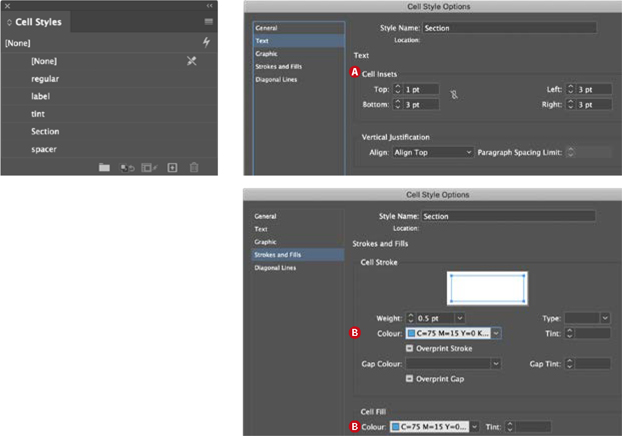
The form uses five recurring types of cell. Create and apply cell styles. Thereafter, experiment with the spacing values globally — and consistently — by editing the cell style definitions. In this particular document, the cell insets (A) and the strokes and fills (B) are important to create hierarchy and differentiation.
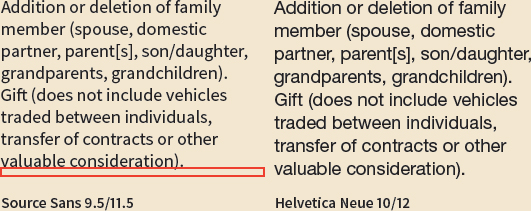
We think the Source Sans looks more inviting than the Helvetica, and readability is not compromised even though we’re using it at a slightly smaller size. The space saved is indicated in yellow. Cumulatively over the whole document this represents a significant amount of space that can be distributed as spacing between the sections to strengthen the hierarchy.
Choose the type
For our typeface we’ve chosen Source Sans, which incidentally is the typeface we’re using in this book. It’s clean, modern, simple, highly readable, and open source, which we like as a principal. For our redesign we intentionally set out to avoid Helvetica or its close cousin Arial, not because we think they are bad fonts, far from it, but because we’re tired of seeing them. For more than 60 years Helvetica has done a sterling job of making forms readable. It deserves a rest. Time for Helvetica to take a vacation and let the new kids have a go.
With so much information to fit into a finite amount of space, how you use the space is critical. The leading, the cell padding, the margins, the letterspacing all play a crucial role in making the text readable. With text size, bigger does not equate to more readable. The original uses 10 point type on 12 point leading. We found that by reducing this to 9.5/11.5 we could redistribute the space we gained throughout the document, especially adding more space between sections, for a result that is more readable. The letter shapes and counters of Source Sans are open enough, and its x-height is high enough to be perfectly readable at 9.5 points.
Putting the labels in uppercase distinguished them from the body text and allowed us to put their baselines flush with the field below, making it unambiguous what field they relate to. Because the labels are smaller and in all caps, we’ve added tracking to put some air between the characters.
Do You Really Need a Table?
There’s always more than one way to do something in InDesign, and that’s equally true with forms. This form could have been created without tables, but rather with tabs, dot leaders, and paragraph rules. In some ways this method is less restrictive than tables, but we warn you, you will quickly reach the limit of how far you can go with this table-free approach. We think that a document like this is about at that limit. And if you find tables frustrating, just wait until you try to create something more complex using tabs.
For heavy-duty form design, if you’re Windows-based, check out Adobe LiveCycle Designer. It isn’t pretty, but it is efficient and purpose built for creating forms.
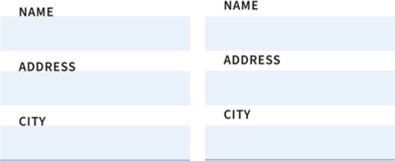
Left: The labels are in all caps so that their baselines sit on top of the field beneath, making it clear which label relates to which field.
Right: the position of the label is ambiguous. Do they relate to the field above or the field below?
A single-column form requires less eye tracking than multi-column layouts where the questions are positioned side by side. For this reason, we’ve retained the one-column layout of the original, but have reassigned some of the note text to the right column, so gaining more vertical space. It’s necessary to break from the single column when multiple fields are expected on the same line, like names (first, last) dates (day, month, year), time (hours, minutes), address (city, state, zip/post code). We also made everything left aligned. This avoided the potential gappiness of justified text and gave us more white space on the right side of the document. The asymmetry of a ragged alignment helps make the document look less static.
To keep things as simple as possible, we limited the number of size changes for the type. We think it’s a good idea in general to use as few sizes as possible, and this is especially so with forms. Basically, if you can’t articulate why you need to make a certain piece of type bigger or smaller, then don’t. We already have several ways to indicate hierarchy and difference — casing, weight, spacing, and color.
Speaking of color, because no one enjoys filling out forms, we chose a calming blue for the section heads and made a tint of this color to indicate the fields that need to be completed.
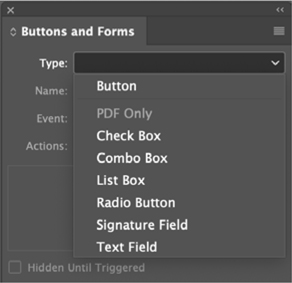
To take this further and make your form interactive use the Buttons and Forms panel. For relatively simple forms like this one, these options will be up to the task. For more complex forms, you will also need to explore the options available in Acrobat Pro, including JavaScript. But, without trying to sound like we’re brushing you off, that’s beyond our purview.