
Hand-Lettered Type Portrait
The best of times, and the worst of times
The Brief
Represent a celebrity in the form of a hand-lettered type portrait
Trim Size
US Letter/A4
Learning Points
Hand lettering in Fresco (or Illustrator)
Combining Photoshop, Fresco, and Illustrator
Tools
Photoshop, Illustrator, Fresco
Inspiration
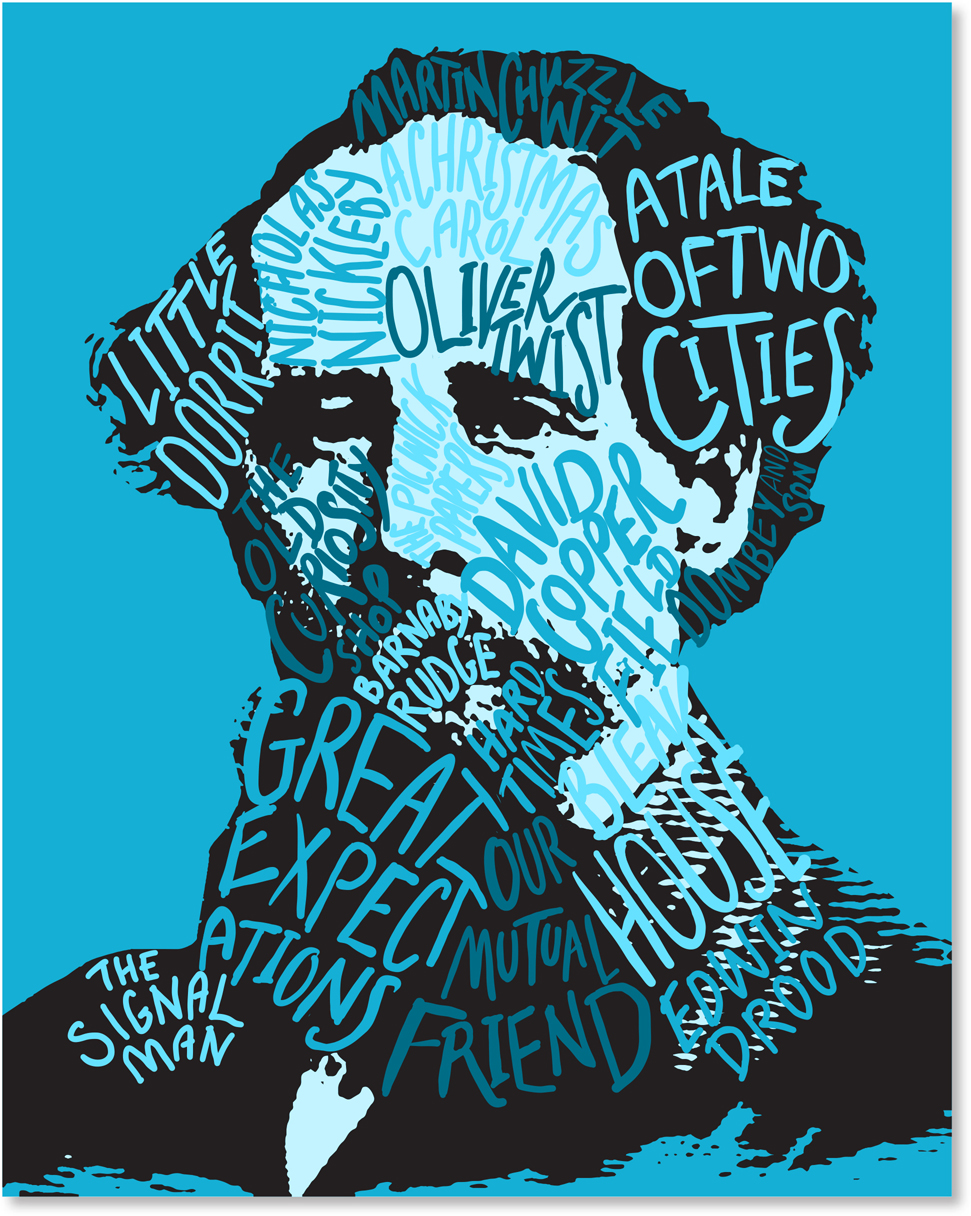
You know what they say: “You are what you write.” That’s particularly true if you lived in the 19th century and wrote dozens of books that are almost all household names, as Charles Dickens did. Who or what is Dickens, other than a collection of words? They just happen to be very well-selected words.
For this project, let’s make another type portrait. Only this time, I (Nigel) will simplify an image to its most basic elements and then build it back up using hand lettering to add depth and complexity. It’s another way of teasing the mind. The viewer is not sure if they’re meant to read the image with their visual mind, their literary mind, or both .
This project will take us from Photoshop to Fresco on the iPad and ultimately to Illustrator.
Prepare the image
I started out in Photoshop by converting the Dickens image to a stylized solid black-and-white portrait. To simplify things, I drew a pen path, which I converted to a vector mask around the head and shoulders. This hides any distracting background detail. Next, I applied a Threshold adjustment to force the gray values to black and white. Because the source image is low resolution, I chose Image > Image Size to resample the image to 8 inches wide at a resolution of 240 pixels per inch using the Preserve Details 2.0 algorithm.

Of course upsampling an image is a cardinal sin. Ordinarily, I would never dream of such a thing! But in this case, with a low-resolution image that is being transformed into a highly stylized vector artwork, breaking the rules is what’s called for.
For the next step I moved the artwork to Fresco, and because Fresco requires a PSD file, I saved the file in Photoshop format.
Add the lettering in Fresco
My aim was to fill each discrete area with lettering, listing the titles in a looping pattern across the face and hair. I made a list of all the Dickens’ books I could dimly remember from my school days in the last century (then I resorted to Wikipedia). Then I made a rough pencil sketch as a road map, squeezing the letters in around each other as neatly as I could manage.
In Fresco, I created a layer for each book as I went along. After trying out different brushes, I settled on a Vector brush, with 100% roundness, no taper, a Smoothing value of 50%, and Pressure Dynamics set to 15%, but you should experiment to find what works best for you. If you don’t have Fresco and an Apple Pencil, you can do the lettering in Illustrator.
Add the lettering in Fresco using a Vector Brush:
Each book gets its own layer, which can be locked and/or hidden as necessary while the work is progress.
Save the file as a PDF; then finish off in Illustrator.
The trick with something like this is to make the lettering feel casual and playful, when the truth is that you have spent hours agonizing over every line. I revisited the layers several times to reshape and redraw the letters, zooming in close, rotating the screen as necessary, and making liberal use of the Eraser tool. At this point I wasn’t worried about color because I intended to work that out in Illustrator.

Image tracing the portrait will convert the pixels to vectors and thus make it scalable.

Finishing off in Illustrator
Once I was happy with the composition, I published and exported it as a PDF. Opening the PDF in Illustrator, I found that although the layers had been retained, they were all Clip Groups of a single layer — some housekeeping was needed.
To make my Fresco files editable in Illustrator, I selected the layer by clicking the “bullseye” to the right of its name; then from the menu, I chose Release to Layers (Sequence). I dragged out the sublayers above Layer 1 to make them fully fledged layers.
There was also a clipping mask around each layer that I needed to remove. Choose Select > Object > Clipping Masks; then press Delete.
In Illustrator, I created a color theme of three shades of blue and converted them to global swatches (double-click the swatch and check the Global box) so that I could more easily experiment with color variations once they had been applied.
What tedium! Now for the fun part.

Reorganizing the layers exported from Fresco: Select Layer 1 (A) and Release to Layers (B). This will make the Clip Groups into sublayers of Layer 1 (C). Select all sublayers and drag them above Layer 1 (D), which can then be deleted.
Tracing the image
It was now time to vectorize the image that I had prepared in Photoshop and chose Image Trace. Typically for something like this I would choose Ignore White, so that the negative space wouldn’t also be traced, but in this case I wanted to fill the white areas of the face with color. Tracing the white area did mean that I had to delete the unwanted background white areas, which I selected with the Direct Selection tool.
To simplify the trace, I removed the highlight areas in the hair. For this task, I chose the Blob brush. Before starting, I double-clicked the tool to access its options and chose Keep Selected.

Simplify the tracing result with the Blob brush.
I then selected the black shape of the hair and painted over the trapped areas of interior space to incorporate them into the surrounding shape. You may wish to choose Hide Edges (Cmd/Ctrl+H) as you do this. You can also use the Eraser to smooth any rough edges or remove any unwanted black areas.
At this point, I chose a limited color palette and set about applying these to the different book titles so that the image felt balanced. This required a lot of back and forth — there are three blue tones, plus black, and deciding which item gets which color is part of the fun.
This project did include some tedious layer management in order to transfer vector shapes from one application to another. But the end result is pleasing to me, so perhaps I should close with a Dicken’s quote: “It was the best of times, it was the worst of times.”