
Punk
There is no future in England’s dreaming
The Brief
Create a punk inspired “ransom note” album cover
Trim Size
12 × 12 inches (305 × 305 mm)
Learning Points
Working with the Touch Type tool in Illustrator
Working with vector masks in Photoshop
Working with Gradient Maps
Tools
Illustrator, Photoshop
Fonts Used
Courier, Poplar, Times, Helvetica Condensed
Inspiration
If you’re younger than 40, you can’t be blamed for having romantic ideas about the 1970s. Take it from us: This decade stank. Literally. The garbage men were on strike, and mainstream culture was bland and complacent. If you don’t believe us, Google “Donny & Marie.” The stuff of nightmares.
Luckily, a few scrappy rebels invented a whole new style: defiant, brash, angry, and — as far as typography goes — hard to read. Young people with almost no design training, promoting their own bands and printing their own fanzines, showed the world that type could be cut, pasted, torn, erased, xeroxed, and over-exposed, and still be beautiful.
Punk design can be many things, but it’s most recognizable by its attitude: anti-establishment, DIY, aggressive, and sarcastic. If there’s one common design trait we can point to, it’s the ransom note typography. Not that far from what the Dadaists had been doing 60 years earlier, this look has become synonymous with punk style and the punk era. Some of the most defining examples of the genre were designed by Jamie Reid for the Sex Pistols, especially their debut album, Never Mind the Bollocks.
For this project, we created an album cover for a fictional band, Wretched Factor. After spending way too long trying and failing to come up with the ultimate punk band name, we delegated this decision to an online band name generator. As our inspiration we took Jamie Reid’s iconic covers for the single God Save the Queen and the album Never Mind the Bollocks . . . , released in 1976 and 1977, respectively. The title, Proceed to the Route, was suggested by a confused SatNav and felt appropriately ominous.
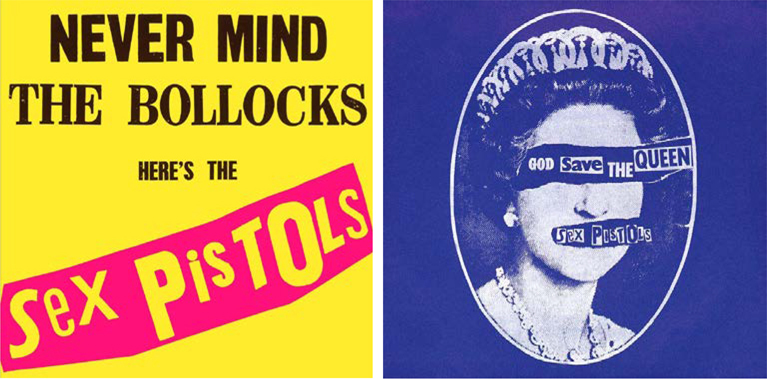
Covers designed for the Sex Pistols by Jamie Reid
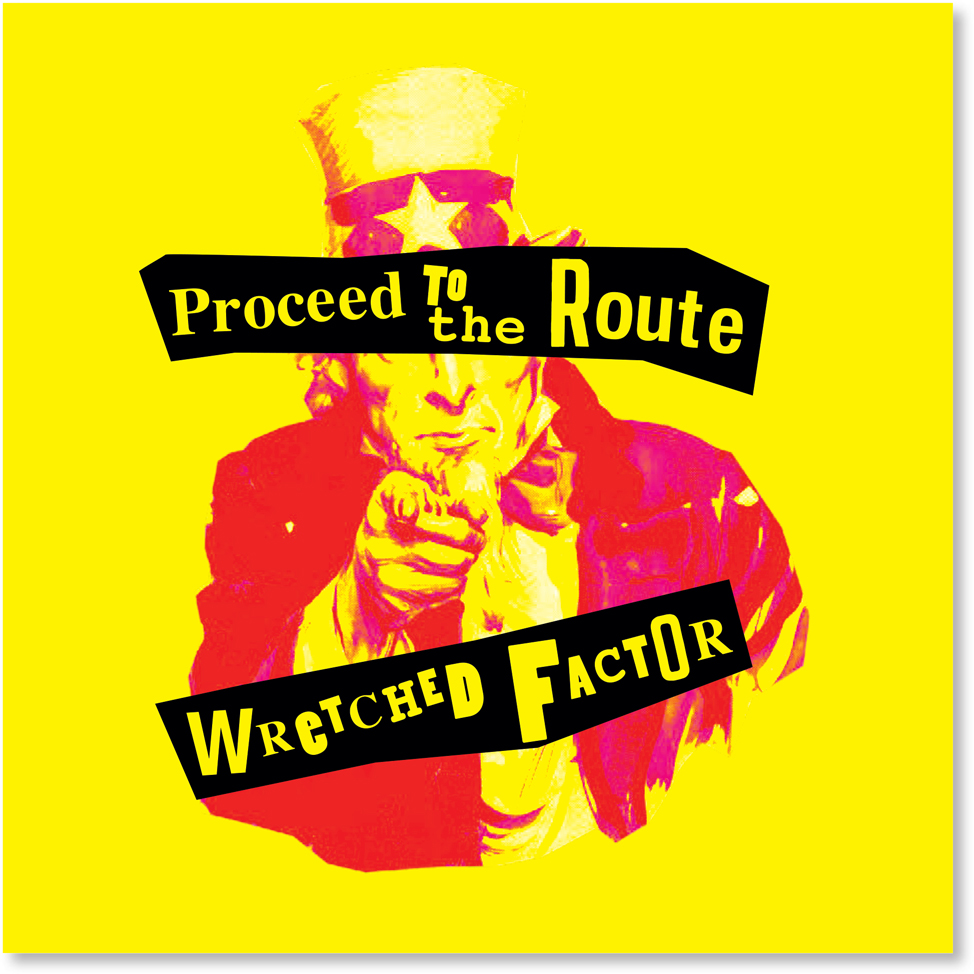
Every punk needs an authority figure to rebel against, so we chose Uncle Sam. The iconic painting by James Montgomery Flagg just happens to be in the public domain and accessible from the Library of Congress website. What could be more punk than the public domain?
Prepare the image
We planned to prepare the type and assemble the cover in Illustrator, but before we did this, we needed to prepare the image in Photoshop. The first step was to right-click to the right of the layer thumbnail and convert the image to a Smart Object so that any changes would be non-destructive. (We’re not so punk that we want to degrade our image data.)
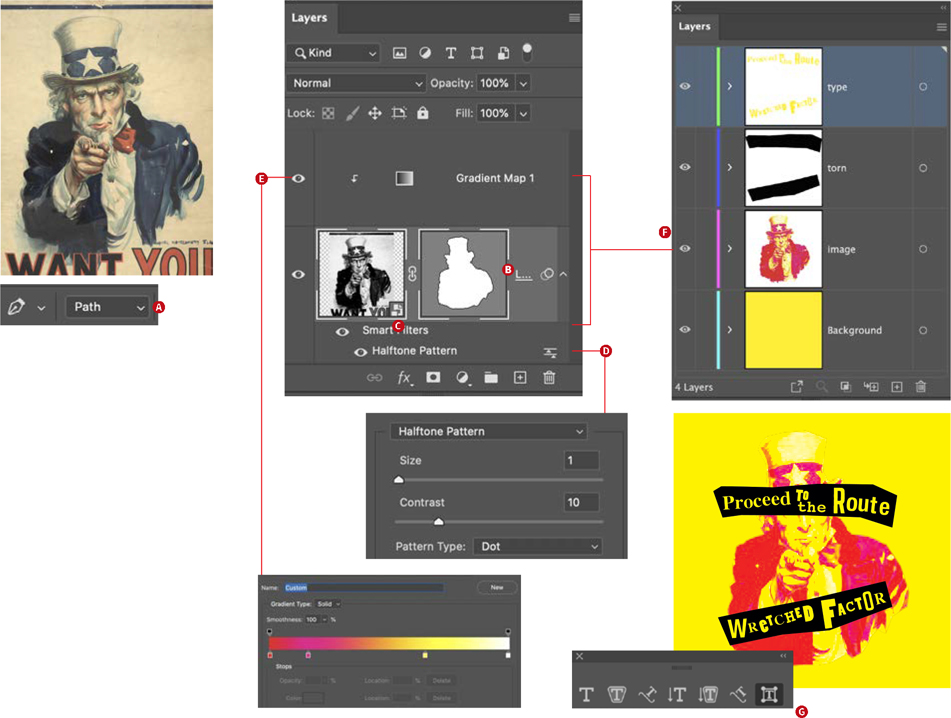
In Photoshop, use the Pen tool to create a pen path (A) around the subject and convert this to a vector mask (B).
Convert the image to a Smart Object (C).
Add a halftone pattern, Filter > Sketch > Halftone Pattern (D).
Add a Gradient Map adjustment to color the image (E).
Place the image in Illustrator (F).
Add type on a separate layer and use the Touch Type tool to move, scale, and rotate the letters (G).
Using the Pen tool, set to draw paths rather than shapes, we drew a pen path around the figure. Because we wanted a rough cutout that looked like it was made with a pair of blunt scissors, we used only straight line segments. This was no time for graceful Bézier curves. We Cmd/Ctrl-clicked the Mask icon at the bottom of the Layers panel to convert the pen path to a vector mask.
Next, we added a simple halftone effect to make it look like the image was cut from a newspaper. From the Sketch group of filters we chose Halftone Pattern — but not before checking that our foreground and background colors were black and white, because these determine the colors of the halftone effect.
The halftone is more for texture than color, and we actually wanted the image to look like a budget print job, printed without black but with just two process colors: magenta and yellow. Feeling the need to do this “authentically” in a way that would create only two separation plates, we explored Photoshop’s once-loved-and-now-overlooked Duotone color mode. Interesting though this was (to us at least), we were reminded that life is short, that being a purist is a bumpy path to travel, and that the visual effect that we were after can be more easily achieved with a Gradient Map. Applied as an adjustment layer, the Gradient Map replaces the shadows with the color on the left side of the gradient and the highlights with the color on the right of the gradient, transitioning from one to the other via any gradient color stops that you add between. After trying out various colors, we settled on a red-to-magenta-to-yellow-to-white gradient. This gave the effect of the magenta and yellow plates combining to make red and also retained the highlights in white.

A rub-down lettering sheet made by Letraset (left) alongside similar product made by a rival. PHOTO: PAUL HENNING
Add the type
Switching to Illustrator, we placed the image on its own layer and on a layer beneath added a rectangle of solid yellow. The subtle-as-a-ton-of-bricks color combination of pure yellow and pure magenta is intentionally confrontational and reflects the in-your-face punk attitude as well as the necessity of working with the constraints of cheap printing.
We chose typefaces that we imagined would have been popular as rub-down type in 1976 (aka dry transfer lettering) — Courier, Times, Times Bold Italic, Poplar, and Helvetica Condensed. Each word is a separate piece of Point Type so that we can move, rotate, and scale it independently. The type is surrounded by a rough polygon drawn with the Pen tool — again, all straight line segments. We were going to keep within the constraints we set and fill these with magenta, yellow, or red, but they just looked better in black, because of the contrast. We make the rules; we break the rules.
The super flexible Touch Type tool is one of our favorite tools in Illustrator. It lets you adjust the letters one by one, all the while keeping the type live and editable — so without the need to convert to outlines. For ready access to it, we like to tear off the Type panel. With the Touch Type tool we went letter by letter to mess up the baselines and the letter spacing, add some rotation, as well as a bit of scaling here and there. As well as mixing sizes, we’re also mixing uppercase and lowercase. We wanted to channel the random anti-design vibe of hastily torn out ransom note letters and give the impression that we were designing with less than a full sheet of Letraset, and thus having to resort to mixing type sizes and styles. It should look like it was done in a hurry (even though it wasn’t). After all, it’s 1976 — there’s music to make and bands to watch; we’ve got better things to do than design record covers.
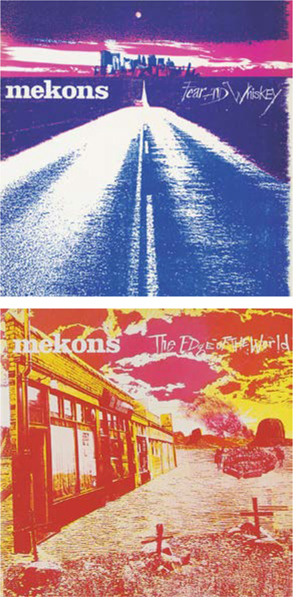
Another influence were the covers of Fear and Whisky and Edge of the World by the Mekons. Formed in Leeds in 1977 and still going, the Mekons are the last punk band still standing. Even though they have traveled far from their original anarchic sound, their punk ethos is still intact. Both covers appear to have been created with only two process colors — cyan and magenta, and magenta and yellow. Whether this was for aesthetic or budgetary reasons, we can only speculate, but the results are striking, and we wanted to achieve a similar look.