
Silkscreened Gig Poster
Indie rock in limited color
The Brief
Design a silkscreen gig poster with a limited color palette
Trim Size
18 × 24 inches (457 × 610 mm)
Learning Points
Setting type in Photoshop
Applying strokes and type effects in Photoshop
Trapping inks for silkscreen printing using layers
Simplifying layers to match color plates
Tools
Photoshop
Fonts Used
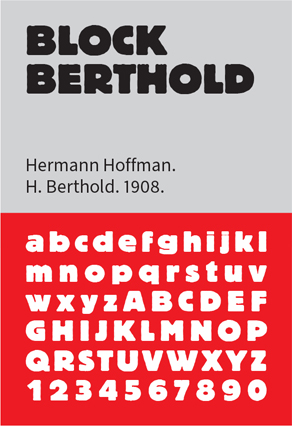
Brandon Grotesque, Block Berthold
Inspiration
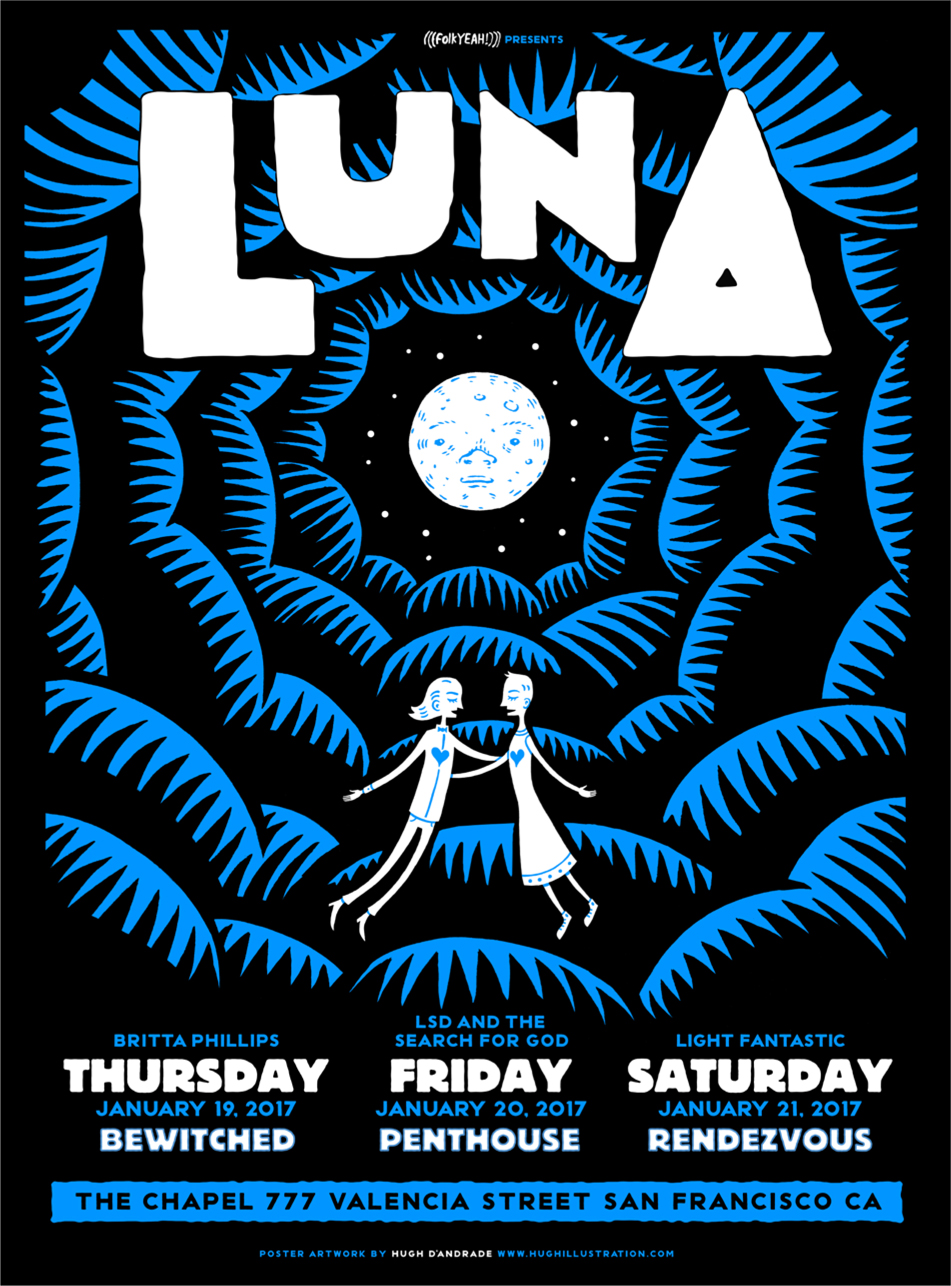
The indie band Luna has been spinning on Hugh’s turntable since the ’90s. Their music is chill yet loud. They are fantastic live. When he learned they were coming to San Francisco to play three full albums in their entirety over three nights, he wrote to ask if he could do a poster for the show. They said yes, and here’s what he had to say about how the project went.
The poster would be silkscreen printed by a professional printer, using only two colors. I knew I wanted a big bold image, but because there were three nights, each with different information, it would need a lot of type, too. One catch: I decided to set the type for this poster directly in Photoshop, rather than InDesign or Illustrator. In part this was because my printer is kind of a cranky guy, and I want to make things as easy for him as possible. The other reason is that I like a challenge.
So, to challenge myself and make things easy for my printer, I planned to provide him with a single Photoshop file with only two layers — black and blue — while I did the separations and the trapping for him. (If you’re thinking to yourself “I would have just handed over a PDF,” you might have a point. But I learn things by doing them the hard way!)
I drew the band’s name by hand, as part of the art, using a bold, blocky style of type that was inspired by Block Berthold, a classic German typeface that has heavy, black letters with beautifully rounded corners. Along with the rest of the image, I drew the black lines on paper, scanned them, and adjusted the levels to extreme black and white. I created the blue shapes by selecting areas that I wanted to be blue with the Magic Wand, creating a new layer, and filling that selection with blue. I’m a fan of a certain RGB hex: #007eff. It’s a solid blue that’s like a deeper version of cyan. (On press, we’d use a solid Pantone, so the Photoshop color was just a guide.)
Set the type
When it came time to set the type for the details, I returned to Berthold Block. If you zoom in on this typeface, you’ll see that it has a wobble to its line, giving it rough, hand-drawn quality that I appreciate. And since my heading type was inspired by this typeface, I knew it would match. For smaller type, I chose Brandon Grotesque Black, my old standby — beloved for its pointy apexes and rounded edges.
For a gig poster, it needed a lot of text: the names of the opening bands (medium size), the days of the week (as large as possible), the month and year (a bit smaller), and the album they were playing in full each night (medium, but with some styling to set it apart). Of course, I also had the venue name and location, and the credit for myself (the most important part, paradoxically in the tiniest type size).
To keep things organized I put each piece of type on its own line and its own layer and then selected them and grouped them according to category.
One of the design decisions I enjoy in any two-color job like this is deciding which items will be white (or paper-colored), which black, and which will be the color. I spend a lot of time switching back and forth, trying options, turning layers on and off, and mixing it up. When you’re working this way, it’s important to track of your layers — no blue objects on the black layer, and vice versa!

Silkscreened posters require careful separations. You can rely on a good printer to do this work for you, but you may lose some control. Why not use layers to do this work yourself? For this project, there were only two layers: one for black and one for blue, to be printed on white paper.
I started with all the type in white, but in the end I set the openers and the months in blue, and let the day of the week pop out in white. For the album names, I added a stroke from Layer Style menu (choose fx at the bottom left of the Layers panel) and chose Inside for the position. Finally, I made the venue black and set a small credit in white and blue.
Simplify the layers
To send the printer a file with only two layers, black and blue, you’ll need to merge your type layers into to the existing original layers. Here are some tips on how to do that.
I Cmd/Ctrl-clicked each type layer (except for the venue name, which was to be set in black), using Shift to add to the selection. I then selected the original black layer and pressed Delete. This punched holes in the shape of the blue type in the black layer. I also Cmd/Ctrl-clicked the venue layer, made sure black was my foreground color, selected the black layer in the Layers panel, and chose Fill With Foreground Color (Option/Alt+Delete).
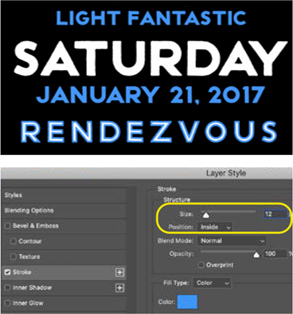
To add the stroke effect to the album titles, select the first album name in the Layers panel, choose the fx menu, and select Stroke.
Sample the blue from the existing artwork using the Color Picker. Set the stroke’s position to Inside so that it doesn’t fatten the type.
Adjust the pixel width until it feels right — a heavy stroke, but not so heavy that it fills in the letters.
Copy the effect to subsequent layers by holding Option/Alt while dragging the effect icon down onto the other layers.
For the type that would be blue, I added a heavy stroke to the outside of each. The reason: trapping. Trapping means building in a little overlap between the two colors, so that when it’s on press, the printer has some leeway in aligning things — particularly important in silkscreen printing, which isn’t as mechanically precise as offset printing.
I selected each layer with blue type (the months and the openers) and added a 12 px stroke from the fx menu. I did something similar with the album titles, except that I added 12 pixels to the existing stroke and changed the position to Center.
At this point, you can turn off your type layers. If you’ve made any mistakes in selecting and cutting type out of the black and blue layers, they should be apparent now. Don’t delete the layers yet, in case you need to make an edit at a later time. You can (and should) delete them before you deliver the file to your printer.
Check the trap
To check the trapping, make sure the black layer is on top; then change its opacity to 75%. The darker areas around the blue shapes tell you where the blue is trapped by the black layer.
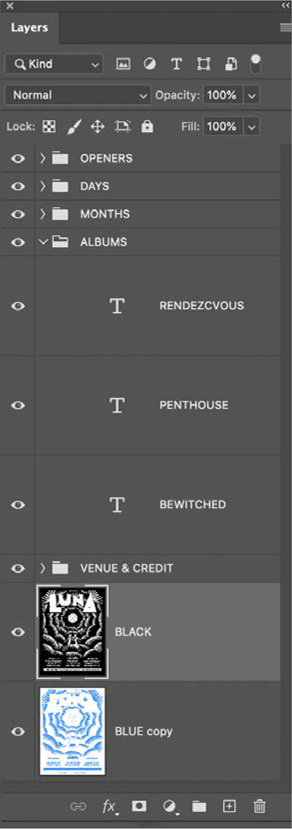
The Layers panel has all the different items grouped by subject: Openers, Days, Months, Albums, and Venue and credits. This keeps me from losing even more hair than I already have.
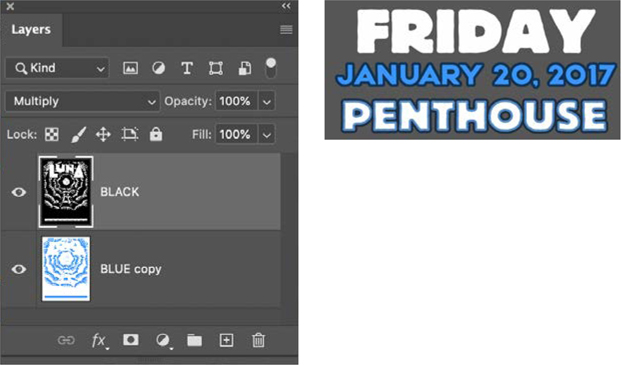
The black layer is set to Multiply, just so that any white pixels are transparent. The printer can use these layers to create films that will be used to create the screens.
You can check the trapping (some overprinting between the two colors) by temporarily lowering the opacity of your top layer. You should see a dark shadow around the color. (Typically, the darker color traps the brighter color.)
I noticed that all of the other blue shapes on my blue layer were un-trapped. What an oversight! I selected that layer, clicked on it with Cmd/Ctrl to get marching ants around each blue shape, chose Select > Modify > Expand, and gave it an extra 12 pixels. Scrolling around the image, I checked carefully to see if anything was missed, and if so, I added or subtracted blue color.
Was it wise of me to set the type in Photoshop? Probably not. Had I set this type in Illustrator or InDesign, I could have had more control over the trapping, adjusted spacing and leading a lot easier, and saved time overall. Doing it this way was a challenge, but as a masochist, I take a lot of satisfaction in creating art that is so simple that it can be created out of two layers.