Chapter 2. Getting started with OneNote 2013
Your first task in Microsoft OneNote 2013 is to create a notebook for storing the notes you write. After you create a notebook, you create sections for storing the pages where notes are written, pages for storing notes, and then the notes themselves.
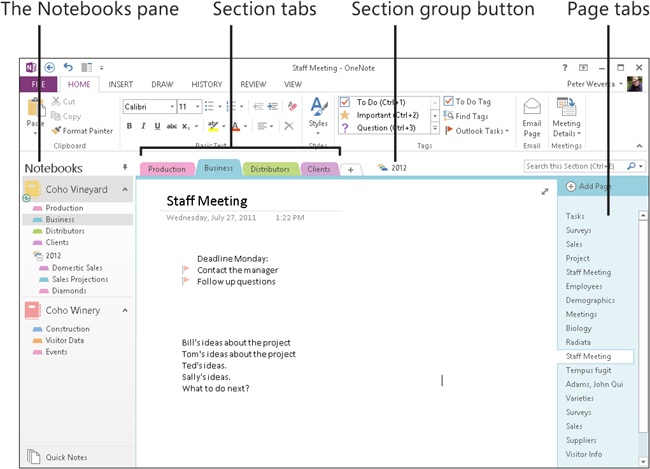
In OneNote 2013, notes are stored in a notebook-section-pages hierarchy that is designed to help you categorize information, write notes, and retrieve notes. Navigating in OneNote is a matter of using the Notebooks pane, section tabs, and page tabs to go from place to place. In the Notebooks pane, where notebook names are listed, you can collapse and expand notebooks to hide or display their sections.
You can open notebooks to work on them, close them when you no longer need them, and rename them as needed.
If you used Microsoft OneNote 2007, be sure to convert your 2007 notebooks to 2010-2013 notebooks. OneNote offers a special command for doing that.
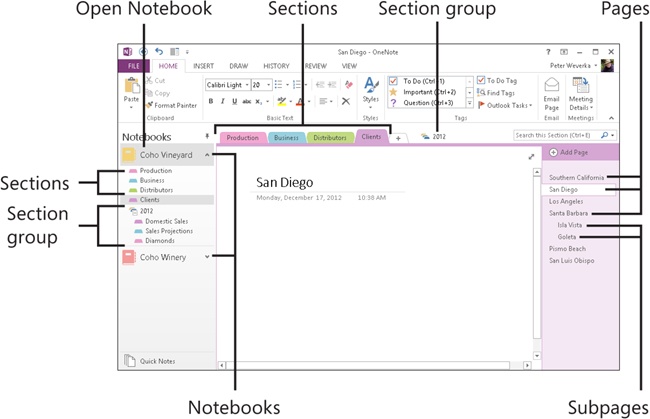
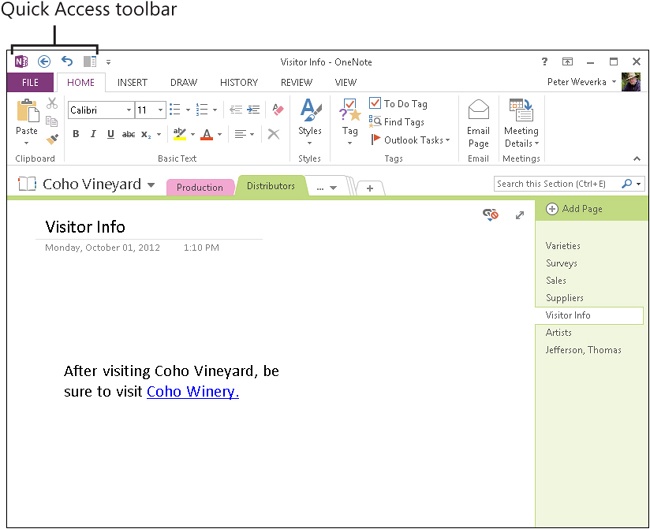
The purpose of OneNote is to make it easier for you to record, store, organize, and find notes. To that end, the OneNote screen is divided into these areas:
-
Notebooks pane . Lists the names of open notebooks. Below each notebook name are the names of its sections and section groups. Click a section name to open a different section in any open notebook.
-
Section tabs . Shows the names of sections, with the name of each section on its own tab. Section groups appear to the right of the section tabs. Click a tab to go to a different section. Click a section group button to display its sections.
-
Page tabs . Lists the names of pages and subpages in the currently open section. Pages are stored in sections. Click a page tab to open a different page.
-
Page . Shows the notes and other items on the current page.
Try This
Click a section name in the Notebooks pane and notice that a new section opens. Then, click a section tab. You can open a different section by clicking a section name in the Notebooks pane or the section tabs
See Also
To learn how to expand and collapse the Notebooks pane and page tabs, read Collapsing and expanding the Notebooks pane and page tabs.
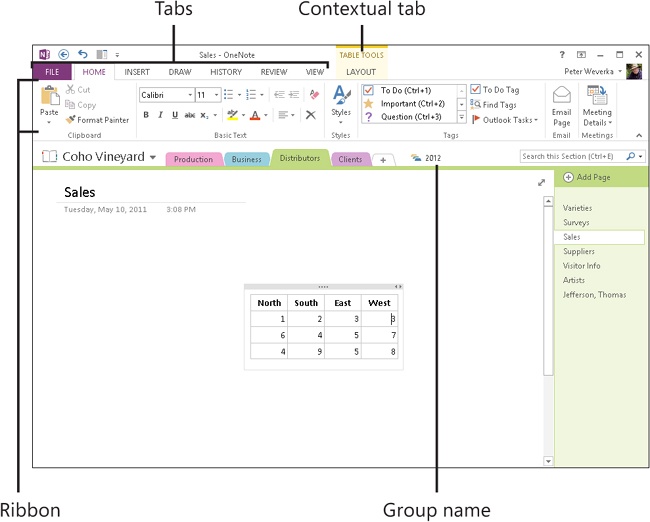
The ribbon initially appears as an assortment of tabs positioned along the top of the OneNote window. When you expand the ribbon by clicking a tab, it displays buttons and commands so you can perform various tasks.
Click a tab name on the ribbon to display it and use its buttons and commands. After choosing a button or command, the ribbon automatically collapses; you see only the tabs and have more workspace on the screen. However, you can show the full ribbon all the time if you want.
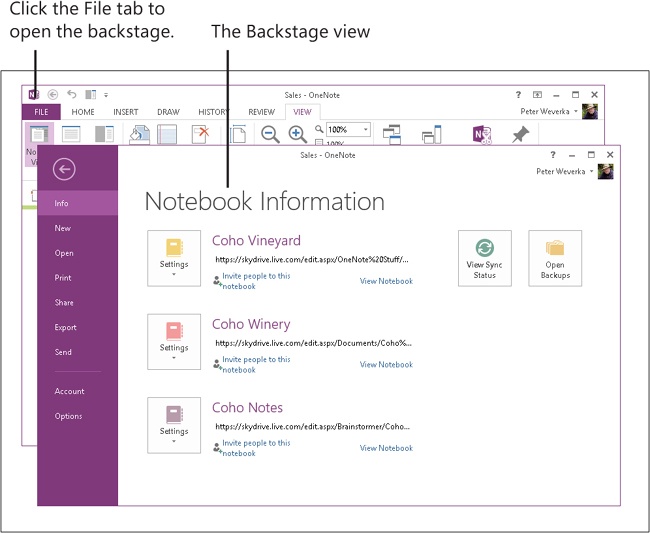
There are seven tabs in all: File, Home, Insert, Draw, History, Review, and View. Clicking the File tab opens the Backstage view, where you find commands for doing file-related tasks. The other tabs provide buttons and commands for doing similar tasks. For example, click the View tab to change your view of the OneNote screen.
The other tabs provide buttons and commands for doing similar tasks. For example, click the View tab to change your view of the OneNote screen.
Within each tab, buttons and commands are divided into groups. You can see the group names along the bottom of the ribbon. These group names help you to understand what buttons and commands do.
Besides the standard tabs, OneNote sometimes presents a contextual tab. Contextual tabs appear on the ribbon only when you need them. For example, when you work on a table, the Table Tools | Layout tab appears; it offers commands for working with tables. Look for contextual tabs to the right of the standard tabs on the ribbon.
See Also
To learn all the different ways to hide and display the ribbon, read Showing and collapsing the ribbon.
Above the ribbon, in the upper-left corner of the window, is the Quick Access Toolbar. This toolbar offers three convenient buttons: Back, Undo, and Dock To Desktop. On tablets, the Quick Access Toolbar offers a fourth button: Touch/Mouse Mode.
What’s more, you can add and remove buttons from the Quick Access Toolbar. You can even place it below the ribbon.
See Also
To learn how to add or remove buttons on the Quick Access Toolbar, read Adding or removing Quick Access Toolbar buttons.
See Also
To learn how to move the Quick Access Toolbar below the ribbon, read Repositioning the Quick Access Toolbar.
In OneNote 2013, notes are stored in a notebook-section-pages hierarchy, with the highest-level unit of storage being the notebook. Within each notebook, you create sections, and within sections, you create pages.
How you organize information in this hierarchy is important not only for retrieving information but also for conceptualizing it. In For academic work, for example, you can create one notebook for the class, one section for each lecture, and within each section, a page for each subject in the lecture. When the time comes to study for the final examination, you will know where to retrieve information about each subject, and moreover, your notebook-sections-pages structure will help you to get a sense of how the subjects fit together.
The goal is to create notebooks, sections, and pages so that information is stored in a meaningful fashion that makes retrieving information easier. As part of that goal, think of descriptive names for each of these elements when you create them.
From largest to smallest, OneNote offers these units for storing notes:
-
Notebook . The place where all information is stored. The names of open notebooks appear in the Notebooks pane.
-
Section . A subcategory of a notebook, used to store pages. The names of sections in a notebook appear on the Notebooks pane below the notebook’s name as well as on the section tabs.
-
Section groups . A means of organizing sections. You can store sections in a section group and, in so doing, be able to find and manage them more easily. After you select a section group in the section tabs, only the sections in the group appear in the section tabs.
-
Page and subpage . The place where notes are recorded. Pages and subpages are stored in sections. The names of pages and subpages in the currently open section appear in the page tabs on the right side of the screen; names on subpage tabs are indented.