
3D games come in many varieties. First of all, they vary in the way they display the game world, either as a top-down view (a bit like a board game), or from the side similar to a platform game, or from eye-level.
Then there's how they control the way you follow your game character. Do you simply see through the eyes of your character and see what they see? Or, is your character in front of you, and your point of view remains behind them? Maybe the scene in front of you is static and only changes screen by screen. Maybe you are looking down like a god and the scene only scrolls to the North, South, East or West when your character gets near the edge.
Whichever different game configurations you could choose, the same basic element can be found in every one of them--The Level. A level is a section or a stage in the game. When you design your game, you break it up into levels, because this will keep you from having to think of the whole game at once. For example, you may be creating an adventure game taking part throughout the continent of South America. You may break your game up into levels such as The Airport, The Hotel, The Mayan Village, The Jungle, and so on. Each of these may still be too big, so you may choose to divide them up further into sub-levels, which are more focused on a particular goal within the main level. Within the airport level, you may have five sub-levels based on progressing through parts of the airport until you reach the plane, or from the plane to the taxi.
A level is a discrete area within your game world. In games such as the adventure game I have described, the levels may be quite large and unwieldy, in others, such as those with huge maps to explore, they become just too big to handle. For this reason when you design your games, you will almost always break up the levels into further chunks. The best way of thinking about this is to take the analogy of a chess board. The chess board is the game world, which has just one level, but that level is broken up into squares. Each square has a reference, A4 or F1, so that we all know where it is. The chess pieces are the players or non-player characters that move around in that level. Now, in your game you can break up your levels into squares, too. Each square will be an element of the game level. When you create many squares, your game level will be complete.
Here is the game square you will be creating in this book:
If this game had a specific task carried out in the square (as shown in the previous screenshot) before allowing you to move to the next square, this would be a game level in itself. If not, you would add other squares to it until your whole level, or game world, is complete.
Level creation is an art. In order to create a masterpiece, you need all the right tools at your disposal. You've already encountered SketchUp and GIMP. In the previous two chapters, you became proficient with these tools. In this chapter, you'll really start to see their potential as you whiz through creating a small level in a single chapter.
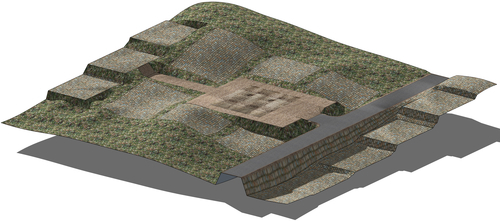
When you have finished this chapter, you'll have the basic level shown here. This is called a "plate", and it's the basic floor level area that you will add assets to. Assets are things like trees, plants, fences, and buildings.
In this chapter, you will:
- Create a basic floor plate (terrain) with all textures present
- Stamp flat road geometry onto your plate
- Create the hilly terrains with SketchUp Sandbox tools
- Add shadows to simulate depth
- Create seamless and tile-able textures
To start with, you need some idea of what your level will look like. In a game development environment, you will usually be given this "look" by your art director. As an asset artist or level designer, you will take their specifications and drawings, and turn them into a 3D reality. The level designer will already have thought about game-play, the level of difficulty, the challenges to be contained in the level, overall look and feel, and perhaps the lighting quality and sound. You will also have parameters to stick to within the whole game production:
- Is the game set in the real world or fantasy or sci-fi?
- What's the date?
- Are graphics cartoony, realistic, edgy, dreamlike, happy, or dark?
- How quickly should the graphics render: low or high detail?
As well as many more.
Your job as a game artist, level designer, or asset modeler is to stay rigidly within the parameters that you have been given and, having done that, to shine through with your incredible artistic and modeling talent.
This chapter will show you some of the basics of level modeling and texturing—enough to get you going, and start you off building games for your portfolio or to include it in your own game. Game companies tell us that it's better to have a few small and perfectly executed examples in your portfolio than many large unfinished or below-par examples. So, take your own time on this one, and add some of your own artistic flourishes as you go on, but stay within the basic tutorial steps I've explained to you.