
You will use this technique of blending layers together over and over again in the future. Let's move on and see whether we can get this texture to repeat seamlessly. This is called tiling. Tiling is useful when we have a large area to cover with the texture.
- Go to Layer ¦ Layer to Image Size.
- Save your project as a GIMP XCF file before doing the next command. Now, go to Image ¦ Flatten image. This removes all the layer information:
Note
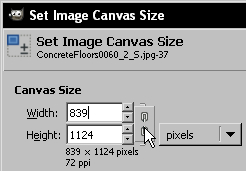
Before transforming a layer as per the next step, you will need an image that is an even number of pixels, wide and high. If your image is not, use Image ¦ Canvas Size to take off a row of pixels where needed. Remember to uncheck the chain icon so that the height and width don't change together.
- Go to Layer ¦ Transform ¦ Offset. Click on the button that says Offset by X/2, Y/2. Now click on Offset.
- Everything should look absolutely fine, apart from a black strip down the middle. It's there because the second texture didn't quite fit, and left a gap at the edge. No problem!
- Select the clone tool. Hold down Ctrl (Cmd on Mac) and click at the corner of the steel frame as you can see in the following screenshot:

- Now, release the Ctrl (or Cmd) button and move to the right-hand side. Begin painting from there (see the next screenshot):
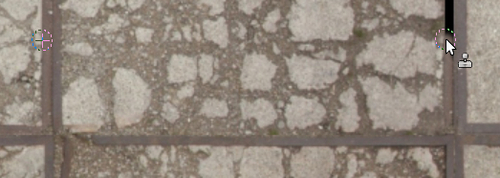
- This clones the area on the left over the area on the right. The left-hand part of the clone tool moves along with your brush. Do this all the way up. As you paint further up, you may need to release the mouse button. If you do this the clone tool will start back at the spot you placed it when you released the Ctrl (or Cmd) button. You may need to find another spot and continue from there.
- You've now cloned over the empty area of the image. The rest of the texture looks fine, so let's tile it now.
- Save the image as a new file into your texture library so that you can use it again and again. Now you need to tile it for the map.
- Three of these concrete slabs should amount to about 10m in the real world, so let's resize the image to 200 pixels wide (because 10 meters times 20 pixels equals 200).
- When you've done that, go to Filters ¦ Map ¦ Tile and deselect the chain and type in 2048 in width and height.
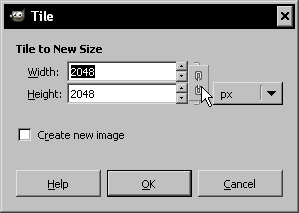
- Deselect Create new image and click OK. The image is tiled to form a texture of the same size as your map texture. Use Filters ¦ Enhance ¦ Unsharp Mask now if you wish.
- Use Colours ¦ Auto ¦ White balance to correct the contrast.
You've just taken another giant leap forward in your game art skills. You now know how to create seamlessly tiled textures, and how to repeat them within GIMP to cover any given size of image. You started with the basic textures from the CGTextures store and added two of them together. You then masked off part of the overlapping image to blend it into the image below. This is the main technique you will need for the creation of any texture on GIMP, and will serve you well for years to come. Using Layers with Masks is also the key to productivity in texturing, and will open the door to many other skills and techniques.
You have learned how to heal an image by Cloning areas of the image to somewhere else.
Now it's time to introduce this tile-able texture to our main map image.