
- Delete the second post.
- Save the SketchUp file as
FencePanelMASTER.skp. - Go to File ¦ Save As and save it again as
FencePanelV01.skp. This is going to be your first variant. - Select some of the textures in the column and move them around a little, rescale or skew them as you learned in Chapter 4,Wooden Pallet: Modeling.
- Save the file and close it.
- Open the master version and save as
FencePanelV02.skp. - Right-click on the fence panel and select Make Unique Texture.
- Now, right-click again and select Texture ¦ Edit Texture Image
- Your fence panel will open in GIMP.
- Use the Eraser Tool to make some jagged holes.
- Add a poster, sign, or pieces of paper from the Posters and Stickers category on
CGTextures.comas a new layer - Go to Layer ¦ Scale Layer if you need to make it smaller.
- Use the Layer Masks feature, or Eraser Tool in GIMP to get rid of the bits you don't need as you can see next:

- When you're done vandalizing your fence, go to Layer ¦ Merge Down.
- Go to File ¦ Save. Then close the GIMP window with the x at the top right.
- SketchUp updates with the new image:
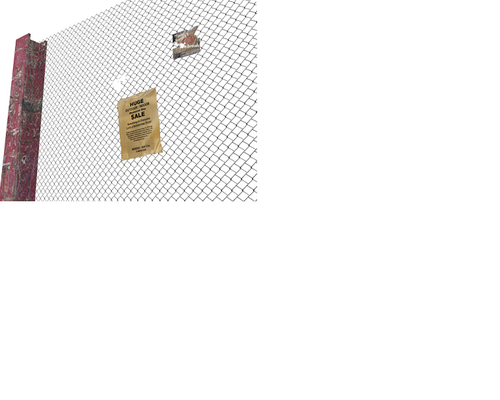
SketchUp allows you to make a unique image based on a face in the model. When you edit it, it retains the properties of the base texture that you applied to it. So, in this case, the image had the see-through bits (Alpha channel) applied correctly. When you added another image over the top, masked bits out, and then merged the layers together, that see-through alpha channel remained intact.
You've now got three different variations of the same fence. Go ahead and make some more!
Imagine that this fence has been there for donkey's years. What would it really look like? Would it be a flat panel if it had been climbed and jumped over a thousand times by neighborhood kids? Of course not! How are you going to make the panel saggy at the top? Actually, you already learned how to do this in Chapter 5, 3D games in SketchUp, when you covered the sandbox tools. If you're feeling adventurous now, give it a go!
Note
Create the panel flat to the ground and rotate it into place when you're done. Or even better, leave one version where it is and use a component copied and rotated at 90 degrees to work on with the sandbox tools.
Alternatively, if you're becoming a dab hand at GIMP or PhotoShop, edit the texture inside to simulate the sagging mesh fence. You can try the Smudge tool or experiment with many other deform tools.