
Even though the model already looks complete, there are a few things you need to do to prepare it for game use. It's a list that's the same for any asset you create from now on. Here's what you need to do:
- Remove the hidden geometry and layers
- Remove unseen faces
- Explode geometry to remove groups and components
- Purge unused materials
- Check if all faces are facing outward
- Move files and textures into correct folders
- Compress or resize textures
- Save in a recognized format
It's really quick to do, and well worth the time getting right. If you start distributing assets with any of these left undone, you will pay the price by being labeled an amateur.
First of all, check that you haven't hidden anything and that all layers are visible. As a rule I never use layers in SketchUp, but if you have used layers then you need to check there's nothing on a hidden layer that you have forgotten about.
- Go to View ¦ Hidden Geometry.
- If anything appears, right click on it and select Unhide.
- Go to Window ¦ Layers. Check if all layers have a check in the Visible field.
- If there is more than one Layer, go to Edit ¦ Select All. Then right-click and select Entity Info. Select Layer0. If you have components in your model, you will have to repeat this step for each unique component.
There are parts of your model that have faces overlapping other faces. That's bad. How will the game engine know which to display? We're going to remove them.
- Select the three cross members by holding down Shift when you click on them. Right-click and select Explode.
- Now right-click again and select Intersect Faces ¦ With Model.
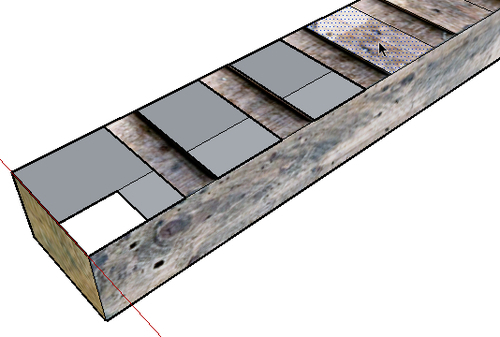
- Select all the top and bottom plank components, right-click and select Hide.
- Select and delete all the faces that have a plank going over the top. Do the same with the bottom.
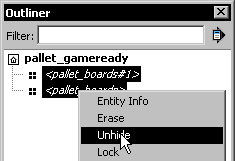
- Go to Window ¦ Outliner, and in the Outliner Pallet select the two pallet_boards components and select Unhide from the right click menu.
- Double click to edit the top component. Pull a box all round the geometry with the Select tool to select all geometry, then right click and select Intersect Faces ¦ With Model.
- This creates faces at all the points where the planks intersect the cross members. Delete all the overlapping faces again as shown:
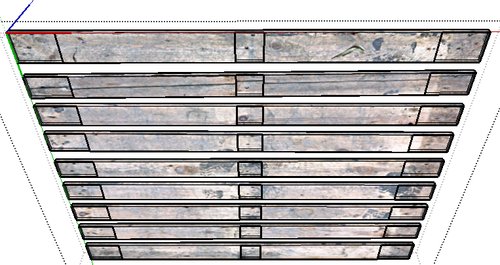
- Repeat with the bottom component, too.
- When you're done the whole thing looks exactly the same as before, but now you only have faces where they need to be.
Exploding geometry has nothing to do with demolishing the school math building. It's simply where you take geometry that used to be in groups and components and make it just geometry again. You do this because in games it's cleaner to have one single mesh if you can.
Tip
Save your model
Before you do anything drastic like the step below, remember to save your model. It's good, while learning, to have several versions of your model saved at intervals while you are working, so that you can go back to a previous version if you get yourself stuck. You can simply label your models with successive numbers in the filename.
Select the whole model (Edit ¦ Select All), right-click and select Explode.
This part is really easy - you already did it once earlier in the chapter. Go to Window ¦ Model Info ¦ Statistics and click on Purge Unused.
Click the Monochrome faces icon. All faces should show up in light grey. If there are any blue faces, right-click on them and select Reverse Faces. If you don't do this, faces may be invisible in the game engine.
Click the Shaded with Textures button to return to your normal textured view.
You remember you saved several versions of your texture? Now's the time to see whether a smaller texture will look ok on this asset. If it does, you will make your game go faster because of it.
- In the Materials Pallet click on the Edit tab. This provides details of the material you've been using.
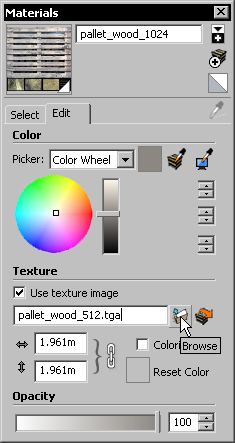
- Click on Browse and navigate to your texture called
pallet_wood_512.tga - Click on Open. The new texture will take the place of the old one. Do you see any difference?
- Since there's no noticeable loss of quality with the lower resolution texture, let's stick with that one instead.
Tip
Checking in-game
It is not guaranteed that the texture processing in SketchUp is identical to the one used in a game engine. The model view in SketchUp can only serve as a guide. If you have a particular game application in mind, you can do this check in the game engine instead and see the results more accurately. If you are creating an asset to be used more generally, as is the case here, this technique is good enough.
Now it's time to save the model and texture in their own folder. Go to File ¦ Save As and create a folder called pallet_gameready. Save your SketchUp model in there. Also move your 512-pixel texture into that folder. Repeat steps 1-3 above to reattach this new texture to the SketchUp model. This step is necessary to redefine the path for the new pallet_gameready folder.
If you have SketchUp Pro version, go to File ¦ Export and select the .fbx format. You could also choose some other well-known formats such as 3DS and OBJ to allow your asset to be imported to the greatest variety of game engines. Unity uses .fbx so that's all we need for now. If you have the free version of SketchUp, select Collada. You will find out how to convert this to FBX in Chapter 6,Importing to a Professional Game Application: Unity 3D.