
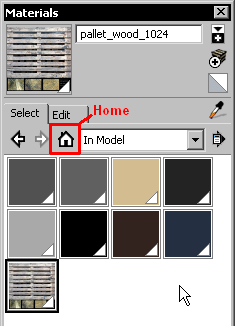
- In SketchUp go to Window and click Materials. The Materials Pallet appears.
- Click on the Home icon (see next image). Here you have a list of all materials being used in your current model.
Note
The Mac version has an additional selection of color pallets at the top of the window. Select the symbol for SketchUpColorPicker to get the same pallet as the Windows one shown here.
- Notice that your
pallet_wood_1024texture has automatically become a material, and you didn't even need to think about it. But what are those others doing there? - If you remember, there was a 2D component of a lady there at the start of the modeling process to help us visualize scale. You deleted her pretty quick. But the materials that made up her clothing have remained in your SketchUp model.
- Go to Window ¦ Model Info and click on the Statistics option. You'll see here a list of what's in your model. More about this in a moment. For now, notice there's a total of 9 materials listed.
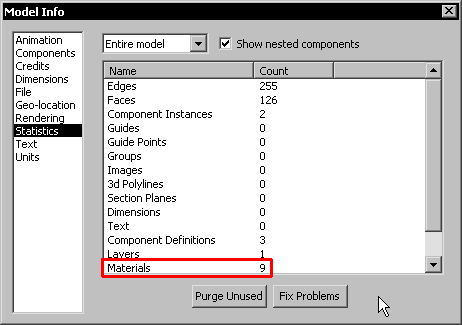
- Now click on Purge Unused. The Materials count reduces to 1, and your Materials Pallet now only shows your texture material. Phew. The world's as it should be again!
- Click on the Paintbucket tool and click on the top face of the left hand member. It's not pretty is it? SketchUp is applying your texture in a random way onto this face. Go to Edit ¦ Undo Paint.
- In the Materials Pallet, click on the Sample Paint tool which looks like an eye dropper. Click on the top face on one of the planks. Alternatively, with the Paint bucket tool still in use, hold Alt (Windows) or Command (Mac) to access the eye dropper.
- Now here's the single click magic. Click on the top face of the left hand member again. Notice the difference? You now have texture, shading and shadow exactly where it should be.
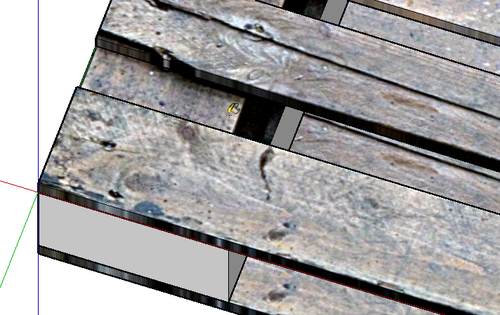
- This is because when CGTextures.com took the photograph for the texture you're using, the object they captured has already had texture, shading and shadow. You're simply recreating what already existed in the real world.
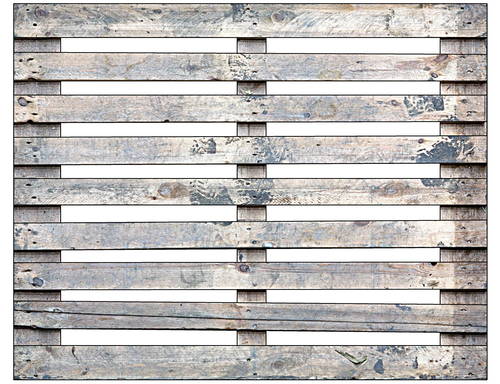
Have you noticed that your extruded member is too wide or too narrow for the texture? That's expected, because you just made it a random size that looked about right. All you need to do now is move the right hand face a little to line up with the wood edge in the texture.
- This is because when CGTextures.com took the photograph for the texture you're using, the object they captured has already had texture, shading and shadow. You're simply recreating what already existed in the real world.
- Select the Push/Pull tool and click on the right-hand side face of the member. Move this face until its edge lines up with the edge in the texture.
- Repeat steps 8-10 for the other two members.
- Click on the Top view icon. You should see the following. Good, isn't it?
- To complete the texturing you just have a few finishing touches to make. Select the Paint Bucket again, click on your texture in the Materials Pallet, and apply the material to the end of one of the cross members.
- Click on the Right view icon.
- Right click on the face and select Texture ¦ Position. Use the mouse to drag the texture so that one of the wood ends covers the face, as shown below.
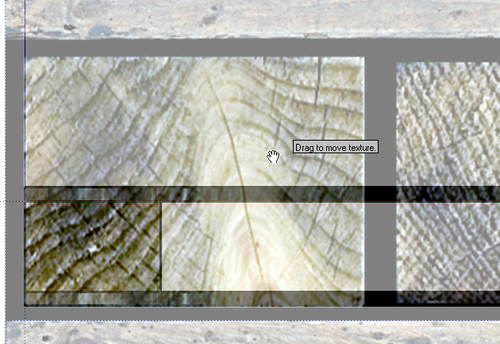
- As you can see, the texture needs to be reduced in size by over a half. Do this now by finding the Green pin and dragging it to the left until the wood end texture fits. It will help if you also drag the texture so that the red-colored pin is to the bottom left of the pallet.

- Now, right-click and select Done.
- To avoid having to re-scale the texture again for the other wood ends, use the Sample Paint tool and apply the texture to the other two faces.
- Now, when you use Texture ¦ Position on these faces there's nothing else to do except move the other two wood end textures into place. You should have something like the following.

Sample one of these wood ends and apply the material to the other ends of the timber members, but for these next three, try out some more of the options within Texture ¦ Position. You can rotate, scale, and move the three wood ends to provide variations on the other three ends. Try to use each of the four colored pins to see what each one does.
When you've done that, continue with the rest of the tutorial.