
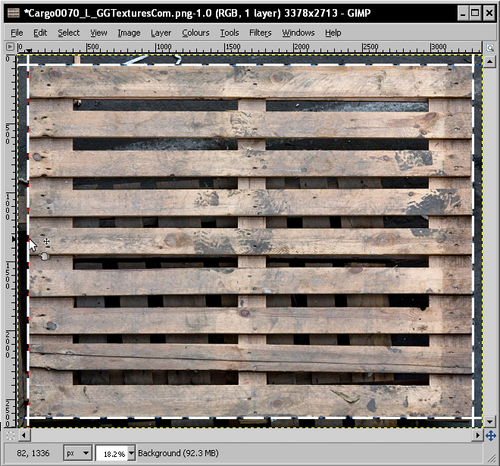
- The pallet looks quite square already. Click on the ruler at the left-hand side of the image, hold down the left mouse button as you do so, and move the mouse to the right.
- This sets up a vertical ruler guide. You can move this until it's at the left-hand side edge of the pallet. As you can see, it's completely horizontal.
- Do the same with the right-hand side edge, and then use the horizontal ruler at the top of the image to set up the horizontal guides at the top and bottom edges. See the result in the next image.
- As you can see, the texture does not need any more straightening. You have now set up four rulers which you can work with. Click on the Crop Tool in the main tool pallet.
- Click on the bottom left-hand side corner where the guides cross, and then drag to the top right-hand side. Hit Enter to crop the image.
- Now to enhance the colors. Go to Colours ¦ Auto ¦ White Balance.
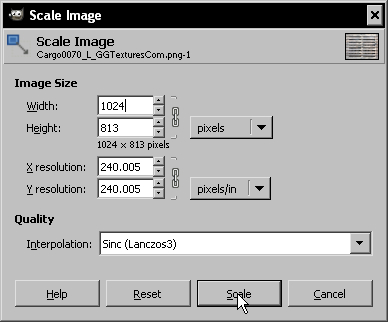
- Go to Image ¦ Scale Image.
- Type 1024 into the Width box. The Height field updates automatically.
- Select Sinc (Lanczos3) in the box marked Interpolation.
- Click on the Scale button.
- To change the zoom, change the value in the small box located at the bottom of the main window. Try setting it to 100%. You have now zoomed in to the highest level of detail contained in this image.
- Go to Filters ¦ Enhance ¦ Unsharp Mask. Click on OK to use the default settings.
- Go to File ¦ Undo and File ¦ Redo to look at the difference before and after using this filter.
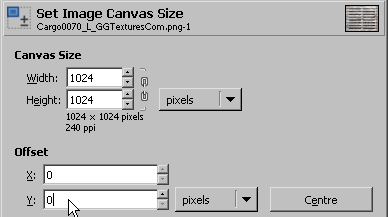
- Go to Image ¦ Canvas Size.
- Click the chain icon at the side of the Width and Height fields. Type in 1024 in the Height field.
- Click on Centre. Notice the preview image of the pallet moves to the center of the canvas? Now type in 0 into the Y field to move the pallet to the top of the canvas.
- Click on Resize.
- You have now finished the process for the top of the pallet. Go to File ¦ Save As and find the words Select File Type. Click on the plus sign next to it.
- You now have a list of file formats to choose from. Select GIMP XCF Image. It will retain all your image data.
- Click on Save.
Note
When saving an image-based project, never save to the original file format, so use Save As, and not Save. Use the GIMP XCF format, which retains all parts of your image project, such as layers, masks, and paths. We will come across these later in this book. Other formats such as PNG and JPG do not retain these elements..
You've created your first game texture, and a good one at that!
- You made sure the object was square and straight by using ruler guides.
- You used the guides as references while using the Crop Tool to change the image size.
- You resized to 1024 pixels wide. This is small enough to keep the file size down, while being one of the recommended standard file sizes.
- You enhanced the image contrast by using the Auto White Balance filter.
- You enhanced image sharpness by using Unsharp Mask.
- You resized the image canvas to make it a square of 1024 x 1024 pixels and made sure the image was positioned at the top of the canvas.
All this won't take you two minutes per texture once you get into it. You've now learned the most useful basic image manipulation skills, and you've had a walk around GIMP to see that it's really not as unfriendly as it might look.
..................Content has been hidden....................
You can't read the all page of ebook, please click here login for view all page.