

Hands
Modeling hands that look good can be a tricky task depending on
your goal. Hands are parts of the body that often have a great
amount of expression and deformation when animated. When a
mesh has a lot of deformation, we must carefully plan the edge flow
in order to match the original reference. At the same time, clean up
as much as possible; you may find that rigging a character with a
dense mesh (especially in areas that have too many vertices) can be
a real nightmare. In this section we discuss how to plan and execute
a human hand that can be used as the basis for any generic human-
oid hand, balancing the accuracy of the original shape with mesh
details.
We begin with a 4x4 box and a simple eight-sided cylinder. As is
common when starting with a primitive, we reshape the primitive
by moving the vertices to fit the reference image we have.
We then cut the marked areas. Cutting the cylinder will provide the
base for the nail and cutting the box will give us the basic structure
for attaching the fingers.
124
Chapter 6 – Human Project: Male Body
Figure 6-30
Figure 6-31

Then we continue to cut the palm and refine the finger. Notice that
not capping the cylinder (n-gon sided) can produce undesired
results with Catmull-Clark subdivision, as shown in Chapter 3. We
push the marked edges to make the finger rounder at the tip.
Now it’s time to create the base of the thumb. In the following fig-
ure, we cut the marked edges, extrude the face, and scale it down a
little bit.
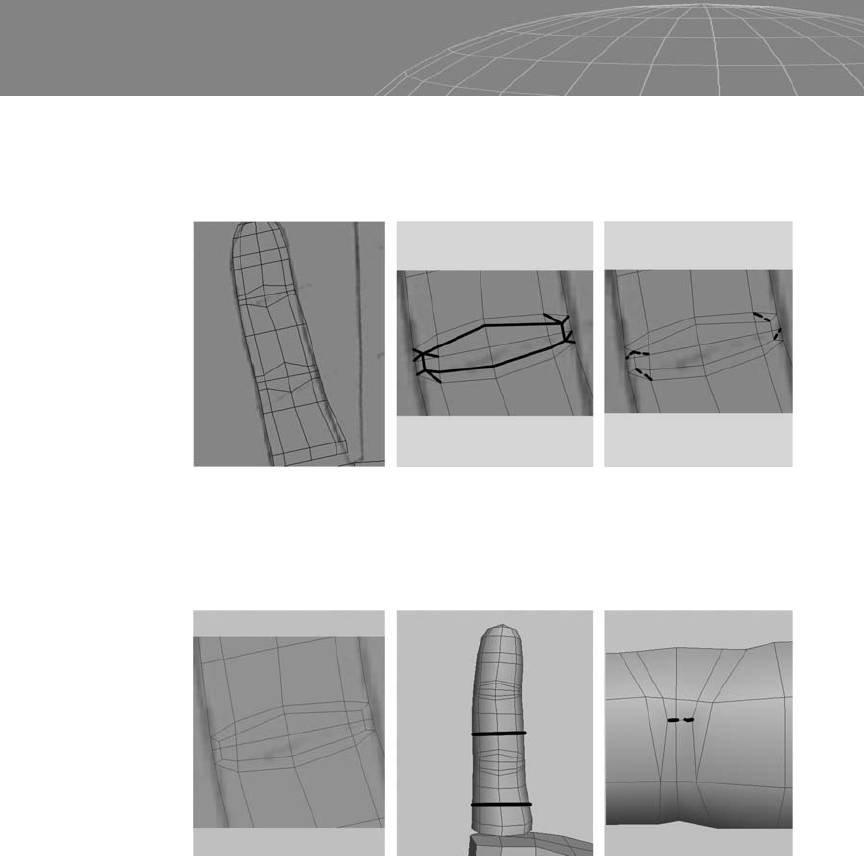
At this point, the thumb needs more edges. This can be done with a
few extrusions or by cutting some loops. Notice the result in Figure
6-34 after one level of subdivision (see center image). Cut the
marked area to continue the line flow, as shown at the right.
125
Chapter 6 – Human Project: Male Body
Figure 6-32
Figure 6-33

We reshape the vertices of the thumb and the areas where the fin-
gers will be attached to make the hand rounder and match the
natural organic flow of the hand.
In viewing the shape from the bottom, we see that the palm is flat,
but it’s okay for now. More details will be added once we have the
base mesh ready and working. Cut the marked edges of the finger
joints.
126
Chapter 6 – Human Project: Male Body
Figure 6-34
Figure 6-35
Figure 6-36
Cut the marked edges and delete the dashed lines. Notice that the
parts of the finger that will be stretched are planned in a way that
reduces the amount of work during the setup process.
We now have everything nice and quad. Cut the marked areas to
obtain more control over the finger joint and remove the dashed
line.
Try to keep the polygons four-sided as much as possible. Some-
times, however, you can’t avoid triangles or you may find that they
will be useful in some way to the deformation. In any case, keep the
number of triangles to a minimum. After the work is done, push
down the areas near the joint a bit to make it rounder and push
down the nail area a little.
127
Chapter 6 – Human Project: Male Body
Figure 6-37
Figure 6-38

Cut in the marked area to start modeling the nail, then select the
edges shown at the right and chamfer it. You can also produce the
same result by cutting following the edge.
Push the vertices down a little near the nail, then connect the verti-
ces of the end of the nail with the Cut tool.
128
Chapter 6 – Human Project: Male Body
Figure 6-39
Figure 6-40
Figure 6-41
..................Content has been hidden....................
You can't read the all page of ebook, please click here login for view all page.