

After making the last connection we can cut the nail to improve the
tension and have better control on the cage. Depending on the soft-
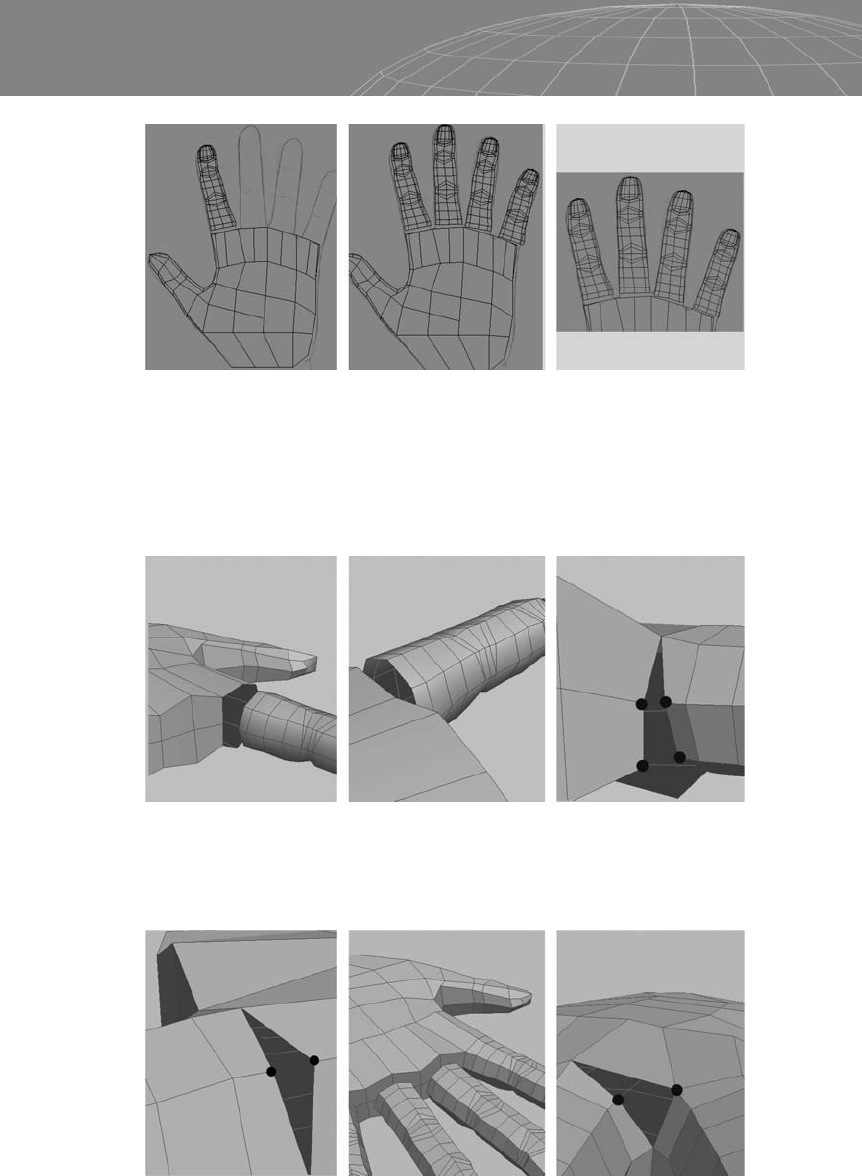
ware you are using, you may need to create some triangle meshes.
Here we create the edges shown in the center, then remove the
edges shown at the right.
Cut the marked edges to reduce the triangular tension of the fin-
gers. This gives us a nice, smooth finger to duplicate, tweak, and
insert into the base mesh of the hand.
The following figure shows the finished finger being duplicated and
ready to be inserted. Notice that the fingers are not exactly the
same. Real fingers differ in size and shape, so you may want to
tweak them before inserting them to add more realism.
129
Chapter 6 – Human Project: Male Body
Figure 6-42
Figure 6-43
We have cut the finger and added tension, but we haven’t changed
the number of sides of the original cylinder. This was done inten-
tionally to help us easily match the vertices of the fingers and the
base palm mesh.
We repeat this process for each finger, removing the polygons of the
finger and the hand in the areas where the vertices will be merged.
130
Chapter 6 – Human Project: Male Body
Figure 6-44
Figure 6-45
Figure 6-46

Once we are done, we get a clearer picture of the final shape of the
hand. With the fingers finished, it’s time to add details to the palm
and the thumb.
Cut the palm in the area shown below and continue the line flow.
This area clearly needs more detail.
Figures 6-49 and 6-50 show the edge structure for well-defined ten-
dons in the hand. Depending on the kind of model you’re creating,
you may want to spend more time to make this area well defined
and plan how to insert modeled veins inside the current topology.
131
Chapter 6 – Human Project: Male Body
Figure 6-47
Figure 6-48

Push the marked vertices up a little bit and notice the difference in
shaded mode.
Cut a loop near the area where we’ve welded the fingers; this is an
important area for deformation and shape definition of the hand.
132
Chapter 6 – Human Project: Male Body
Figure 6-49
Figure 6-50
Figure 6-51

Take a look at the hand in shaded mode. The fingers seem to be
much more finished than the rest of the hand.
Now it’s time to add detail to the palm. After some quick triangle
polygon corrections we add more edges to the palm to make it more
topologically correct.
This area of the palm has a flow completely different from the actual
flow, so we need to change this by adding new edges using the Cut
tool and removing the old ones.
133
Chapter 6 – Human Project: Male Body
Figure 6-52
Figure 6-53
Figure 6-54
..................Content has been hidden....................
You can't read the all page of ebook, please click here login for view all page.