
During a wireless network penetration test, you will be required to attach an external wireless NIC to your Kali Linux machine. If you have Kali Linux installed directly on a disk drive, attaching a wireless NIC is as simple as connecting it via USB. The adapter will automatically be present within the network settings.
However, things can get a bit tricky when using virtual machines. In this section, I will demonstrate how to attach a wireless network adapter to both VMware Workstation and Oracle VM VirtualBox.
If you're using VMware Workstation, follow these steps:
- First, select the Kali Linux virtual machine and click on Edit virtual machine settings:

- Then, the virtual machine settings will open, providing you with a number of options to add, remove, and modify the emulated hardware resources. Select the USB Controller; the options will appear to the right of the window. Select the appropriate USB version based on the physical USB controllers on your computer and ensure there is a tick in the checkbox for Show all USB input devices:

- Now that you're finished, click on OK to save the settings. Power on the Kali Linux virtual machine and plug your wireless adapter into an available USB port on your computer.
In the bottom-right corner of VMware Workstation, you'll see some icons. These icons represent a physical hardware component or device. The faded icons indicate that the hardware or device is not connected to the virtual machine, while the brightly colored icons indicate that the component or device is connected.
- Click on the USB icon highlighted in the following screenshot. A menu will appear, providing the option to attach a USB device from your host machine to the virtual machine. Select the wireless adapter:
![]()
- Once the USB wireless adapter has been successfully attached, the icon should be bright. Now, it's time to verify whether Kali Linux is able to see the wireless adapter. Open a Terminal and execute the ifconfig command:
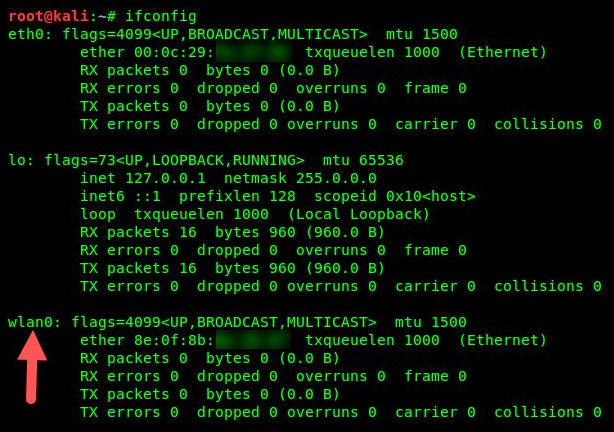
All wireless adapters are represented as wlan, followed by a number. Our wireless adapter is wlan0.
For those who are using Oracle VM VirtualBox, the process is a bit similar to what was mentioned previously for VMware. Use the following steps to complete this exercise of connecting a wireless adapter to Kali Linux through the hypervisor:
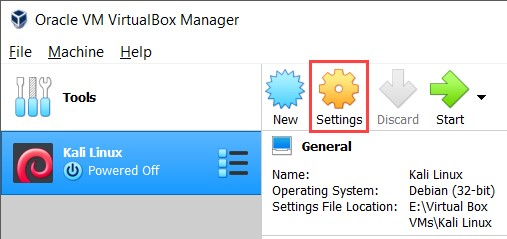
- To get started, select the Kali Linux virtual machine within the dashboard and click on Settings:
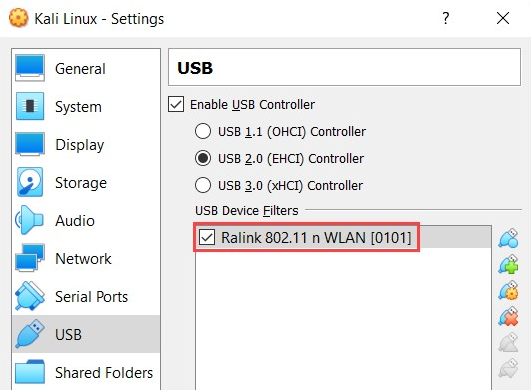
- Once the settings menu has opened, select the USB category on the left column. Ensure the wireless adapter is plugged into a USB port on your computer and, similar to what we did for VMware Workstation, select the USB 2.0 (EHCI) Controller version.
- Next, click the USB icon with the + symbol next to it to attach a USB device to the virtual machine. Select the USB wireless adapter:

The wireless adapter will be inserted into the USB Device Filters field, as shown in the following screenshot:
- Click on OK to save the settings of the virtual machine. Power on the Kali Linux virtual machine and use the ifconfig command to verify the status of the wireless adapter.
Completing this section has provided you with the necessary skills to successfully connect a wireless adapter to a Kali Linux virtual machine. In the next section, we will take a look at how to manage and monitor wireless modes in Kali Linux.