
To get started with packet sniffing, we are going to use the airodump-ng tool. airodump-ng has many functionalities, including performing the raw capture of IEEE 802.11 frames. Additionally, using this tool, we'll be able to view wireless APs, associated and unassociated client devices (stations), encryption types, SSID, the manufacturer of the APs, and so on.
In Chapter 8, Understanding Network Penetration Testing, we outlined the procedures involved in connecting a wireless network adapter to your Kali Linux machine and in enabling monitor mode. For this exercise, you'll need to repeat the process once more.
To enable monitor mode, perform the following steps:
- Connect the wireless adapter to Kali Linux. Use the ifconfig command to verify the status of the adapter.
- Terminate any process that may hamper the enabling of monitor mode by using the airmon-ng check kill command.
- Enable monitor mode on your wireless adapter using the airmon-ng start wlan0 command.
Now that your wireless adapter is in monitor mode, let's use the airodump-ng tool to view a list of all nearby APs and stations. To perform this action, use the following command:
airodump-ng wlan0mon
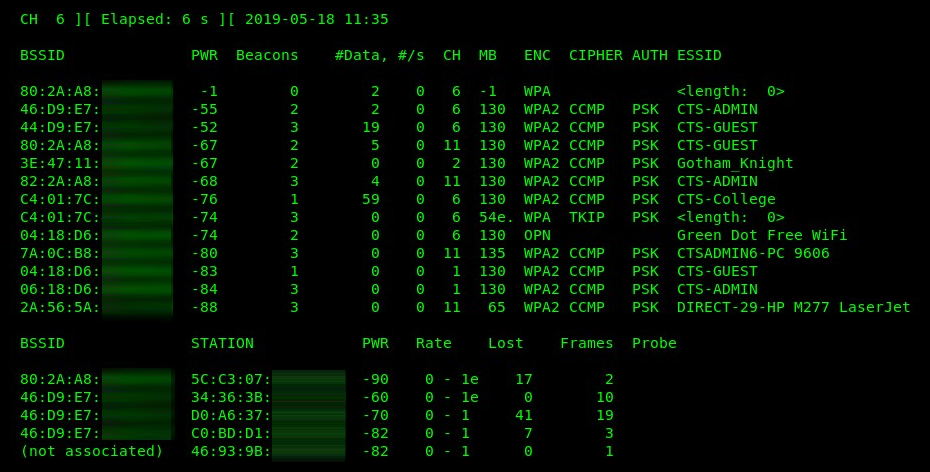
Your Terminal window will now begin to display all of the nearby APs, displaying the following information:
- BSSID: This is the MAC address of the AP or wireless router.
- PWR: This is the power rating. The lower the power rating, the further away the AP is from the wireless adapter.
- Beacons: The beacons are the advertisements sent from an AP. Beacons usually contain information about the AP, such as the network name and operation.
- #Data: This is the amount of captured data packets per network.
- #/s: This field indicates the number of packets per second over a 10-second period.
- CH: This is the operating channel for the AP.
- MB: This field outlines the maximum speed that is supported by the AP.
- ENC: This determines the encryption cipher being used on the wireless network.
- AUTH: This determines the type of authentication protocol on the wireless network.
- ESSID: The Extended Service Set Identifier (ESSID) and the name of the network SSID are the same.
- STATION: This displays the MAC addresses of both associated and unassociated devices.
Upon executing the command, your wireless adapter will perform live scanning and monitoring of all wireless networks and devices nearby. You should receive a screenshot similar to the following:
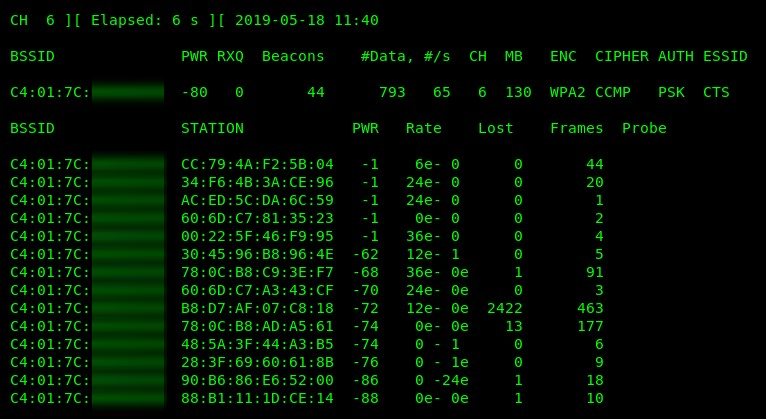
Viewing network traffic in real time can be overwhelming, especially in our situation where we can see all nearby devices. The airodump-ng tool allows us to use the --bssid parameter to filter the output for a specific AP. Additionally, using the -c parameter allows us to specify a channel the AP is operating on. Use the following syntax:
airodump-ng --bissid <bssid value> -c <channel number> wlan0mon
You'll get a similar output to the following, where the specific details about your target wireless network will be shown:
Now that you are able to perform packet sniffing, let's attempt to direct our attack to a specific target in the next section.