
Netdiscover is simply a scanner that leverages the Address Resolution Protocol (ARP) to discover connected clients on a network segment. ARP operates between the data link layer (layer 2) and the network layer (layer 3) of the OSI reference model. Devices use ARP to resolve IP addresses to MAC addresses for local communication.
To perform an internal network scan with Netdiscover, observe the following steps:
- Execute the following commands:
netdiscover -r <network-ID>/<network prefix>
netdiscover -r 10.10.10.0/24
Netdiscover will begin to display all active devices, displaying their IP addresses, MAC addresses, the vendors of their network interface cards (NICs), and their hostnames, as shown in the following screenshot:
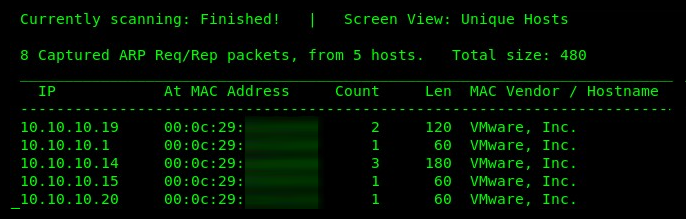
- To perform a passive scan and use the sniffer mode of Netdiscover, use the -p parameter. The following is an example of enabling passive mode:
netdiscover -p -r 10.10.10.0/24
Since passive mode means patiently waiting to detect an ARP message on the wire, populating the table may be time-consuming as you have to wait for devices to communicate. The following is a screenshot indicating that passive mode is enabled:

During a penetration test, always remember to use simple tools to get the job done. Sometimes, using a complex tool may put you in a situation that means you'll be stuck for some time. As you will have noticed, the tools that we have been using aren't too difficult to use in order to complete a given task.
In this section, you have learned how to perform passive scanning using Netdiscover on Kali Linux. Next, we will learn how to perform network scanning using the AutoScan tool.