
When you get into the field of penetration testing and vulnerability assessment, one tool you must be familiar with using is Nessus. Nessus is one of the most popular vulnerability assessment tools available on the market. The Nessus application is controlled using a web interface that allows its users to create customized scans. Additionally, Nessus contains prebuilt scanning templates for various types of industries, such as the Payment Card Industry (PCI) compliance scanner.
Tenable, the creator of Nessus, has indicated that Nessus is capable of detecting over 47,000 common vulnerabilities and exposures (CVE). As a future ethical hacker/penetration tester, using Nessus during your security auditing phase will aid you significantly in discovering security vulnerabilities quickly.
Nessus is supported on many platforms, such as Windows and Kali Linux. The Nessus Home edition is free for personal use, and is capable of scanning up to 16 IP addresses per scan. To get the Nessus Home edition, simply go to https://www.tenable.com/products/nessus-home and complete the registration form in order to obtain an activation license. After registration, you'll be redirected to the download center, where you can choose a suitable version for your platform:

If you're installing Nessus on a Windows operating system, the procedure is quite simple. Download the Windows executable file, and run it.
However, to install Nessus on Kali Linux, follow these steps:
- Open Terminal and run the following commands to upgrade all currently installed applications on the platform:
apt-get update && apt-get upgrade
- Obtain an activation code from Tenable by completing the registration form at https://www.tenable.com/products/nessus/nessus-essentials.
- Navigate to the Nessus Downloads page at https://www.tenable.com/downloads/nessus and download either the 32-bit or the 64-bit version, based on your operating system architecture:

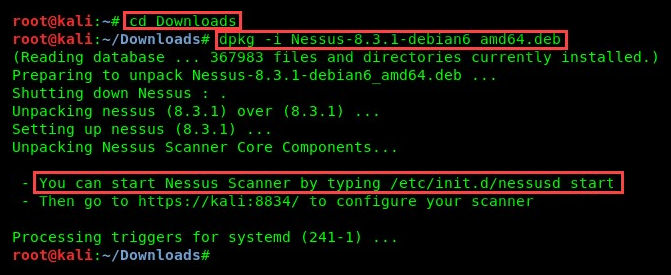
- Once Nessus has been downloaded on Kali Linux, open Terminal, change the directory to the Downloads folder, and begin installation using the following command:
dpkg -i Nessus-8.3.1-debian6_amd64.deb
The output of running the preceding command is as follows:
- Once the installation is complete, use the following command to start the Nessus service on Kali Linux:
/etc/init.d/nessusd start
Optionally, if you would like the Nessus service to start automatically during the Kali Linux boot process, the following command can be used to enable this feature:
update-rc.d nessusd enable
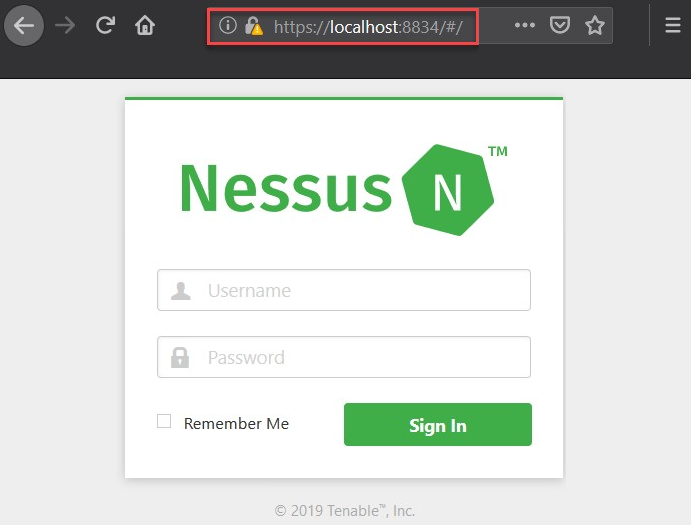
- Once the installation has been completed on Kali Linux, enter https://localhost:8834/ into your web browser. At this point, you'll be prompted to create a user account:

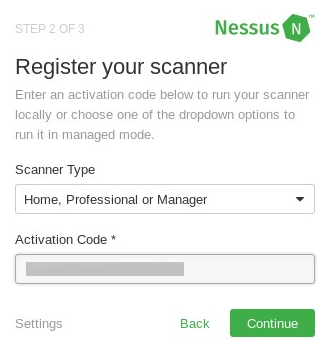
- Next, you'll be prompted to enter your Nessus license to activate the product. You'll need the activation code from step 2 to complete this stage:
- After completing the activation phase, Nessus will attempt to connect to the internet to download additional resources. This process should take a few minutes to complete:
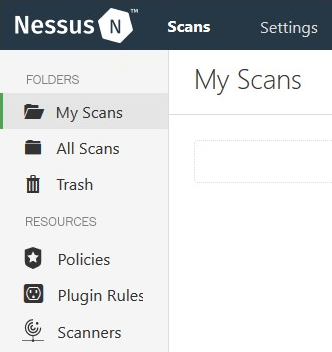
- Once you're logged in, your user dashboard will be available. Here, you can create new scans and templates and modify existing resources as per your preferences:
During the course of this book, we'll be exploring the capabilities of Nessus during our penetration testing phases.
Having completed this section, you are now able to install and set up the Nessus vulnerability scanner on Kali Linux. In the next section, you will learn how to install Android as a virtual machine within your lab environment.