
Lesson 42 | Editing Hatch Objects
This lesson describes how to edit hatch and gradient patterns with the Hatchedit command.
Most projects are subject to design changes, so the ability to easily modify an existing hatch is important to remaining productive. The change can be as simple as changing the scale of a hatch object or as complex as altering the boundary or adding or removing islands.
Warning!
The name of the Hatch and Gradient dialog box in AutoCAD LT is the Hatch dialog box.

Objectives
After completing this lesson, you will be able to:
- Describe which edits maintain associative properties and which destroy the associativity.
- Use the Hatchedit command to edit hatches and fills.
Maintaining Associative Properties when Editing Hatches
Understanding when a hatch might lose its associativity, and thus not fill a newly edited object or area, is critical in learning how to effectively edit hatched objects and maintain a high productivity rate. Failure to understand this may result in unnecessary rework.
Hatch Associativity Guidelines
Consider the following guidelines for associative and nonassociative hatches:
- If a hatch's associativity is lost, it cannot be restored. You have to delete and recreate the hatch pattern.
- If you do not close a hatch boundary, the hatch properties change from associative to nonassociative.
Gaps in Hatch Boundaries Remove Hatch Associativity
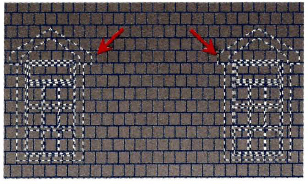
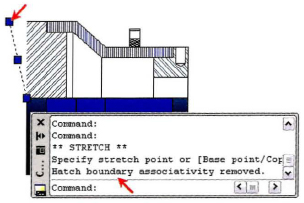
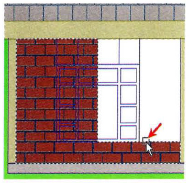
When you are editing an object or area containing a hatch and you create a gap in the boundary, the hatch pattern loses its associativity. If this occurs, a message on the Command line indicating the hatch boundary associativity has been removed is displayed, and the hatch pattern does not fill the object or area, as shown in the following illustration.
Editing Hatches
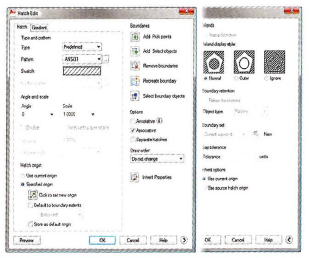
The options and functionality in the Hatch Edit dialog box are identical to those found in the Hatch and Gradient dialog box. When you edit a hatch pattern or fill, you can use the same options you used when you created the hatch or fill.
When you start the Hatchedit command, you are prompted to select a hatch pattern. After you select the hatch pattern, the Hatch Edit dialog box is displayed and shows the properties of the selected hatch pattern or fill. You can adjust any of the properties used to create the hatch pattern and apply those changes immediately.
You can also edit a nonassociative hatch using grips.
Command Access

Hatch Edit Dialog Box
Except for a slight wording difference in the Options area (Separate Hatches versus Create Separate Hatches), the Hatch Edit and Hatch and Gradient dialog boxes are identical.
Hatch Boundary Grips
The following grips are available for a nonassociative hatch.
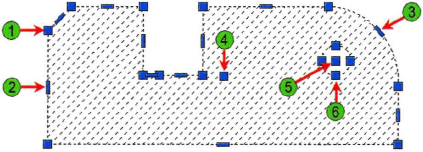
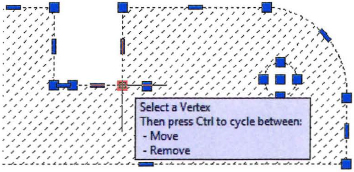
| Select a Vertex: Moves or removes the selected point. | |
| Select an Edge: Add a new point to the line segment or convert the line segment to an arc. | |
| Select an Edge: Add a new point to the arc segment, stretch the arc, or convert the arc segment to a line. | |
| Location Grip: Move the entire hatch object to a new location using the selected grip point as the base point. | |
| Island Location: Move the island to a new location. | |
| Island Stretch: Stretch the specified edge. |
When you hover over a grip, the tooltip that displays shows the editing options for the grip. You can cycle through the options by selecting a grip and pressing CTRL. The following grips are available for a nonassociative hatch.
Procedure: Editing Hatch Patterns and Fills
The following steps give an overview of editing hatch patterns and fills.
- Double-click a hatch pattern or gradient fill.
- Make the appropriate changes to the pattern in the Hatch Edit dialog box and click Preview.
- Right-click anywhere in the drawing to accept the changes or left-click anywhere in the drawing to return to the dialog box.
Hatch Editing Guidelines
Consider the following guidelines when editing hatches:
- The Hatch Edit and Hatch and Gradient dialog boxes are almost identical.
- You edit hatches with the same options you used to create them.
- Double-click a hatch pattern or gradient fill to start the Hatchedit command. This saves you the step of having to start the command, then select the hatch pattern.